


Whew! We made it to Wednesday! Thanksgiving’s tomorrow and with a few days off you just might have some time to complete a DIY project for your home. Especially after all of the Thanksgiving festivities are done and I have just the one for you! This week’s tutorial shows you how to create a neutral colored wall hanging for any spot in your home.
This idea sprung into my head after wanting to create a piece of wall art that involved clean, neutral colors for our home and making a discovery at Home Depot. Just about every weekend my husband and I are making a trip to Home Depot even if it’s just to walk around. Last weekend I stumbled upon wood biscuits in the tool section while Ryan was looking around. I immediately knew that I could convert them into a piece of wall art and that’s exactly what I did. It was a $5 well spent!

The best part about this DIY tutorial is that you can make your wall hanging any color scheme that you would like to match your home.
Here’s the how-to:
Supplies:
1 container of wood biscuits || 4 different colors of spray paint || 1 stick from your yard || sewing thread || drill || drill bit || 4 sheets of poster board || yarn || scissors

Step 1: Using the drill and a drill bit, drill a hole in each end of every wood biscuit. Make sure the hole that is created by the drill bit is big enough for thread to fit through.


Step 2: Once all of the holes are drilled, evenly divide the wood biscuits into four piles.

Step 3: Evenly place each group of wood biscuits on their own sheet of poster board or on a box outside in a single layer.

Step 4: Using your 4 different colors of spray paint, spray each set of wood biscuits. Apply the first coat and allow them to fully dry. Continue by applying a second coat and let them dry once again. Repeat by flipping the wood biscuits over and spray painting the other side.
** I used the spray paint colors Stone Gray, Cream, White, and London Gray by Rust-Oleum. **


Step 5: Once the wood biscuits have fully dried, it’s time to piece them together! Using your sewing thread, cut pieces of thread that are about 4 inches in length. Take a strand of thread and push the thread through a hole in a wood biscuit and double knot the thread to secure it. Using the other end of the thread, run it through another wood biscuit and double knot the thread. The two biscuits should now be connected.
** I allowed for about 1 inch of thread between each wood biscuit.
Step 6: Keep attaching wood biscuits until your desired length. Create as many strands as needed.

Step 7: Using your last wood biscuit on each strand, attach a piece of thread that’s about 6 inches in length in order to easily attach to the stick. Attach each strand of wood biscuits to the stick by double knotting the thread around the stick. Leave about a 1 inch space between each strand.

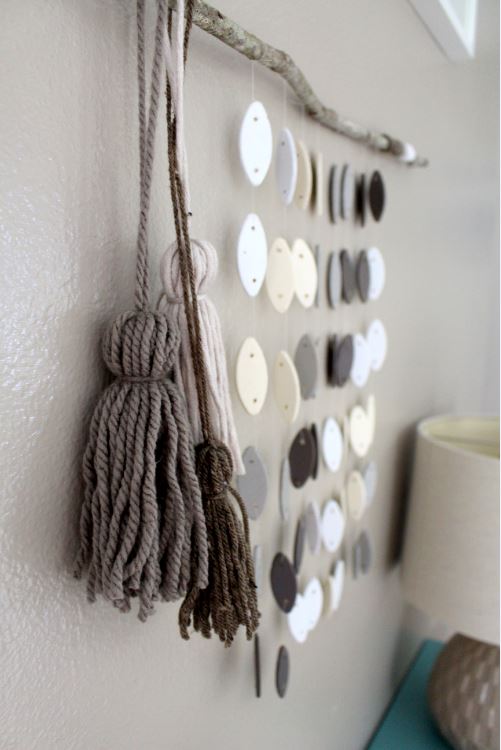
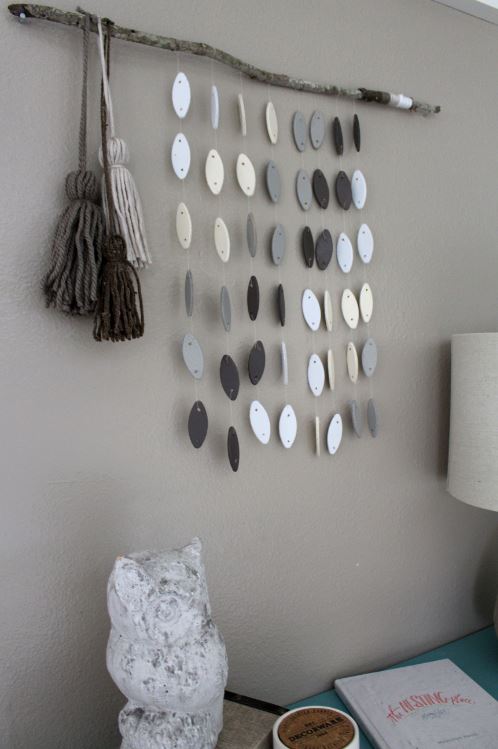
Step 8: Your wall hanging is now ready to hang in your home. To add a little more detail, wrap yarn around one end of the stick that creates a pattern.

Step 9: On the other end of the stick, I created yarn tassels to visually balance the wall hanging. You can follow this great tutorial here to see how to make them.

Step 10: Hang your new wall hanging by placing two small nails in the wall.

I love the dimension, character, and style this neutral colored wall hanging brings to a space! And to think it all started with finding a container of wood biscuits at Home Depot.
Let’s keep in touch!
We have a brand new community over on Facebook, House & Home, where we’ll be chatting, sharing, and helping one another when it comes to home decor and projects. Come join us! Check it out here.
Like on Facebook || Follow on Instagram || Follow on Pinterest
