


 I recently shared a then and now of our home in celebration of our 1 year houseiversary {part 1 and part 2}. It was very exciting giving you a glimpse into our space we call home. I also realized there are so many projects around our home that we have completed that I want to share even further with you. With so many favorites {like our stenciled wall} it was hard to choose which project to share next. I decided to share with you the orb chandelier mainly because I was proud {and shocked} that it actually all came together and worked!
 I couldn’t create this orb chandelier on my own though! One afternoon I was being ‘productive’ and started to explore on Pinterest. That is when I saw a DIY picture for an orb chandelier. It wasn’t that I found the perfect chandelier for our breakfast nook that had me swooning. Nope. It was the fact that I could make my own chandelier that I also loved the look of for much cheaper compared to buying one! The DIY orb chandelier tutorial by Whats Ur Home Story had me running out the door buying materials the second I read it. You can find the tutorial here.
 If you read the tutorial, Vidya of Whats Ur Home Story, mentions that you can find decorative orbs at HomeGoods. That was my first stop and it was a success! {Side note: I was in there just the other day and they still carry these orbs.} The next item I needed was going to be the hardest: the older chandelier. As it ends up, it was meant for me to make this lighting fixture. I stopped by one of my favorite thrift stores next and the exact chandelier I needed greeted me at the entrance of the store. The wonderful owner even made sure it was in working condition. Here is what I came home with after a successful shopping trip:
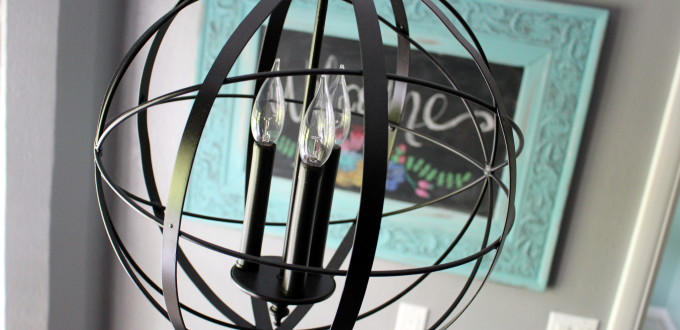
 After disassembling the older chandelier, spray painting the objects black, drilling a hole, and attaching the extra parts to hold the two pieces together, I had a new light fixture! And all for around $35 total! Woo hoo! I then added the finishing touch by deciding to use Edison light bulbs. They worked out perfect!
 Just a few tips that I learned along the way:
1. You don’t necessarily have to use drop cloths to protect your surroundings. I simply placed a tarp on the garage floor and placed flattened cardboard boxes standing up around the tarp. This took a little extra time due to having to wait for one side to dry before flipping the items over to spray paint the other side.
2. I tried. And then I tried again. Even with my husband’s help the orb was too thick to drill a hole straight down in the middle. We opted to go slightly to the side where we would only have to drill through one sheet of metal. You couldn’t even tell once it was hung!
 3. The wire that is sprayed (not the copper) becomes very sticky when handled no matter how long you let it dry. Just be prepared! You can see in the picture below how I weaved the wire and copper wire through the chain.
 And last, but not least, please have someone help you to hang it! My husband was my right hand man throughout this entire process. This project only took 2 hours to complete from start to finish. It is a great weekend project if you are wanting to spruce up an area of your home and Whats Ur Home Story’s tutorial makes it an easy process! You can find the list of materials below.
 Materials:
Orb {can find at HomeGoods} || Carriage Light Caddy {thrift shops} || Oil Rubbed Bronze Spray Paint || Zinc Plated Nipples || Black Primer Spray Paint || 4 Nuts || Optional: Epoxy Glue || Drill || Edison Light Bulbs
Let’s keep in touch!
We have a brand new community over on Facebook, House & Home, where we’ll be chatting, sharing, and helping one another when it comes to home decor and projects. Come join us! Check it out here.
Like on Facebook || Follow on Instagram || Follow on Pinterest

[…] we nearly cried about. I debated on making another one {especially after successfully making our orb chandelier} but decided against […]
[…] lights add so much character! I would have to move my orb light to another space because there is no way I could get rid of it! I could also place the pendant […]
[…] be our pantry door in the kitchen! By adding black to this space, it would help tie in with the orb chandelier I made for our breakfast nook by bringing black accents throughout the kitchen. What turned this […]
That turned out awesome! Love the light you found too.
Thank you so much Vidya!! Your tutorial was amazing and made it possible. . . love your blog!