


I had a blast decorating for Halloween! Our mantel and fireplace finally got the attention it needed for this festive time of year. Once Halloween ended, I knew I couldn’t go back to a ‘bare’ mantel. It’s also a little too early to start decorating for Christmas {although I need to start preparing for it}! With Thanksgiving being hosted at our home this year this is the perfect opportunity to decorate for this fall holiday. Since I’m not one to carve pumpkins, I figured I’d create a fall theme with painted pumpkins.

I used real pumpkins for this tutorial but I advise you to find fake pumpkins to use so that they can be used year after year. You might be hesitant about paint and spray paint eating away on a real pumpkin. Don’t worry! The pumpkins were perfectly fine with the materials being applied to them.
It’s easy enough to create painted pumpkins so this tutorial today will also show you designs to place on the pumpkins.
Here’s the how-to:
Supplies:
Pumpkins || Acrylic paint || Paintbrush || Spray paint || Glitter || Paint pen || Glue || Material to place your pumpkins on as you paint them (cardboard box, tarp, piece of wood, etc.) || Wax paper

Step 1: Place your pumpkins on a protective surface outside. My just so happens to be my go to piece of plywood for projects like this.

Step 2: Spray paint the bottom of your pumpkins first by leaning them on their side. Let the first coat fully dry and apply a second coat.

Step 3: Once the second coat has dried, place the pumpkins right side up and continue by spray painting the top of the pumpkins. Repeat with a second coat just like you did in step 2.

Step 4: Allow the pumpkins to fully dry before bringing them in to paint designs. I let my pumpkins dry for about 2 hours due to the texture of the pumpkins.
Step 5: Cover your surface with sheets of wax paper to protect the surface as you turn the pumpkins to paint the designs. This will prevent the paint from rubbing off the bottom of the pumpkin onto your workspace.

Step 6: Using gold acrylic paint and your paintbrush, paint the stem of each pumpkin gold. If you know my fascination with gold, you’ll know why this wasn’t even a second thought when designing my painted pumpkins.


Step 7: Start designing your pumpkins using paint and paint pens! I’m sharing with you a few of my designs below:
Polka Dots:
To create polka dots on a pumpkin, use a gold paint pen. The paint pen dries quickly and provides a very easy way to paint circles.

Once the polka dots have dried, spread glue over a few circles using the tip of your finger. It’s much easier than trying to use a paintbrush. Quickly sprinkle fine gold glitter over the glue and shake off the excess glitter. Wait for the glitter to adhere/dry to the glue before wiping off the glitter that did not shake off.

Color Block:
Create a color block design by using metallic gold paint and a paintbrush. Rather than painting a line straight across, I painted a line at a diagonal that curves around the other side of the pumpkin.

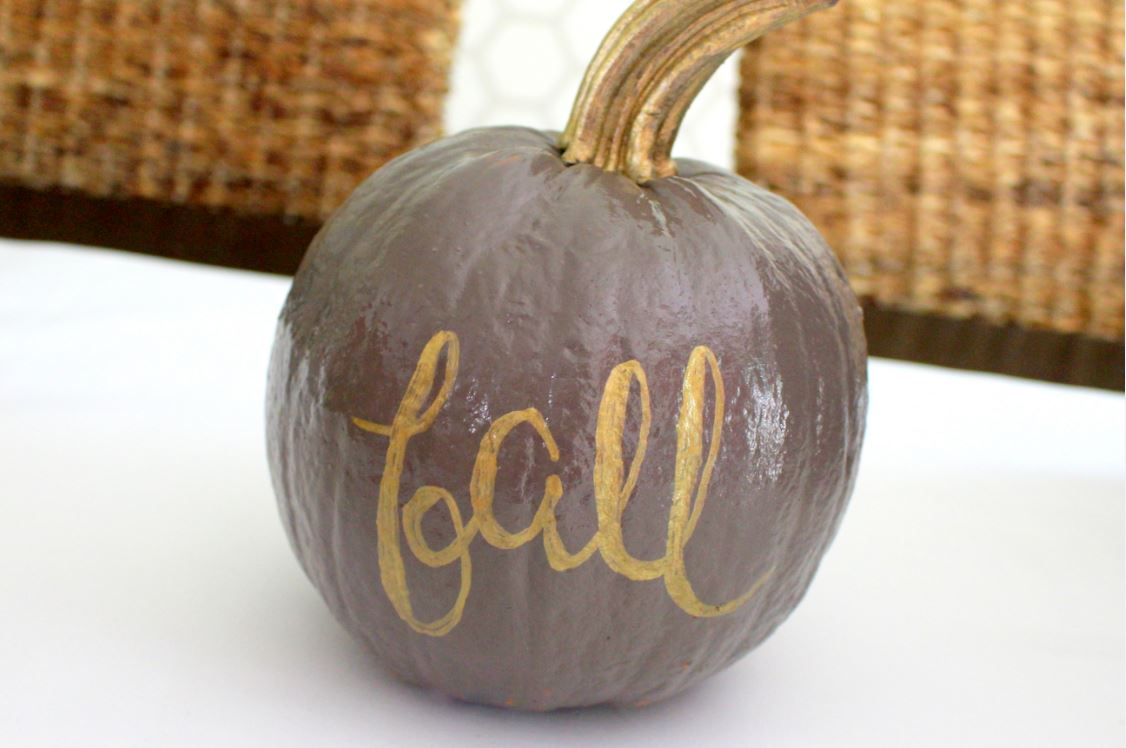
Scallops and Wording:
Create half circles that are connect and going around the pumpkin. Paint in the design to create a scalloped look. Use a paint pen to write a festive Thanksgiving word. I used gather and fall for two of my pumpkins.


White Pumpkin:
I love the simplicity and beauty of a white pumpkin. All I did to this pumpkin was paint the stem gold and called it a day!

Step 8: Put your beautiful pumpkins on display once they have all dried.

I guarantee you that your painted pumpkins will bring instant cheerfulness and the perfect fall decor you have been looking for. By using fake pumpkins you will have custom fall decor year after year. I’m sure they will also be the topic of conversation when your Thanksgiving guests arrive for a day of eating, laughing, and memories.

Let’s keep in touch!
We have a brand new community over on Facebook, House & Home, where we’ll be chatting, sharing, and helping one another when it comes to home decor and projects. Come join us! Check it out here.
Like on Facebook || Follow on Instagram || Follow on Pinterest
