


This post contains affiliate links; learn more on our about page and thanks for supporting Within the Grove by shopping through our links!
For those of you that don’t already know, I am a primary school teacher by day. Teaching a class full of amazing students, attending trainings, and planning/creating the details of Within the Grove on a daily basis leaves me with a lot of note taking. With that said, I am such a paper and pen gal. There is just something about taking notes and jotting down ideas the old fashion way that I love.
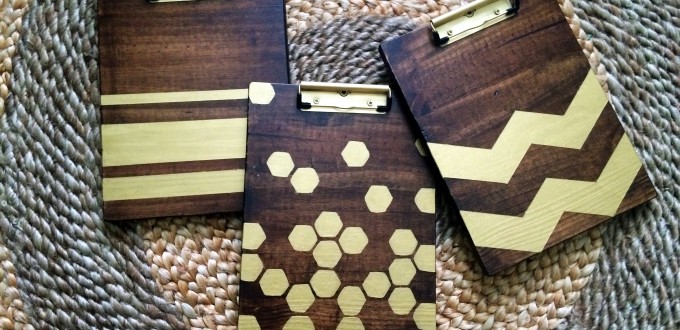
That is what gave me the idea to create my own beautiful wooden clipboards to give my note taking a little flair. Plus, it gives my desk a little eye candy. I can’t even deal with the final look of these handcrafted clipboards! I am in love with how they turned out and this project only left me wanting to create more.

Here’s the how-to:
Supplies:
wood panel cut 9 inches x 12 inches || sand paper || foam brush || wood stain || chevron template || painter’s tape || pencil || paper towel || craft paint || paintbrush || polycrylic || clipboard clip || metallic gold spray paint {optional} || screws and power drill
Stain used: Rust-Oleum Dark Walnut || Paint used: Martha Stewart Metallic Gold
 Step 1: You have a few options picking out your piece of wood to use for the clipboard. If you do not want to cut your own, you can simply purchase a wood panel at a local craft store. In my case I bought a piece of wood that was 12 inches in width, 72 inches in length, and about 1/2 an inch in height. That way I could cut more than one piece to create multiple clipboards.
 Step 2: Don’t worry about cutting the wood yourself! Home Depot and Lowes will cut the wood for you at your desired measurements. You will need to cut the piece of wood at the 9 inch mark. This will give you the average size of a clipboard needed for this DIY project: 9 inches x 12 inches. My husband wanted to help me with this project by cutting our piece of wood. I do believe it was an opportunity to bust out his man tools.
 Step 3: Time to sand your board. You will need to sand every edge and corner of your board to create a smooth and rounded effect.
 Step 4: Apply your stain using the foam brush. You will want to apply the stain going in the same direction as the wood grain. Allow the stain to set for a few minutes and then wipe the excess stain with a paper towel. The stain will need to completely dry which takes about 1 hour.
 Step 5: Print and cut out the chevron template. Arrange the template on your board and trace with a pencil to create the chevron pattern.
 Step 6: Apply the painter’s tape on the edges of the chevron pattern that was traced onto the board. Make sure to thoroughly press down the tape and smooth out any bubbles.
 Step 7: Using your paint color of choice, paint the chevron pattern. Be very careful and do not paint towards the painter’s tape as this can result in paint getting underneath the tape.
I painted 3 coats of the metallic gold to get a smooth and blemish free finish. Once you have painted your last coat, immediately and carefully peel off the painter’s tape. This will prevent the paint from sticking to the tape and peeling half of your design off. I learned this the hard way!
 Step 8: After the paint is dry {about an hour and a half} apply the polycrylic. I applied 2 coats with about a 45 minute drying time between the coats.
 Step 9: While waiting for the final coat of the polycrylic to dry, spray paint your clipboard clips and screws with the metallic gold spray paint. This is optional! I wanted my clip to match the gold paint. I also popped off the black rubber corners and placed them back on once the clips were completely dried.
I purchased my clip board clips online but you can also purchase them in an office supply store. 
Step 10: Center the clip at the top of the piece of wood. Using the power drill and screws, attach the clip to your board. You now have a custom wooden clipboard!


How I created the following clipboards:

Using a hexagon stencil, I traced where I wanted to paint the hexagons with a pencil. I then painted the hexagons free handed. You can also use a stencil brush and dab the paint while the stencil is securely on the board.

Using painter’s tape, create the straight lines you want painted on the wooden clipboard.
Let’s keep in touch!
We have a brand new community over on Facebook, House & Home, where we’ll be chatting, sharing, and helping one another when it comes to home decor and projects. Come join us! Check it out here.
Like on Facebook || Follow on Instagram || Follow on Pinterest

I have checked your page and i have found some duplicate content,
that’s why you don’t rank high in google, but there
is a tool that can help you to create 100% unique content, search for; SSundee advices unlimited
content for your blog
I see you don’t monetize your blog, don’t waste your traffic,
you can earn extra bucks every month because you’ve got hi quality content.
If you want to know how to make extra bucks, search for: Ercannou’s essential adsense alternative
I’m actually doing a slightly different craft, (staining and painting wood for homemade bottle openers) but this was really helpful and great inspiration!
That you for your kind words! I hope your craft turned out amazing. I would love to see!
I work with your husbands Aunt Donna – she showed your site to me, and it is adorable. You are hired!!! lol
I am thrilled that you ventured over to my blog!! Please tell Donna I said hello! When do I start?
Appreciating the persistence you put into your blog and detailed information you present. It’s good to come across a blog every once in a while that isn’t the same outdated rehashed information. Fantastic read! I’ve saved your site and I’m including your RSS feeds to my Google account.|