


Home Project // DIY Trash Can Shed for Curb Appeal

This shop has been compensated by Collective Bias, Inc. and its advertiser. All opinions are mine alone. #RoofedItMyself #CollectiveBias

Spring is in full swing which means the outdoor projects have started. Today I’m focusing on cleaning up our garbage can area outside. After wear and tear from the rain, sun, and being tossed back to the ground after garbage pick up, our garbage can isn’t the prettiest thing to look at. Add trash to it, well, you get the point. In the past we have kept our garbage can on the side of the house. The truth is, it’s such an eye sore so we moved it to our back yard next to our patio door. Although it’s hidden from the street, now we’re stuck looking at it on our patio.

Ryan and I decided to build a mini trash shed to conceal the garbage can and add a little design and landscaping to our backyard. We knew if we built one, it would have to blend in and become a part of our little oasis out back. Right away we started sketching a design and knew we had to have one thing: shingles. Why? For a few reasons. For one, it keeps the sun out with the hopes of the trash not smelling as bad on those hot summer days. The rain water will no longer fill up the trash can which in return becomes infested with mosquitoes and creates soggy trash. Then the ultimate reason: curb and backyard appeal.

By adding shingles it gives the shed a great design and along with functionality. It’s a polished look that your neighbors will be thanking your for or asking you to build one for them also. But you can’t add just any shingles. We went for the best: Timberline® High Definition® Shingles. They’re the best selling shingles in America and made with proprietary, granular technology. Not only do they look great, but they are super durable.

I know what you’re thinking. That these GAF shingles are a professional product meant to be used by contractors. But wait! Have you ever attempted to install your own roofing? A DIYer like yourself can install them too! Get ready, I’m about to show you the step-by-step with plenty of images to show you how you’ll have your own trash can shed in no time.

Alright, Let’s Do This!
Supplies:
Trash Shed Structure of Choosing || FeltBuster® High-Traction Synthetic Roofing Felt || Timberline HD® Shingles (I used the color Charcoal) || Seal-A-Ridge® Protective Ridge Cap Shingles || Drip Edge || 1 1/4″ Galvanized Steel Roofing Nails || 1″ Round Plastic Cap Roofing Nails || Gloves || Razor Blade || Aluminum Snips || Hammer || Measuring Tape || White Chalk

All of the roofing materials can be found in Lowe’s. There’s even a special end cap that displays the type and color choices for GAF shingles. Here’s exactly where you can find everything near the Contractor/Pro Services Center:

The How-To // Shingling the Roof
Before you get started with the shingles, you’ll need a solid structure to apply your shingles on. Refer to the images below on how we constructed our trash can shed:

Step 1: You’ll start by attaching the drip edge to the structure. This will help make it look more appealing and protect the structure from wind driven rain. Apply the drip edge directly along the eaves (the sides) using the galvanized steel roofing nails. Measure how much you’ll need and trim the excess with aluminum snips.

Step 2: Time to apply the FeltBuster®. This product allows moisture to escape but protects the roof from wind driven rain with it’s waterproof features.

Roll out the FeltBuster® along the roof structure. If the slope of your structure is 4 inches or more per foot, add one layer of FeltBuster®. For a low slop of 2-4 inches per foot, apply the pieces half lapped.


Step 3: Secure the FeltBuster® in place by using as many round plastic cap roofing nails that you need.

Step 4:Just like you did in step one, attach the drip edge to the front and back of the roof structure using galvanized steel roofing nails. This is also known as the rake of the structure. Measure and cut off the excess. You’ll then mark a line where the drip edge meets the peak. You will cut along this line so that the drip edge can bend and successfully secure to the structure.

Step 5:Gather your Timberline HD® Shingles and the 1 1/4″ galvanized steel roof nails. It’s very important to use this size nail so that it penetrates through the Timberline HD® Shingles, FeltBuster®, and plywood.


Step 6: Place the first row of full Timberline HD® Shingles flushed with the eave and rake of the structure. Make sure that it’s hanging over by at least 1/4 of an inch.

Hammer 4 nails below the self sealing strip on the Timberline HD® Shingles. The heads of the nails should be flushed with the shingles. This will ensure that they will stay in place and strengthen the seal. You can also refer to the packaging for installation instructions.


Step 7: Trim 6 inches from the first shingle of the next row. Place the bottom of this Timberline HD® Shingle at the top of the dragon teeth of the underlying shingle. Work from left to right.


Step 8: Repeat step 7 for the 3rd row except trim 11 inches from the first shingle. For the 4th row trim 17 inches from the first shingle. On the 5th row you will repeat this pattern until you reach the top of your structure.

Step 9: Using white chalk or a chalk line, draw a line to show where you want a clean. straight edge. Trim the excess shingles with a razor blade.

Step 10: Don’t forget the Seal-A-Ridge® Protective Ridge Cap Shingles! Take out a full sheet and cut into equal sections. You’ll place them along the very top of the roof where they will fold in half.

Nail the first piece along the seal line. Place the second ridge cap shingle overlapping the first one and use two roofing nails to secure. Repeat this pattern down the entire length.


Step 11: Once you get to the end of the peak with the Seal-A-Ridge®, cut off the seal/tar end of the shingle. Nail the shingle to the end of the row. This will cleanly finish the ridge caps. Make sure to seal the last two nails that are exposed with an acrylic water proof sealant.

That’s it! It may seem like a lot but it honestly isn’t. Just take your time. Pull up these directions on your phone or tablet and take it one step at a time. I’m thrilled with my personal results. Plus, I’m super proud that we finally completed an outdoor project in the spring rather than in the dead middle of summer.
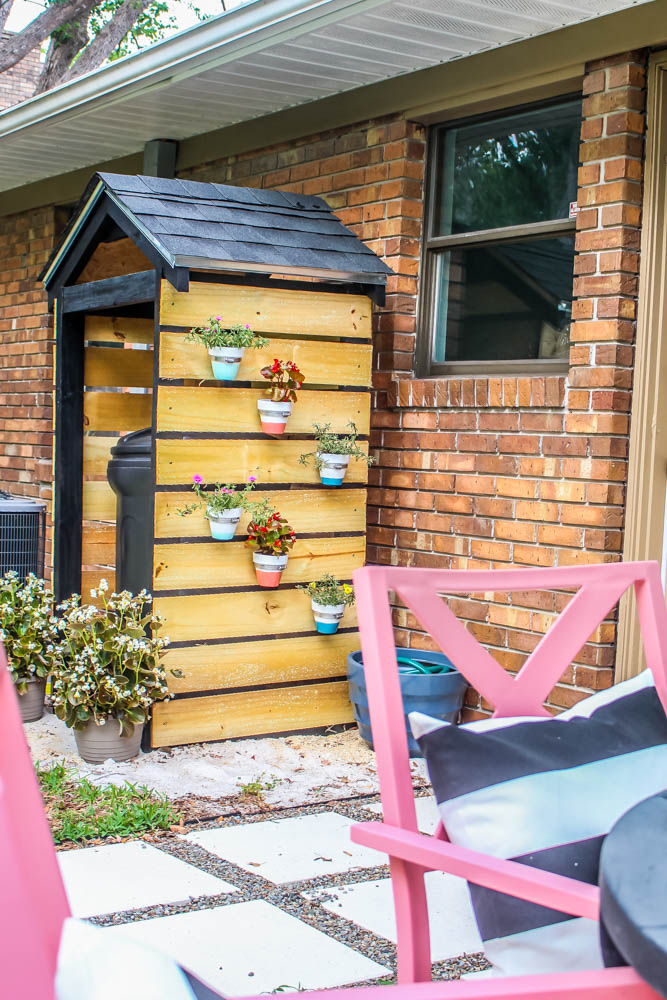
To decorate the shed, I added a few potted flowers to one side of the trash can shed, flowers in the front, and a garden hose pot on the side. By also building a structure that incorporates GAF shingles, it adds to our backyard experience. First off, one can never have too many flowers!


And can we talk about how I can store my hose in a decorative way? Now I don’t have to walk as far to get a hose to water the flowers around the shed.

Then there’s the added bonus of the trash shed in general. Not only does the shed conceal the garbage can and make it no longer an eyesore, but it helps hide our AC unit. I’d say this shed just shot to the top of my favorite list of home projects.

While you have the time before the summer heat arrives, it’s time to get started with your roofing project! Need a little inspiration? Find some ideas here. You can also check out GAF on Facebook and their website. What kind of project would you like to complete using GAF roofing for the first time? Let me know in the comments below. See you at Lowe’s!
Let’s keep in touch!
We have a brand new community over on Facebook, House & Home, where we’ll be chatting, sharing, and helping one another when it comes to home decor and projects. Come join us! Check it out here.
Like on Facebook || Follow on Instagram || Follow on Pinterest

[…] via withinthegrove […]
It turned out SO CUTE! I love the addition of the flowers on it. And the roof looks great! #client
Thank you Kristi!