• Home
  • ABOUT
  • WORK WITH ME
  • Paint Colors
  • Shop Our House
    • Guest Bedroom
    • Front Living Room
    • Living Room with Fireplace
    • Previous Second Living Room
    • Current Playroom
    • Prior Playroom
    • Dining Room
    • Laundry Room
    • Oliver’s Bedroom
    • Guest Bathroom
    • Covered Lanai
    • Patio
    • Master Bedroom
  • CONTACT
    • Facebook
    • Instagram
    • Pinterest

Within the Grove

Join the list to receive occasional news and special updates!

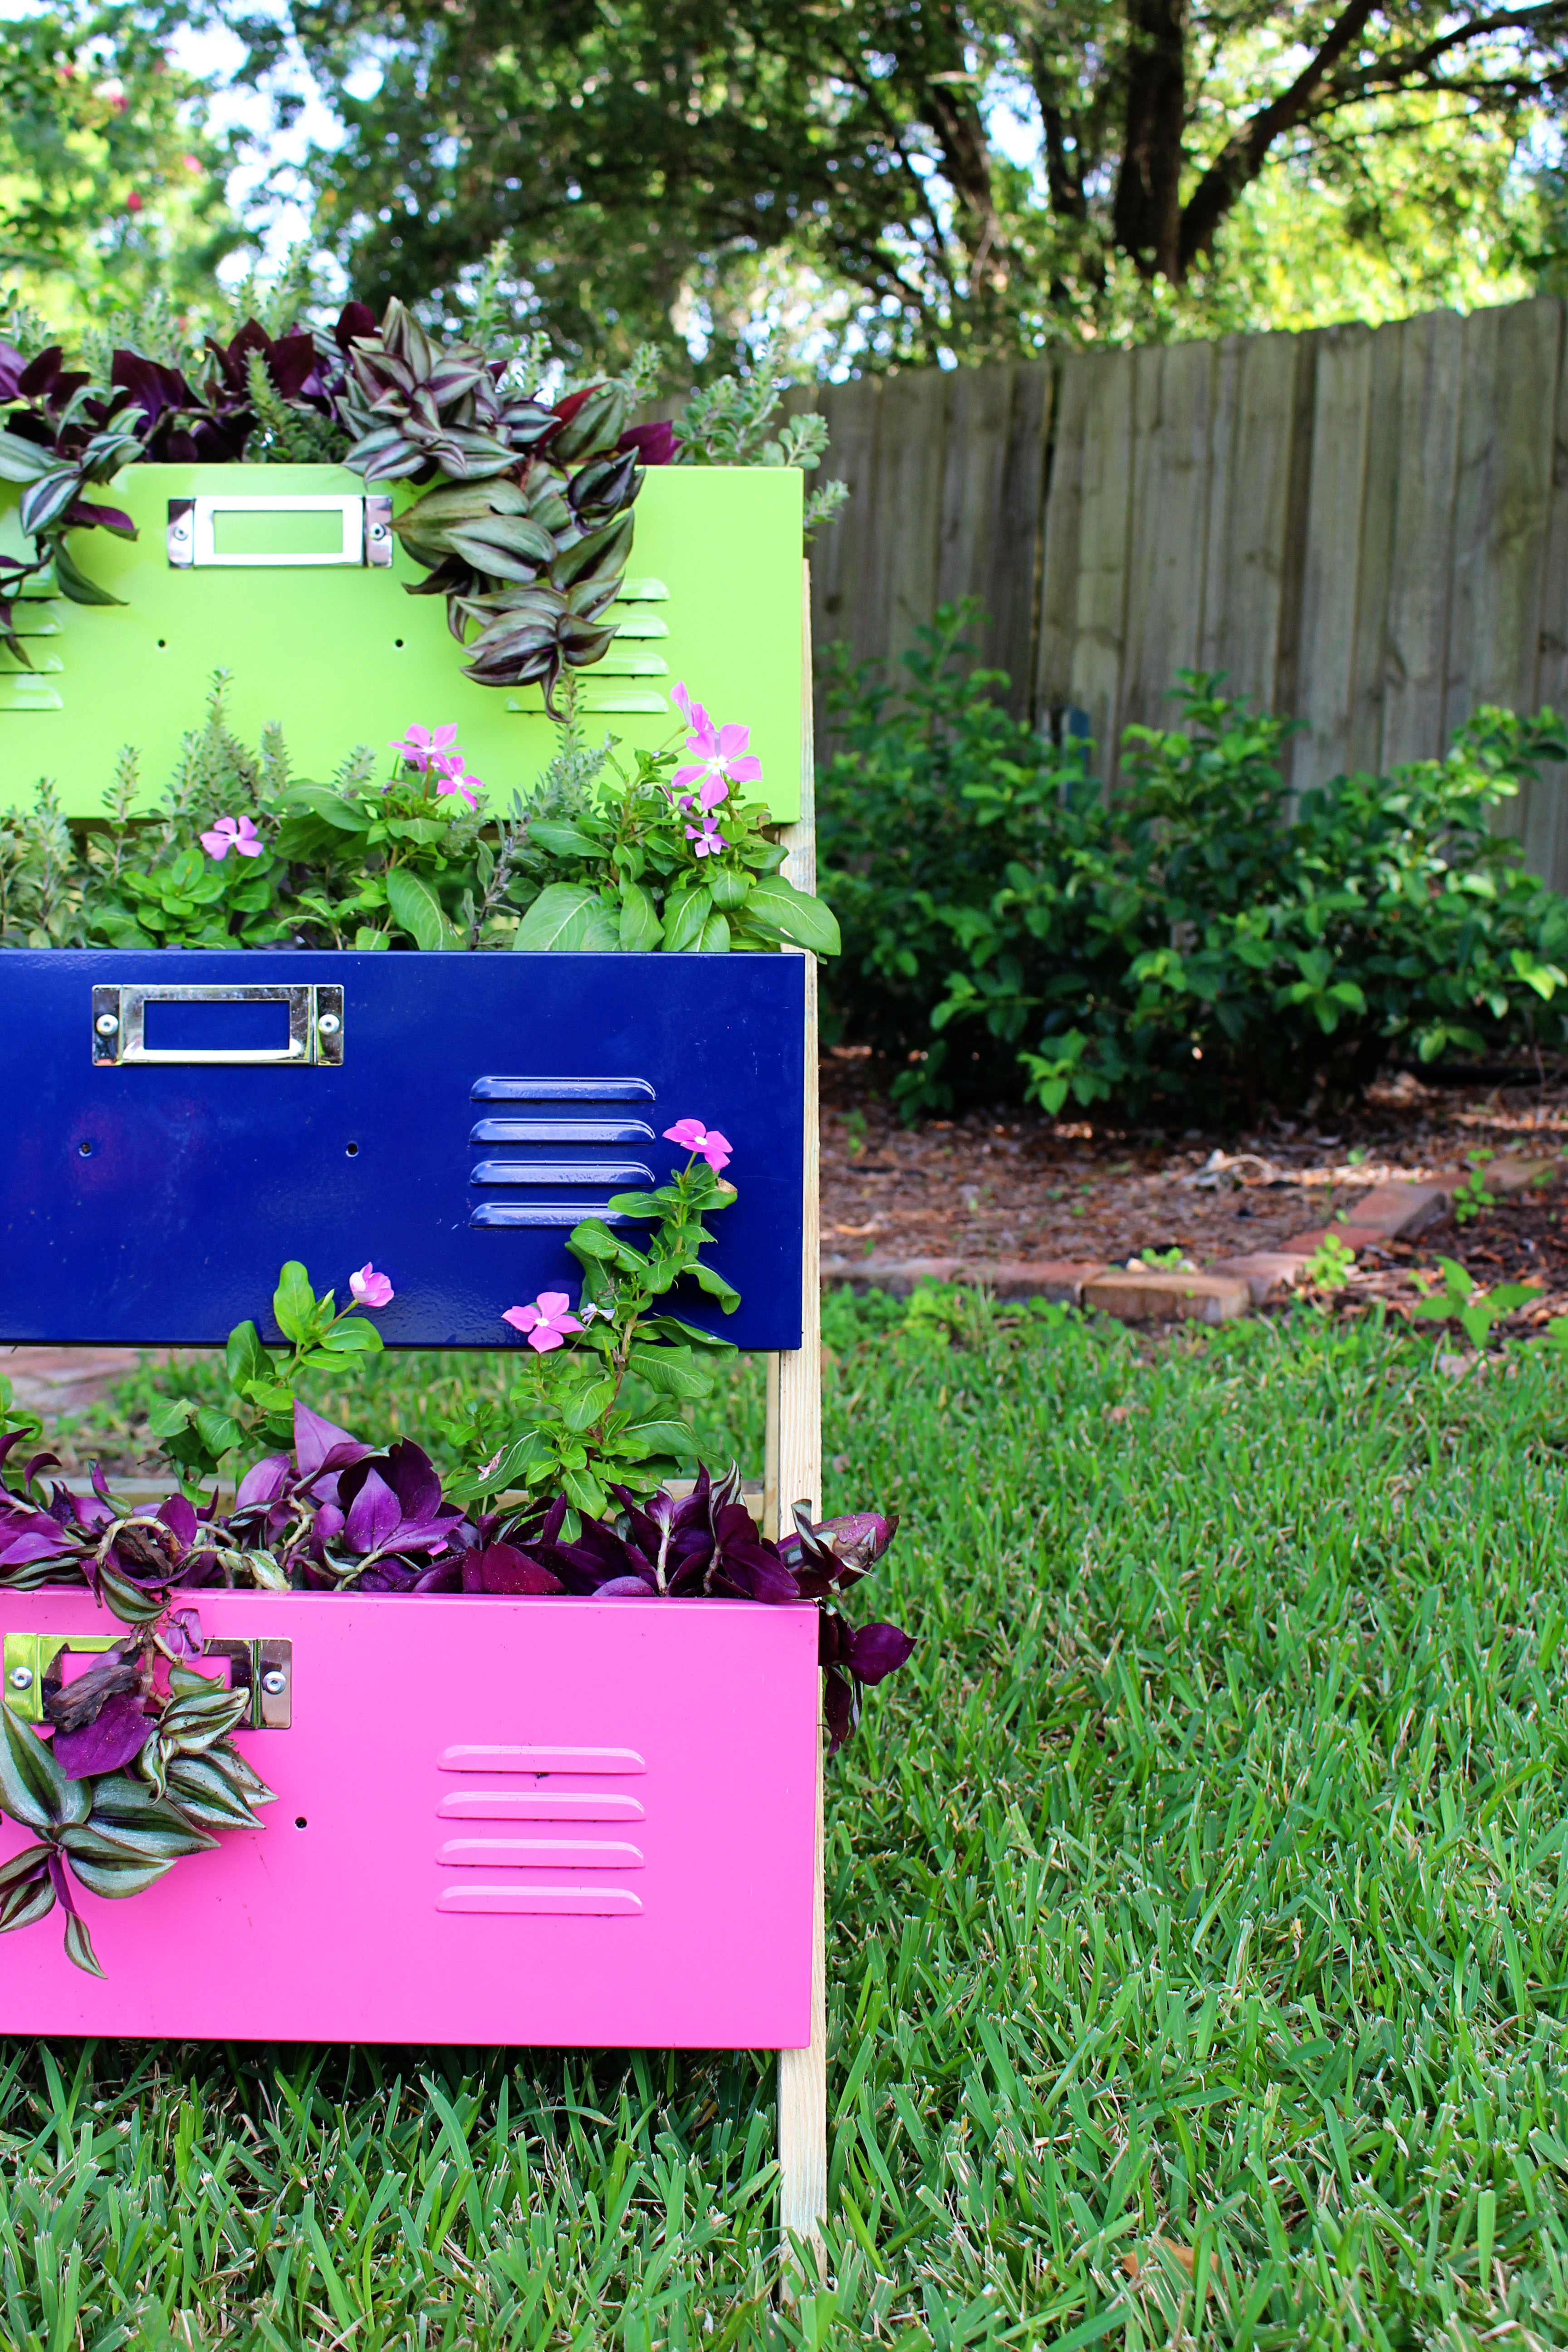
DIY // Garden Planters Using Locker Drawers

August 3, 2016

DIY Garden Planters using Lockers

This past week I had the unique opportunity to team up with Central Florida bloggers and Habitat for Humanity of Greater Orlando ReStores.  We were given the task to head to our local ReStore, shop around, and see what we can beautifully transform into a DIY project. This had my name all over it!  I couldn’t get to the ReStore fast enough to get my hands on a few pieces of thrift treasure.  I’ll be sharing a few amazing DIY posts by other Central Florida Bloggers {you seriously don’t want to miss out on these} at the end of my blog post! After my recent trip I came home with the front of 3 locker drawers, a table, and a large mirror.  I’ll be sharing the other flips with you in the coming weeks. 

Build your own planter boxes

Here are some great tricks of the trade and information about Habitat for Humanity ReStores here in Orlando

ReStore of Orlando, Florida

|| I was shocked when I looked on the website Sunday morning to see that they were open. The ReStores here in Orlando have extended their hours for us to have even more time to thrift our hearts out.  They are open Monday – Saturday from 9 a.m. to 7 p.m. and Sundays from noon to 6 p.m.

|| Not only do they accept gently used furniture, but you can also find building materials, paint, appliances, home decor, and hardware.  As an individual or a corporate business, you can donate your heart.  The ReStores even put the icing on the cake by offering a free pick-up service.  So forget thinking that you can’t donate because you don’t have a truck {I’ve been there before}. Simply call the donation hotline: 407-426-7859.

ReStore of Orlando

Shopping at the ReStore of Orlando

|| Wondering where all the proceeds from the store sales go?  They help fund Habitat’s mission for homeowners on their journey to building a better life trough self-reliance and providing for their families through affordable home ownership.  Amazing, right? 

Now for the DIY tutorial on how to make your own Locker Garden Planters.  I found these amazing locker drawer fronts sitting very lonely on a shelf. They were not attached to a drawer so you would think they would be hard to use.  I immediately knew I wanted build garden planters out of them. Hello pop of color in my back yard! This was followed by me grabbing them as if they were about to be taken right before my eyes.   With the help of my husband, this project took about two hours to complete.  

Locker drawers being transformed into planter boxes.

Supplies: 

Locker drawer fronts || 3/4″ and 1″ wood screws || Small and medium sized drill bits || Drill || Wood glue || Saw || Measuring Tape || Marker || 2 -1 x 6 at 8 feet long || 1 – 1 x 8 at 8 feet long || Optional: 2 – 1 x 2 at 8 feet long

Supplies to create your own locker planter box

The How-To:

Step 1: Using the table saw, cut your wood to match the dimensions of your locker piece. Tip: You can also have Home Depot cut your wood for you if you do not own a table saw.  I use to do this all the time!

My locker drawer front was 21 inches in length. I used the following measurements for each planter:

1 – 1 x 8 cut at 21 inches {the bottom}
2 – 1 x 6 cut at 7.5 inches {the sides}
1 – 1 x 6 cut at 21 inches {the back}

Disclaimer: These measurements are for my particular planters using the locker drawer fronts I found.  You will need to adjust your measurements to match the length of the front of your planter.

Cutting pieces of wood to create planter boxes.

Step 2: Flip the locker front to the back and locate the piece of metal that is sticking out at the bottom.

Using lockers for planter boxes.

Step 3: Measure 5 inches from each end and mark with a marker.  Using the small drill bit, drill a hole on each 5″ mark.  Make sure your drill bit isn’t bigger than the screw head.

Drilling holes in a locker to secure to wood.

Step 4: Line the back of the locker drawer with the edge of the 1 x 8 piece of wood.  Using the marker, mark on the wood where you just drilled the holes.  

Marking where you are going to drill for building wooden planters.

Step 5: Using a small drill bit, drill a hole on the two spots on the piece of wood you just marked with the marker.

Pre-drilling a hole for the screws.

Step 6: Use two 3/4″ wood screws to secure the locker front to the 1 x 8 piece of wood.

Securing garden planter boxes

Step 7: Place the two 1 x 6 pieces of wood measured at 7.5″ on the sides of the locker.  I placed mine on the inside of the metal piece that already had two holes for me to place screws in.  Next, place the 1 x 6 cut at 21 inches along the back to make sure everything aligns evenly.

Lining up the pieces of wood for the locker planters

Step 8: Apply wood glue to the bottom of one of the side pieces and place back down.

Applying wood glue for extra hold with DIY Planter Boxes

Step 9: Use two 3/4″ wood screws to attach the side to the front piece {the locker drawer piece}.

Attaching the sides to the wooden planter box.

Step 10: Repeat steps 8 and 9 for the other side.

Step 11:  Place the locker front face down on the table and secure the bottom of the box to the sides by using two 1″ screws on each side on the bottom.  Optional: Use a clamp to help secure the bottom to the sides.

Securing the bottoms to the side of planter box.

Step 12: Turn the locker planter right side up. Apply wood glue on the back of the sides and along the edge of the bottom on top. Next, place the front of the locker planter face down.  

Applying wood glue on a planters box.

Step 13: Place the 1 x 6 cut at 21″ evenly along the back.  Using two 1″ wood screws for each end, secure the back of the planter to the side pieces.

Attaching the back to a locker planter box.

Creating a planters box

Step 14: Further secure the bottom of the planter by drilling two 1″ screws along the bottom piece of wood that meets the back piece.

Creating planters out of lockers

Step 15: Using a larger drill bit, drill about 10 holes in the bottom of each planter to allow water to drain.

Drill holes in the bottom of your planter to drain water.

Step 16: Repeat steps 1-15 for additional planter boxes.

Optional Step: To create the tiered planter box, follow this great tutorial by Ana-White that shows you the step-by-step process.  This is what we used and it was very easy to follow along!

Locker Planters you can make yourself

All together this project was around $30 to make.  $15 for the lockers and $15 on wood and screws. I hope this DIY project has motivated and inspired you to head to your local Habitat for Humanity ReStore to create something unique and fresh for your home.  I even saved the best for last! When you head to the ReStore here in Orlando for your next DIY project, mention my blog post and you’ll receive 15% off your next store purchase! 

Tiered Locker Planters

Need more inspiration?  Go ahead and hop around the other blogs that participated in this campaign. Kerri of Shaken Together Life and Sarah of While The Snooze showed off their DIY skills with their amazing projects.  I think we all need to go to the Restore and tackle a DIY project together!  Their DIY projects just might end up in my home as well. Click the images below: 

Mid-Century Bench by While They Snooze

DIY Mid-Century Bench

DIY Margarita Scented Candles by Shaken Together Life

DIY Margarita Scented Candles

Let’s keep in touch!

We have a brand new community over on Facebook, House & Home, where we’ll be chatting, sharing, and helping one another when it comes to home decor and projects. Come join us! Check it out here.

Like on Facebook || Follow on Instagram || Follow on Pinterest

Share this:

  • Click to share on Twitter (Opens in new window)
  • Click to share on Facebook (Opens in new window)

Related

Filed Under: DIY, DIY Tutorial, Home of the Rishels, Home Project

« August 2016 Island Vibes Wallpaper // Free Download
How to Create a Boho Baby Shower on a Budget »

Comments

  1. Ashlyn says

    January 31, 2017 at 9:01 am

    These are adorable!!! Love this idea!

    Reply
  2. Diane + Dean DIY says

    August 15, 2016 at 7:52 am

    This is awesome, Elizabeth. Thank you for sharing.

    We get. a lot of enjoyment designing and creating projects for our own home but we get so much more when we know we help others in need. We would love to participate the next time you get involved locally.

    Here is a link to one of our favorite local projects for transitional housing. It was very fulfilling. http://www.dianeanddean.com/blogging-it-forward-bungalow-makeover/

    Reply
    • ElizabethRishel says

      August 22, 2016 at 10:46 am

      This is amazing! Are you in the Central Florida area? I would love to collaborate on a future project.

      Reply

Trackbacks

  1. 25 DIY Garden Ideas To Make Your Outdoor Space Beautiful says:
    September 18, 2022 at 4:04 pm

    […] Having nothing to do special with the old locker drawers? Then do plan them to fancy up your garden. Yes, they can be an ideal candidate for creating expensive-looking planters inexpensively. Look at these tiered stepped planters made of locker drawers, each having uniquely painted front. Details here withinthegrove […]

    Reply
  2. 77 Easy DIY Planters and Plant Pots for Indoors and Outdoors says:
    April 10, 2020 at 4:30 pm

    […] Tutorial: withinthegrove.com […]

    Reply
  3. 5 Upcycling Ideas to Transform Unwanted Office Supplies & Help You Go Zero Waste - Eco Warrior Princess says:
    May 9, 2017 at 8:27 pm

    […] company chooses to get rid of old lockers, you can plant all kinds of flowers and various other plants inside the locker. Although you may be afraid that the locker will rust and harm the plants, it is actually fairly […]

    Reply
  4. Easy DIY Margarita Scented Candles says:
    August 3, 2016 at 1:00 pm

    […] out the DIY Garden Planters Using Locker Drawers from Elizabeth at Within the […]

    Reply

Leave a Reply Cancel reply

Your email address will not be published. Required fields are marked *

This site uses Akismet to reduce spam. Learn how your comment data is processed.

Looking for something?

withinthegrove

This pretty much sums up the progress of making 25 This pretty much sums up the progress of making 250 cement tiles. But I’m halfway through! The moment I finish the last tile is the moment I knock out the old tile. Let’s do this!
Time to bet on my DIY skills! I’m attempting to Time to bet on my DIY skills! I’m attempting to make my own cement tiles for our outdoor front door area. Mainly because of what I’m saving vs buying them. Won’t be saving much on time but I’M MAKING TILES! Never thought I’d hear myself say that. Make sure to follow along because if this works out, I have a feeling a lot of you are already eyeing a spot in your home to try your own DIY cement tiles. 
 
Thank you @vintagerevivals and @abby_roadhome for showing it’s possible with your gorgeous bathroom tiles! 

#CementTiles #DiyCementTiles #DiyProject #DIYonABudget #DIYProjects
We got the call that the pool build is starting! W We got the call that the pool build is starting! Which had me scrambling to dig up all the plants that were in the way in an effort to save them. Literally down to the last second before the crew showed up. Exciting day but you know what’s even more exciting? Knowing the next crew will officially be breaking ground with the excavation phase of the build.
This time of year is full of organizing and purgin This time of year is full of organizing and purging to bring spaces back to life. But sometimes all a space needs to feel refreshed is, well, a refresh and a little attention. Your number one requested space was the living room. So I gave mine a refresh with some unique and gorgeous finds from @homesense_us . I found a few fun pots for my houseplants, a gorgeous magnifying glass, and a few other items for our coffee table and couch.

I never know what I’m going to find when I walk into Homesense since it’s always rotating with amazing finds. But I do know I’ll walk out with a few new favorites for my home at affordable prices. If you haven’t yet, I urge you to check and see if you have a Homesense near you! #DiscoverHomesense #HomesensePartner
2022, you were awesome. But I’m determined to ma 2022, you were awesome. But I’m determined to make 2023 even better! And I hope you join me! We can be one of our biggest cheerleaders, but together we’re going to do big things. Go ahead and write down a big, small and a few in-between projects you want to get done this year in your home. Kicking it off with intention and that reminder that we can do this. Ready to get started?! Let me know in the comments the first project you want to tackle!
We finally got the Christmas/winter edition of the We finally got the Christmas/winter edition of the window projection up and running! It was a hit for Halloween and just as fun for this time of year as well. I built frames wrapped with a plastic drop cloth but you can also secure the drop cloth over the windows using command strips. The videos are from @atmosfx and we use a mini projector to play them on the screen. Place a Bluetooth speaker outside and you’re in business! Such a fun addition this time of year for the exterior of your home.
It’s the last little bit of the demo we needed t It’s the last little bit of the demo we needed to do in order to give the green light for the pool to start. And 2,456 pavers later, it’s done! This was exhausting but worth the money we saved doing it ourselves. And why remove them? We’re using a different stone around the pool and we want it to be cohesive up to the house. Don’t worry, someone got one heck of a deal on these pavers, we made a little money, and someone else got them out of our driveway. I’d say that’s a win-win. Stayed tuned for the entire pool process as we enter 2023. It’s going to be pretty exciting to watch!
Our patio space has served us so well over the yea Our patio space has served us so well over the years and now it’s time for a change because we’re getting a POOL!! Sharing this with you makes it even more real because just a year ago I would have told you it isn’t in the cards for us. We’ll be breaking ground soon but first we have to remove the screen enclosure. Spoiler: we won’t be putting one back up around the pool. It has already made the biggest difference visually and SO much natural light pours into our home now with it gone. It’s going to be so exciting seeing this all unfold so stay tuned! Up next: removing the pavers.
This holiday season we were able to travel to my h This holiday season we were able to travel to my hometown for the first time in awhile. We were greeted by the most beautiful sunset on the beach. Fast forward to this week as I headed to @homesense_us for some holiday shopping, and I ended up finding a few pieces for our home that remind me of that core memory on the beach. The beautiful wicker bench caught my eye first followed by the comforter and toss pillows. Everything at amazing price points while not sacrificing style and quality. #HomesensePartner

Mixing a thrill of a find with a core memory, I guarantee you'll fall in love with your home even more as you go to decorate. Decorating your home isn't grasping on to the newest trend or what you think others would do. It's what YOU want to do. And sometimes that's based on an emotional connection. Oh, the stories your spaces will be able to tell as you decorate each one. Start with seeing if there’s a @homesense_us near you! #DiscoverHomesense #HomesenseSarasota
Load More... Follow on Instagram

Sign up here to have our fresh posts delivered to your inbox!

Enter your email address:

Delivered by FeedBurner

Copyright © 2023 Within The Grove • Customized by Brave Creative Design · Log in

  • Privacy Policy
  • Terms and Conditions
  • Disclosures + Photo Usage
 

Loading Comments...