• Home
  • ABOUT
  • WORK WITH ME
  • Paint Colors
  • Shop Our House
    • Guest Bedroom
    • Front Living Room
    • Living Room with Fireplace
    • Previous Second Living Room
    • Current Playroom
    • Prior Playroom
    • Dining Room
    • Laundry Room
    • Oliver’s Bedroom
    • Guest Bathroom
    • Covered Lanai
    • Patio
    • Master Bedroom
  • CONTACT
    • Facebook
    • Instagram
    • Pinterest

Within the Grove

Join the list to receive occasional news and special updates!

DIY Wooden Hooks

January 19, 2020

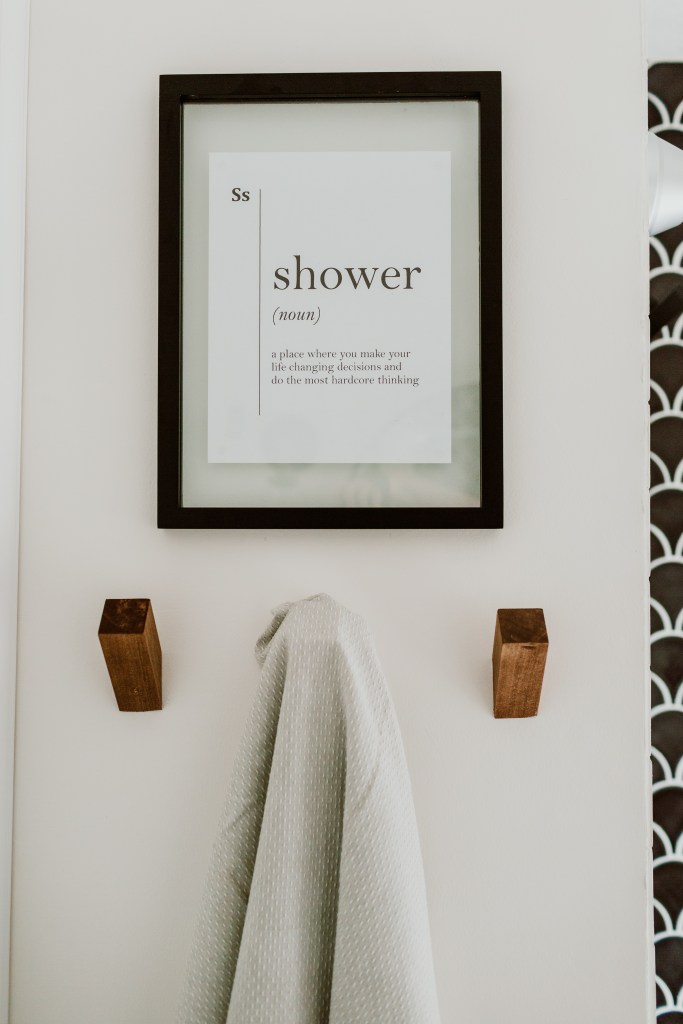
Back when we were renovating our guest bathroom, I knew I wanted to add hooks for towel versus a traditional towel bar. But I ran into a snag when I couldn’t find anything that fit our style or without spending a lot of money. With it being the end of our renovation, money was already tight so we decided to make our own wooden hooks. And I have been obsessed with them every since!

Using a basic piece of 2 x 2 pine wood, we created these wooden hooks that ended up being the perfect finishing touch in our bathroom. Fast forward to now, I recently finished transforming my mother’s renter friendly entryway and once again went on the hunt for hooks. Until I realized I could do the same hooks in her entryway. But this time I spray painted them black versus staining them.

So not only did I get the exact hooks I wanted but I also saved a lot of money. Modern looking hooks can average $8 and up per hook. My DIY hook cost total? $8 for the pine 2 x 2 and $4 for the spray paint. Plus, you can get about 12 hooks out of one piece of 2 x 2 when buying a 6 foot section. And now you can make some for your own home. Here’s my quick and simple tutorial including a video if you’re a visual person like me on how to make your own wooden hooks.

Materials 

  • Miter saw 
  • 2 x 2 pine
  • Measuring Tape
  • Pencil
  • Sandpaper 120 and 220 grit
  • Drill
  • Drill bit (slightly smaller than the dowel screw)
  • Dowel screws (one for every hook)
  • Pliers
  • Drywall Anchors (one for every hook)
  • Stain or spray paint of choice 

**Some of these links are affiliate links. 

The How-To

Step1: Cut the end of the 2 x 2 at a 45 degree angle using a miter saw.

Step 2: From the lower end/shorter side of the 45 degree angle, measure out 3 inches and mark it with a pencil. Make a straight cut on the three inch mark.

Step 3: Repeat steps 1 and 2 until you have the number of hooks you need.

Step 4: Sand all the hooks especially the edges. Start with a 120 grit to remove the top coating and finish with a 220 grit for a smooth finish.

Step 5: Drill a hole in the 45 degree angled side for the dowel screw to screw into. You’ll want to use a drill bit that is slightly smaller than the dowel screw. Make sure that the hole goes in straight and you want it going in the direction that will allow the hook to rest flush against the wall. Make sure to insert the screw in the exact same spot on every hook.

Step 6: Before you insert the dowel screw, stain or paint your hooks. Flagstone by Varathane is a great stain to use and flat black by Behr is a great spray paint option.

Step 7: Insert one side of the dowel screw in the pre-drill hole. Use pliers to help twist it in.

Step 8: Measure and evenly install drywall anchors where the hooks will be. From experience, the drywall anchors that can hold up to 100 pounds hold the hooks better in place. It isn’t because a lot of weight can be placed on them but it makes them more sturdy and getting wobbly over time.

Step 9: Screw in the other end of the dowel screw into the drywall anchor. That’s it!

You can also watch this quick video showing you majority of the steps when creating the wooden hooks for my Mother’s entryway. It really shows how simple this project is but with beautiful results.


There are so many places you can install these wooden hooks in your home. Your bathroom, entryway, kitchen, mudroom, laundry room, garage, office, etc. They would also make a great gift! Let me know if you make some for your home and I always love seeing pictures of your projects as well!

We also have a brand new community over on Facebook, House & Home, where we’ll be chatting, sharing, and helping one another when it comes to home decor and projects. Come join us! Check it out here.
Like on Facebook || Follow on Instagram || Follow on Pinterest`

Share this:

  • Click to share on Twitter (Opens in new window)
  • Click to share on Facebook (Opens in new window)

Related

Filed Under: DIY, Home Decor, Home Project

« Renter Friendly Entryway Makeover
Invest in Your Home with a Smart Water Heater »

Trackbacks

  1. DIY Garage Storage Wall – Haute House Look says:
    April 16, 2020 at 12:33 pm

    […] claim this genius idea they came from my dear friend Liz @withinthegrove. I have linked the tutorial here. The only thing I tweaked is the use of leftover 1×2 instead of the recommended 2×2 that […]

    Reply

Leave a Reply Cancel reply

Your email address will not be published. Required fields are marked *

This site uses Akismet to reduce spam. Learn how your comment data is processed.

Looking for something?

withinthegrove

The waterline tile and decking are both done! With The waterline tile and decking are both done! With the limestone making the biggest difference with this pool update. It’s stunning!! Very exciting to see our entire pool area installed. We’re almost there!! Just the interior finish to go and then it’s time to fill the pool. 

•Pavers are limestone in Myra White 
• If you’re local to Central Florida, @caapavers installed ours! 
• Waterline tile is by NPT in the color Carbon.
DIY TILE REVEAL! The front door is styled and now DIY TILE REVEAL! The front door is styled and now taking the time to soak these tiles in! I kept it simple with the decor and took away the rug. If you've been here for a little bit, you know I love to place a rug underneath my wooden doormat. But letting these tiles SHINE is a must. Still can’t believe I made these! Head to the last image. I installed an imperfectly perfect tile as a little nod to these being handmade. DIY tile blog post coming your way soon! Grabbing packages from my front door just became even more exciting. 

Front door color: Black Magic by Sherwin-Williams
House Color: Cloud White by Benjamin Moore
Decor: You can find it on my LTK through my profile!
Right when we thought the pool excavation day was Right when we thought the pool excavation day was exciting, the gunite was installed! We’re about halfway through the pool build and we officially have the shell of the pool done. This all happened so fast. I’m talking about two weeks. The waterline tile and decking up next!
This will forever be a project where I will say: “ I MADE THESE TILES!” What would have cost me close to $2,000 to buy, I was able to make them for $350. I started experimenting with how to make them and nailing down the perfect black color 8 weeks ago. Let that sink in! This has been such a labor of love. 20 hours went into making the tiles. Two weeks worth of demo + installation. And a lot of learning curves in between. This project is so much more than saving money. It’s the process I went through and what I pushed myself to learn and do to get to this moment. We can do hard things!! Cheers to this project being done. How about we make a front door next? JUST KIDDING!! But a new front will be happening!

Thank you @vintagerevivals for showing that making cement tiles is a project one can tackle and @abby_roadhome doing the same with this amazing pattern!
The tiles are in place! 🎉 I’m not done yet bu The tiles are in place! 🎉 I’m not done yet but this is certainly a part of the project that needs to be celebrated. Grout is up next to call this project a wrap. It has been a process but one of the most rewarding ones when it comes to projects I’ve tackled in our home.
IT IS TIME! I have been waiting for this moment to IT IS TIME! I have been waiting for this moment to smash these front door tiles ever since we moved in. And it felt so dang good! Here’s what I’m doing to prep the concrete slab for the tile install: 

1. Remove old tile
2. Use an angle grinder with a diamond grinding blade to remove the thin set and paint. 
3. Wash the slab
4. Apply two coats of Hydro Ban to create waterproofing barrier from the moisture in the concrete slab and to help with crack isolation.
Another exciting step for the pool: Excavation day Another exciting step for the pool: Excavation day! We officially broke ground. It was the coolest thing to watch. Rebar and gunite up next.
250 cement tiles made!! 20+ hours went into making 250 cement tiles made!! 20+ hours went into making these tiles and we’re going to celebrate making it to this point! I questioned myself during the last push when molds started failing, tiles weren’t turning out, and I was just flat out tired. If there’s a project to test patience, this is the one. But want to know the craziest part? I’d do it all over again. What an awesome process being able to make my own tiles. And the part we’ve all been waiting for is coming up next: INSTALL!! Tiles, don’t fail me now.
This pretty much sums up the progress of making 25 This pretty much sums up the progress of making 250 cement tiles. But I’m halfway through! The moment I finish the last tile is the moment I knock out the old tile. Let’s do this!
Load More... Follow on Instagram

Sign up here to have our fresh posts delivered to your inbox!

Enter your email address:

Delivered by FeedBurner

Copyright © 2023 Within The Grove • Customized by Brave Creative Design · Log in

  • Privacy Policy
  • Terms and Conditions
  • Disclosures + Photo Usage
 

Loading Comments...