• Home
  • ABOUT
  • WORK WITH ME
  • Paint Colors
  • Shop Our House
    • Guest Bedroom
    • Front Living Room
    • Living Room with Fireplace
    • Previous Second Living Room
    • Current Playroom
    • Prior Playroom
    • Dining Room
    • Laundry Room
    • Oliver’s Bedroom
    • Guest Bathroom
    • Covered Lanai
    • Patio
    • Master Bedroom
  • CONTACT
    • Facebook
    • Instagram
    • Pinterest

Within the Grove

Join the list to receive occasional news and special updates!

One Spot DIY // DIY Ombre Tassel Pouch

April 13, 2017

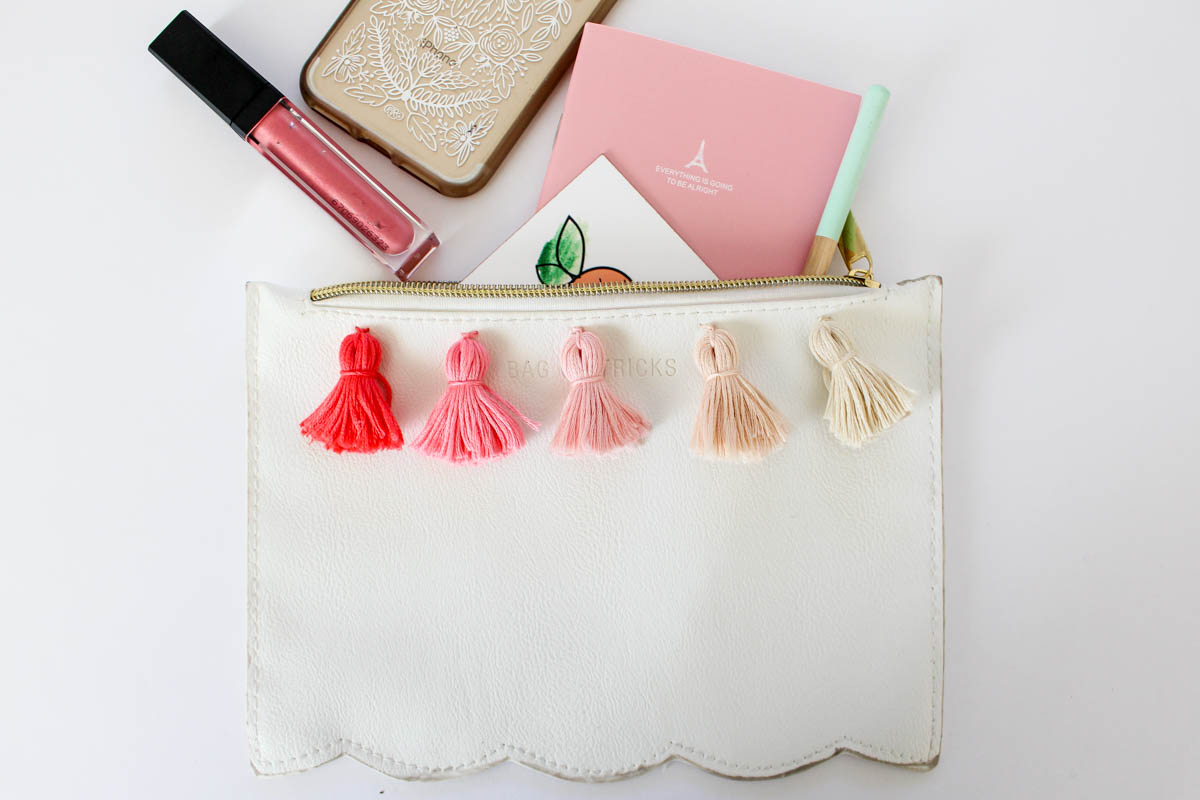
We’ve made it to Friday Eve! Yes, there’s such a thing. Makes Thursday a little better, right? You know what else makes for a great day? A super cute One Spot DIY! I’m tickled pink to share this ombre tassel pouch with you today. First off, I can’t get over this $3 cream pouch I found in the Target One Spot the other day that prompted this newest DIY.

Not only does it say bag of tricks on the front, but it’s super soft with a fleece type lining on the inside. The scallops along the bottom sealed the deal. I wanted to add a pop of color without having to get too messy. $2 later and I had the perfect solution: pink ombre tassels using sewing thread! This project took no more than 30 minutes to complete which also includes making the tassels. Do I dare say 20 minutes to complete it?

It’s the perfect touch of pink with an ombre design. It adds an adorable and fun touch to the pouch while still making it functional. Enough of this chit chat! Here’s how you can make your own ombre tassel pouch.

Supplies:

Cream Pouch from the One Spot || Scissors || Skeins of Embroidery Floss to make 5 Tassels  || Embroidery Needle

The How-To:

We need to create our tassels first! Each skein of embroidery floss will make 2 tassels. I ended up buying 5 different ones to create the ombre pattern. Here are the colors along with the numbers I used just in case you want to use the same colors:

Step 1: Remove the paper sleeves and cut off about 20 inches of thread from the skein. You’ll be using this later!

Step 2: Cut the skein into two equal sections.

Step 3: Take each section you just created and cut in half again. You’ll now have 4 equal sections of thread.

Step 4:Combine 2 sections together. Next you’ll take your 20 inch piece of thread you put to the side and cut it into 4 equal parts.

Step 5: Center one of the pieces of thread underneath a bundle. Make sure it’s in the middle and tie it in a double knot.

Step 6: You’ll now fold this bundle in half. Center another piece of thread under the folded bundle near the top.

Step 7: Tie this thread in a double knot. Trim the excess thread along the bottom for a clean look. 

You’ll repeat these steps until you have all of your tassels made.

Time to attach the tassels to the bag! Before you begin, space out your tassels along the width of the bag so you know where you’re going to attach them.

Step 8:Thread one end of the strands through an embroidery needle. You’re using the first piece of thread you tied around the bundle that’s now at the top.

Step 9: Sew one end through the bag. With just a little push, the needle will go through. Repeat with the other piece of thread by sewing it right next to the first one.

Step 10: From the inside of the pouch, tie the thread in a double knot. Trim the excess thread. Repeat this until you have all of the tassels sewn onto the pouch. That’s it!

It seems like a lot of steps, but once you get the hang of creating the tassels and sewing them onto the pouch, it really is a quick project. This pouch is the perfect size to serve for many different uses.

You can place art supplies, receipts and business transactions, or use it as a purse with just your essentials inside. It would also make a great gift to give to someone. Super cute!

What colors will you be using for your pouch? I almost picked a blue ombre pattern but decided to use pink at the last minute. Maybe green is your color for spring time. Either way, I want to see your adorable pouch when you’re done! Can’t find the pouch? This method will work on just about any purse, tote, or bag. Chat soon!

Let’s keep in touch!

We have a brand new community over on Facebook, House & Home, where we’ll be chatting, sharing, and helping one another when it comes to home decor and projects. Come join us! Check it out here.

Like on Facebook || Follow on Instagram || Follow on Pinterest

Share this:

  • Click to share on Twitter (Opens in new window)
  • Click to share on Facebook (Opens in new window)

Related

Filed Under: DIY Tutorial, One Spot DIY

« Free Printable // Live Life In Full Bloom Print
Behr Color of the Month: Peek A Blue »

Comments

  1. Susan says

    April 14, 2017 at 1:22 pm

    Great tutorial – I think I’m going to have to tassel up most everything I own.
    Also, at our house, we call it “Friday Lite”. 🙂

    Reply
    • ElizabethRishel says

      June 28, 2017 at 5:01 pm

      Love what you call it! And yes, tassel everything!

      Reply

Leave a Reply Cancel reply

Your email address will not be published. Required fields are marked *

This site uses Akismet to reduce spam. Learn how your comment data is processed.

Looking for something?

withinthegrove

This pretty much sums up the progress of making 25 This pretty much sums up the progress of making 250 cement tiles. But I’m halfway through! The moment I finish the last tile is the moment I knock out the old tile. Let’s do this!
Time to bet on my DIY skills! I’m attempting to Time to bet on my DIY skills! I’m attempting to make my own cement tiles for our outdoor front door area. Mainly because of what I’m saving vs buying them. Won’t be saving much on time but I’M MAKING TILES! Never thought I’d hear myself say that. Make sure to follow along because if this works out, I have a feeling a lot of you are already eyeing a spot in your home to try your own DIY cement tiles. 
 
Thank you @vintagerevivals and @abby_roadhome for showing it’s possible with your gorgeous bathroom tiles! 

#CementTiles #DiyCementTiles #DiyProject #DIYonABudget #DIYProjects
We got the call that the pool build is starting! W We got the call that the pool build is starting! Which had me scrambling to dig up all the plants that were in the way in an effort to save them. Literally down to the last second before the crew showed up. Exciting day but you know what’s even more exciting? Knowing the next crew will officially be breaking ground with the excavation phase of the build.
This time of year is full of organizing and purgin This time of year is full of organizing and purging to bring spaces back to life. But sometimes all a space needs to feel refreshed is, well, a refresh and a little attention. Your number one requested space was the living room. So I gave mine a refresh with some unique and gorgeous finds from @homesense_us . I found a few fun pots for my houseplants, a gorgeous magnifying glass, and a few other items for our coffee table and couch.

I never know what I’m going to find when I walk into Homesense since it’s always rotating with amazing finds. But I do know I’ll walk out with a few new favorites for my home at affordable prices. If you haven’t yet, I urge you to check and see if you have a Homesense near you! #DiscoverHomesense #HomesensePartner
2022, you were awesome. But I’m determined to ma 2022, you were awesome. But I’m determined to make 2023 even better! And I hope you join me! We can be one of our biggest cheerleaders, but together we’re going to do big things. Go ahead and write down a big, small and a few in-between projects you want to get done this year in your home. Kicking it off with intention and that reminder that we can do this. Ready to get started?! Let me know in the comments the first project you want to tackle!
We finally got the Christmas/winter edition of the We finally got the Christmas/winter edition of the window projection up and running! It was a hit for Halloween and just as fun for this time of year as well. I built frames wrapped with a plastic drop cloth but you can also secure the drop cloth over the windows using command strips. The videos are from @atmosfx and we use a mini projector to play them on the screen. Place a Bluetooth speaker outside and you’re in business! Such a fun addition this time of year for the exterior of your home.
It’s the last little bit of the demo we needed t It’s the last little bit of the demo we needed to do in order to give the green light for the pool to start. And 2,456 pavers later, it’s done! This was exhausting but worth the money we saved doing it ourselves. And why remove them? We’re using a different stone around the pool and we want it to be cohesive up to the house. Don’t worry, someone got one heck of a deal on these pavers, we made a little money, and someone else got them out of our driveway. I’d say that’s a win-win. Stayed tuned for the entire pool process as we enter 2023. It’s going to be pretty exciting to watch!
Our patio space has served us so well over the yea Our patio space has served us so well over the years and now it’s time for a change because we’re getting a POOL!! Sharing this with you makes it even more real because just a year ago I would have told you it isn’t in the cards for us. We’ll be breaking ground soon but first we have to remove the screen enclosure. Spoiler: we won’t be putting one back up around the pool. It has already made the biggest difference visually and SO much natural light pours into our home now with it gone. It’s going to be so exciting seeing this all unfold so stay tuned! Up next: removing the pavers.
This holiday season we were able to travel to my h This holiday season we were able to travel to my hometown for the first time in awhile. We were greeted by the most beautiful sunset on the beach. Fast forward to this week as I headed to @homesense_us for some holiday shopping, and I ended up finding a few pieces for our home that remind me of that core memory on the beach. The beautiful wicker bench caught my eye first followed by the comforter and toss pillows. Everything at amazing price points while not sacrificing style and quality. #HomesensePartner

Mixing a thrill of a find with a core memory, I guarantee you'll fall in love with your home even more as you go to decorate. Decorating your home isn't grasping on to the newest trend or what you think others would do. It's what YOU want to do. And sometimes that's based on an emotional connection. Oh, the stories your spaces will be able to tell as you decorate each one. Start with seeing if there’s a @homesense_us near you! #DiscoverHomesense #HomesenseSarasota
Load More... Follow on Instagram

Sign up here to have our fresh posts delivered to your inbox!

Enter your email address:

Delivered by FeedBurner

Copyright © 2023 Within The Grove • Customized by Brave Creative Design · Log in

  • Privacy Policy
  • Terms and Conditions
  • Disclosures + Photo Usage
 

Loading Comments...