• Home
  • ABOUT
  • WORK WITH ME
  • Paint Colors
  • Shop Our House
    • Guest Bedroom
    • Front Living Room
    • Living Room with Fireplace
    • Previous Second Living Room
    • Current Playroom
    • Prior Playroom
    • Dining Room
    • Laundry Room
    • Oliver’s Bedroom
    • Guest Bathroom
    • Covered Lanai
    • Patio
    • Master Bedroom
  • CONTACT
    • Facebook
    • Instagram
    • Pinterest

Within the Grove

Join the list to receive occasional news and special updates!

Stripping Our Kitchen Shelves

January 4, 2019


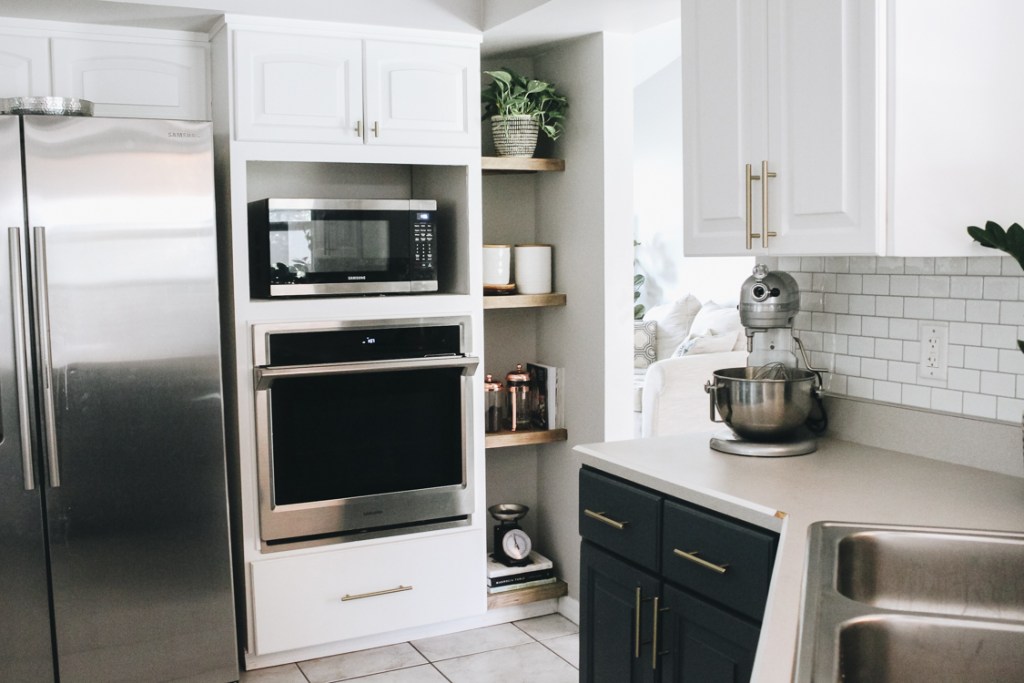
For the past year I’ve been eyeballing the shelves in our kitchen. When we gave our kitchen a makeover, I naturally gave them a fresh coat of white paint along with all the kitchen cabinets. It wasn’t until I looked at an image of our kitchen and realized there was way too much white. White tile floors, white upper cabinets, white backsplash, and white shelves. See where I’m going with this?

I knew what I needed to do to warm up the space: figure out how to transform the white shelves into stained, wooden shelves. I mean, new flooring would be amazing but that’s years down the road. And that’s exactly what I did with the shelves!

I took a risk and stripped the paint off the shelves with fingers crossed I’d find decent wood underneath to sand and stain. I figured, worst case scenario, I’d have to paint them back or figure out another way to install wooden shelves. Luckily, I didn’t have to do either one! I found gorgeous wood underneath the paint and started cleaning them up. You can find the tutorial at the end of this post.

Once the wood was ready to be stained, it took me a few days to pick a stain color. Stain is very intimidating to me because once you apply it, it’s very hard to remove if you don’t like it. Paint? You just paint over it with a new color if you don’t like it.

I decided to jump all in and just go for it with a stain color. You guys, I hated it. I texted images to my mom to see if I was overreacting. Nope. She didn’t like it either. The problem is that it was too dark and made our kitchen appear more rustic. The solution? Giving it a good sanding. That was the trick to lighten it enough to our liking. You can see the difference sanding made in this image.

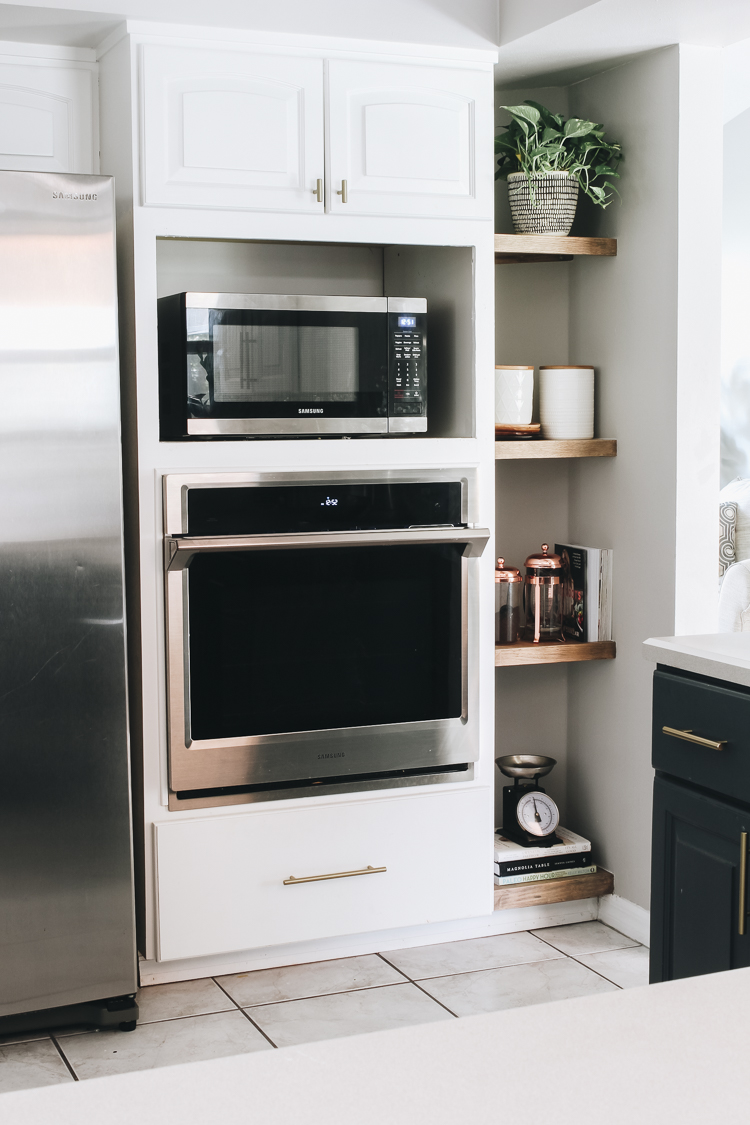
Now that we have wooden shelves that we love, it was time to style them. I used to place items on these shelves because I needed a place for an item to go. In other words, junk shelves like a junk drawer for those items you don’t know what to do with.

This time around I kept functionality and what we truly love in mind when styling them. First up was a houseplant to add a cozy feel to the shelves. When in doubt, add a plant.

I also knew I wanted white canisters for our sugar and coffee beans. Throw in these adorable plates I received for Christmas, another shelf was done! For the last two remaining shelves, I added our go-to cookbooks and items we frequently use. Okay, we may not use the scale so much but it’s the perfect addition on top of the cookbooks.


So, there you have it! Brand new kitchen shelves that cost us $0 to flip because we had all the materials to give them a makeover. And we love the results! Wondering how we did it? Keep reading! Sharing the quick tutorial on how to strip paint back to the natural wood.

How to Strip Paint to Expose the Natural Wood

Materials:
Citristrip
Old Brush
Putty Knife
Baby Wipes + Paper Towels
Disposable Gloves
Metal or Plastic Container

How-To:
Step 1: Wearing gloves, you’ll pour the Citristrip in a metal or plastic container. Apply the Citristrip to the painted surface you’re wanted to strip using an old brush.

Step 2: Allow the Cirtristrip to sit for for at least 30 minutes. You’ll see the paint start bubbling right away but you really want to give the paint stripper time to work throughout the entire surface you’re stripping.

Step 3: Using the paint scrapper, remove the paint by scrapping in the same direction. You’ll discover how easily the paint is removed! Keep in mind, it might take more than one application to fully remove the paint.

Step 4: I’ve always used a baby wipe followed by a paper towel to remove any excess paint stripper.

Step 5: Sand the freshly exposed wood with 180 grit sandpaper followed by 220 grit sandpaper for a smooth finish.

Step 6: Stain and seal your exposed wood if you choose to! We used Briarsmoke followed by heavy sanding to lighten them after thinking they were too dark. We sealed the shelves with sating polycrylic.

Sometimes the smallest changes have the biggest impact when it comes to home projects. This was one of them. I’d love to see how you style your shelves in your home or how you like Citristrip if you try it. It’s our go to product for stripping paint! As always, thank you for stopping by! We appreciate each and every single one of you and this community we have all built together.

Let’s keep in touch!
We have a brand new community over on Facebook, House & Home, where we’ll be chatting, sharing, and helping one another when it comes to home decor and projects. Come join us! Check it out here. 
Like on Facebook|| Follow on Instagram|| Follow on Pinterest

Share this:

  • Click to share on Twitter (Opens in new window)
  • Click to share on Facebook (Opens in new window)

Related

Filed Under: All Things Paint, DIY, Our Home Improvements

« Home Projects from 2018
Office Design Board »

Comments

  1. Pat says

    January 4, 2019 at 4:38 pm

    Um…look at those nice, crisp caulk lines! 😉 Seriously though, I love this makeover! I have shelves in our “library” that were stained, but I want a change. Do you think a nice sanding will do the trick?

    Reply
    • Suzan Ford says

      February 7, 2019 at 7:15 am

      Paint stays on the surface of the wood which makes it fairly easy to remove. Stain, however, seeps into the wood, which can make it difficult to remove. You could be sanding for a very long time.

      Reply
      • ElizabethRishel says

        February 7, 2019 at 12:57 pm

        Yes! You are correct. Luckily, with this project, I was stripping the paint to stain the wood.

        Reply

Leave a Reply Cancel reply

Your email address will not be published. Required fields are marked *

This site uses Akismet to reduce spam. Learn how your comment data is processed.

Looking for something?

withinthegrove

Round 2 (and final!) for the grass install in our Round 2 (and final!) for the grass install in our backyard. Dang, does it feel GOOD to finally say that! It has been a long time coming and a little sweat equity saved us so much by doing it ourselves. Next on the backyard to do list is turning it into a tropical oasis by planting the flower beds. Think huge birds of paradise! Time to start planning.
It has been 6 years since we moved into our home a It has been 6 years since we moved into our home and visualized the potential our backyard would one day have. The first few years were spent clearing out and claiming our property back . Two years ago we built our dream garden, last year we built the play area that feels more like a magical treehouse, and this year we added a pool (still pinching myself every day). We’re seeing our hard work over the years starting to come together as we approach the finish line of installing grass and landscaping that’s going to bring it all together. As I always say, stay tuned because you know I’m going to share it all with you! And a little reminder for you to keep going because home takes time.
The garden is cleaned up, prepped, and ready for t The garden is cleaned up, prepped, and ready for the summer crop. What started as a single garden box has transformed to this garden space over the past few years. Favorite thing about it: being tucked away in this cozy corner with the winding paths throughout it. One thing I would do differently: using pea gravel instead of the granite rocks we went with. These rocks hurt! Pea gravel is smooth enough to comfortably walk barefoot on.
The grass is in! Saying BUH BYE to the dirt around The grass is in! Saying BUH BYE to the dirt around the pool for the first time since December when we broke ground. We spent the past few weeks installing irrigation throughout our backyard and around the pool. Yesterday we finally had the sod delivered and within a few hours it got us one step closer to finishing our backyard oasis. We still have a long ways to go, but my goodness does it feel good to see this part done! And we can finally check off the final inspection for the pool build.
What does it cost to fill a 16,000 gallon pool wit What does it cost to fill a 16,000 gallon pool with a garden hose? Our total came to $229! Does this total surprise you? This of course can greatly vary depending on where you live and your situation. For us, we live in Florida and on county water. We only pay water fees and not sewage. The water company did not give us a discount. We filled the pool right at the start of our billing month so this is it! Have you filled up a pool before? I’d love for you to share your cost, pool size, and location if you feel comfortable doing so!
We have a 16,000 gallon pool and filled it up with We have a 16,000 gallon pool and filled it up with a single water hose. And we for sure had some questions! Answering them here:

• Why not use a water truck? We weren’t in a rush, it was the best way to end this project watching it fill up, and it would have been more expensive. 

• Why not use our local fire station? Our local fire department doesn’t do this and it isn’t very common that most do. We wouldn’t ask if they did. 

• Did our water company give us a discount? Nope. Most water companies will take off the sewage fee but we only pay for water and not sewage where we live. We did notify them so they wouldn’t turn our water off thinking it was a leak. 

• What is that on the end of your hose? We added a filter on the hose to help reduce iron, scale, any other heavy metals and containments to help give our pool a fresh start. 

• How long did it take? 51 hours 

I’ll be sharing the cost soon so make sure to add your guess in the comments!
Pizza nights are back! And one thing we’re addin Pizza nights are back! And one thing we’re adding since our screen enclosure is gone, are these Bitefighter LED String Lights by @tikibrandproducts . You’ve seen us use them in our playset area and now for our patio area. They give us the ambiance we need at night while helping to fight off the mosquitoes as a 2 in 1 solution. There’s no odor, no mess, and they will last all season long. Cheers to the summer nights ahead! #ad #TIKIbrand
Protecting outdoor furniture for the summer!

It’s time to give your outdoor furniture the best start for summer and to help it last long term. Here are some things you can do to protect your outdoor furniture as we enter the summer season:

1. If you have wood furniture, it’s time to seal it! I use Thompson’s Waterseal on all my outdoor wood furniture except for teak. This protects it from moisture, sunshine, and mold/mildew.

2. Easiest way to help keep cushions clean is by spot cleaning throughout the season. I use 30 Seconds Outdoor Cleaner for quick, fresh looking cushions. 

3. To really protect cushions, Shield H2O provides a water repellent treatment that repels moisture and spills, which in return helps prevent mold and mildew. 

4. Have teak furniture? Use a teak SEALER and not an oil. Teak oil is a short term solution and easily washes out with rain. Time to seal it to last long term! 

I have everything I used in my Amazon storefront under outdoor.
We were told 16 weeks for our pool install but it We were told 16 weeks for our pool install but it ended up taking exactly 12 weeks. Broke ground on December 16th and started filling it with water on March 16th. I’m sharing all the pool details over on my blog. Including the answer to the number one question: How much did this cost? Covering how we picked a pool builder, the construction process, the materials we went with and why, what we splurged on and where we saved, and so much more. Save it for future reference! It’s a good one!
Load More... Follow on Instagram

Sign up here to have our fresh posts delivered to your inbox!

Enter your email address:

Delivered by FeedBurner

Copyright © 2023 Within The Grove • Customized by Brave Creative Design · Log in

  • Privacy Policy
  • Terms and Conditions
  • Disclosures + Photo Usage
 

Loading Comments...