• Home
  • ABOUT
  • WORK WITH ME
  • Paint Colors
  • Shop Our House
    • Guest Bedroom
    • Front Living Room
    • Living Room with Fireplace
    • Previous Second Living Room
    • Current Playroom
    • Prior Playroom
    • Dining Room
    • Laundry Room
    • Oliver’s Bedroom
    • Guest Bathroom
    • Covered Lanai
    • Patio
    • Master Bedroom
  • CONTACT
    • Facebook
    • Instagram
    • Pinterest

Within the Grove

Join the list to receive occasional news and special updates!

Summer Floral Party // DIY Ombre Napkins and Place Cards

June 2, 2016

Floral Summer Party

Today’s an exciting day for Within the Grove which means for you also!  I’m more than thrilled to be sharing today’s blog post with you.  It’s no secret that my favorite season is summer and that I love throwing a great get together with a beautiful theme.  There’s nothing sweeter than gathering friends and family for a festive time while enjoying life’s small moments.  We’re usually found attending cookouts, outdoor events, a yummy BBQ, and pool parties throughout the warm summer season.  Why not create a unique and beautiful get together {because it’s summer of course} by hosting a Summer Floral Party?

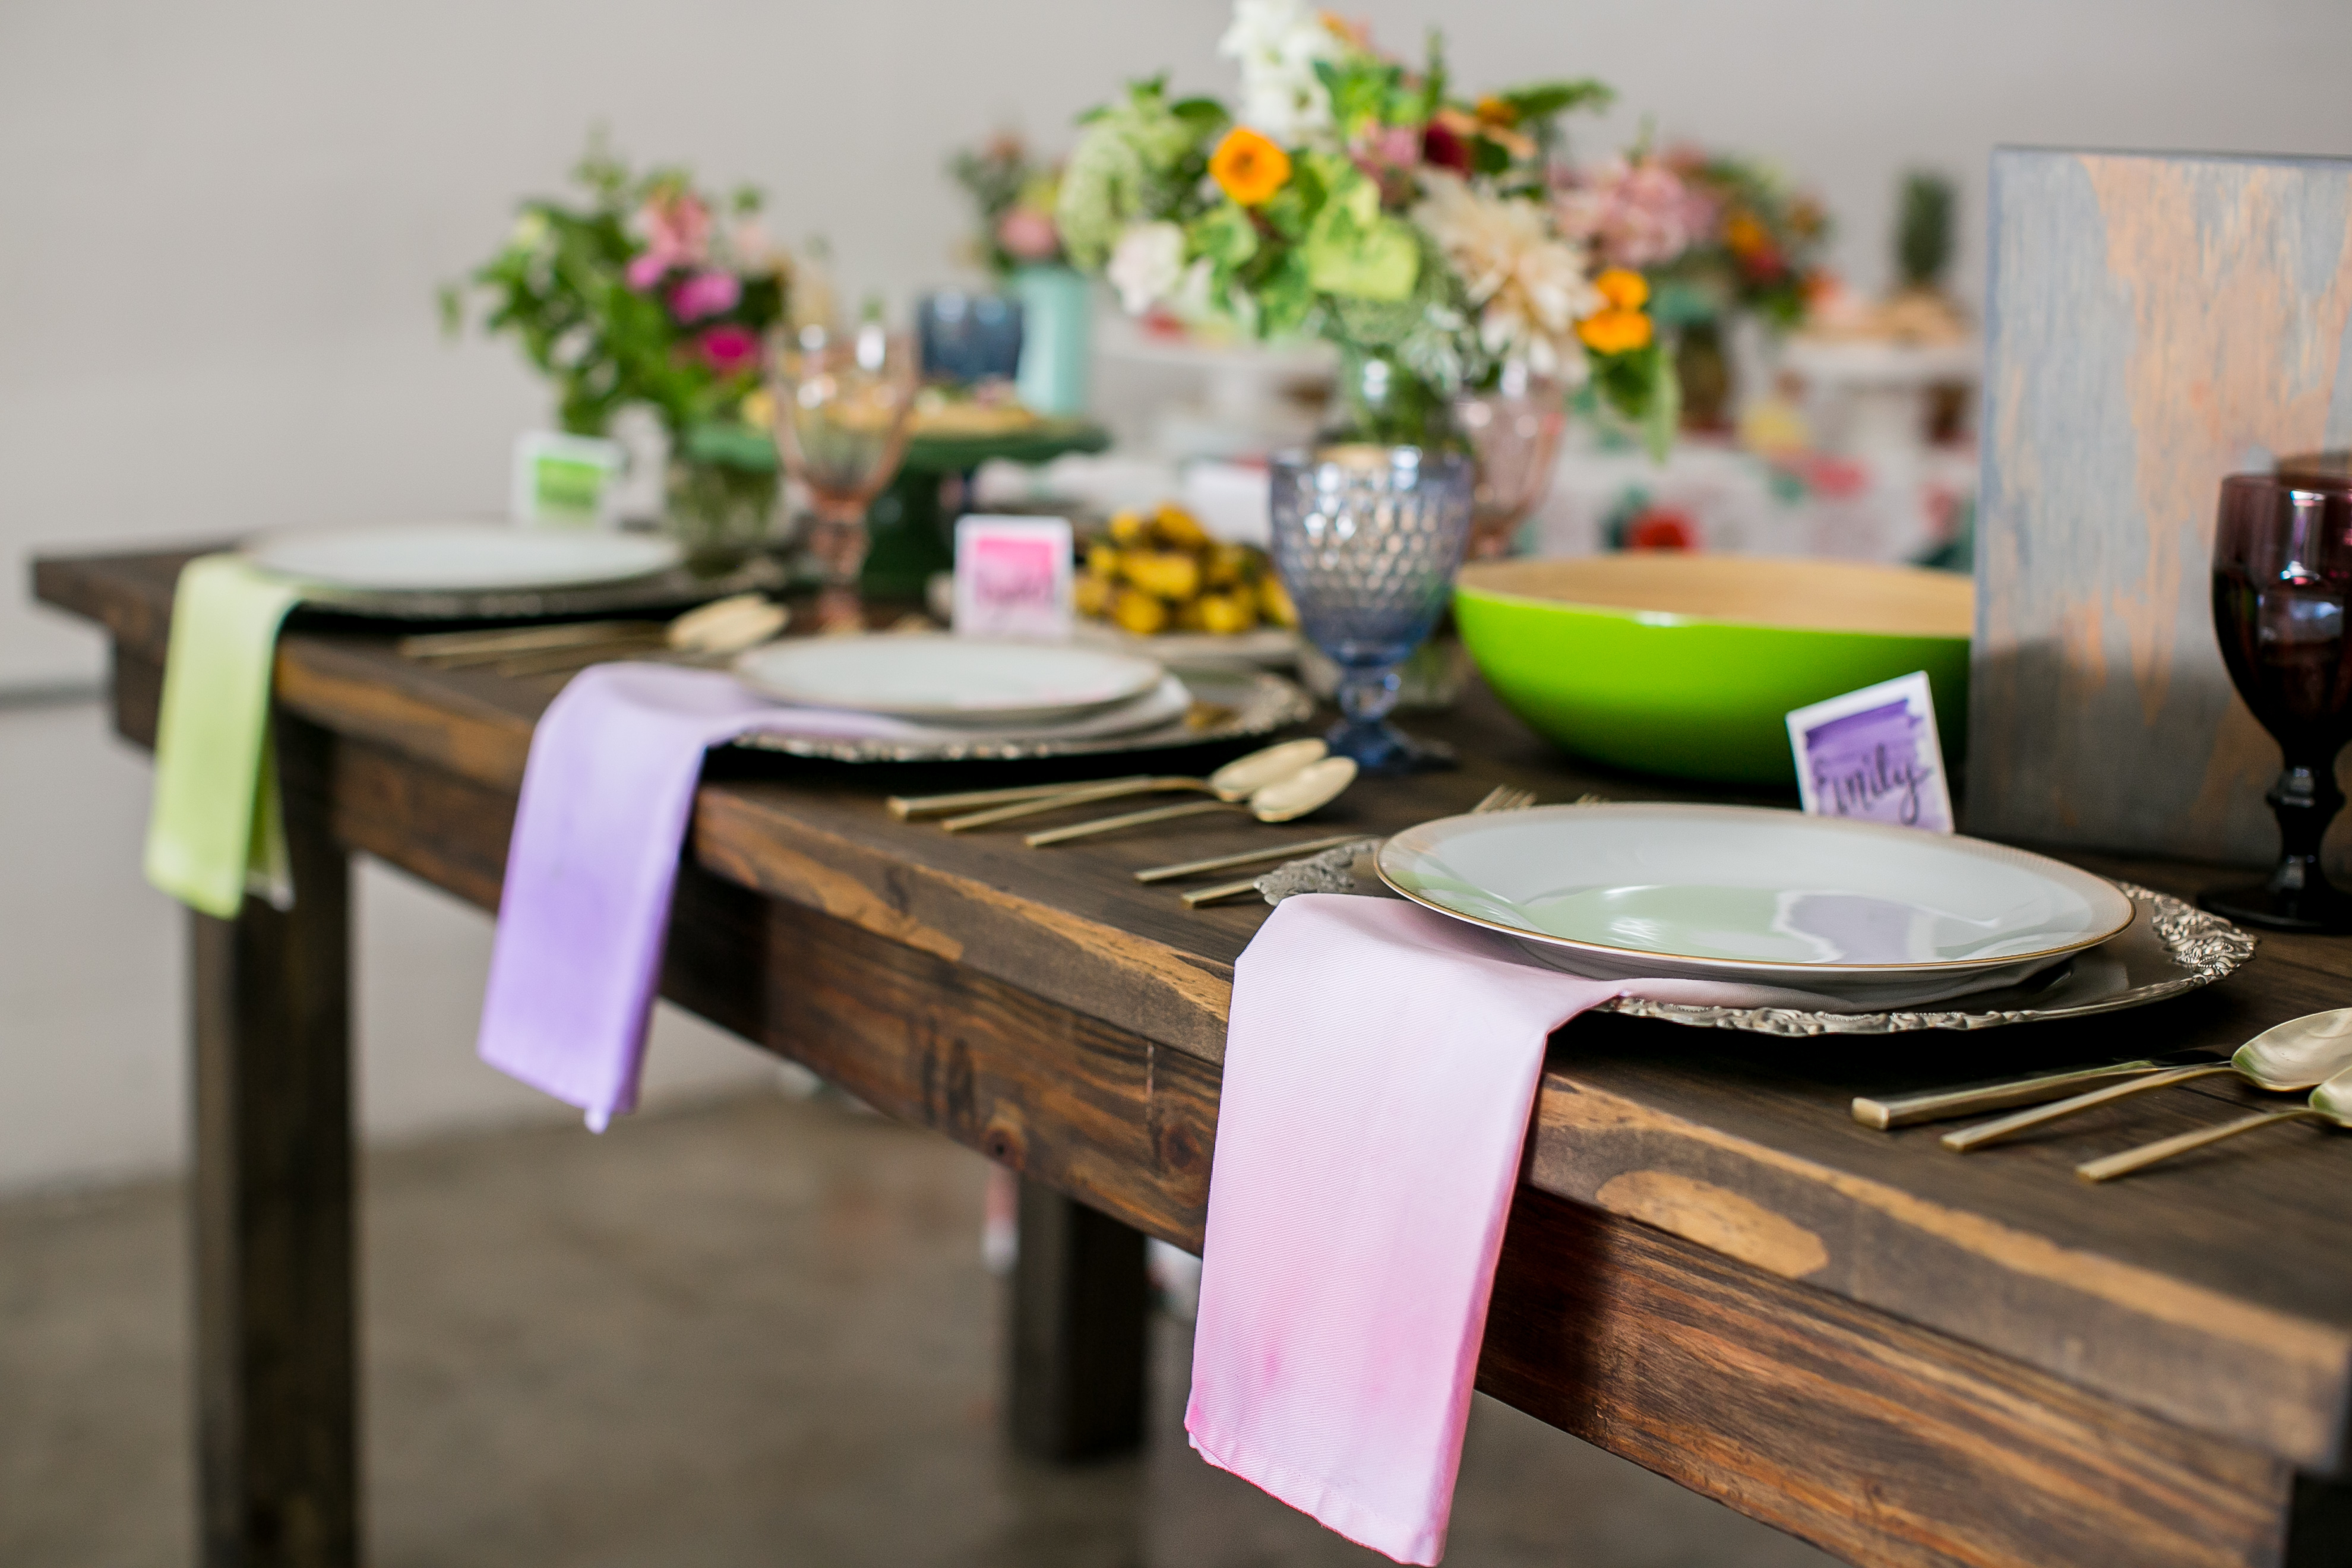
That’s exactly what I did with an amazing group of creatives here in the Central Florida area. I recently had the opportunity to take part in a beautiful collaboration with talented women to create a Summer Floral Party that was flawlessly organized by Melissa Creates.  Teaming up with this fabulous group honestly left me on cloud 9 and in awe with what a group of women can accomplish when we focus on community over competition.  Believe it or not, I also got my husband involved with this collaboration.  Through a wife and husband joint effort, we were able to build the farmhouse table for this party.  I must say, it turned out simply gorgeous!

All images by Rachel V Photography

Entertain your friends this summer with a Floral Summer Party

Now for all the details on how you can create this party yourself.  I’ll be sharing in my post about how you can create ombré napkins and place cards. Seriously, some of the quickest and easiest DIY projects I have done with amazing results.  Once you’re done here, don’t forget to hop around each blog listed at the end of this post to bookmark the recipes, decor, and party tips for all of the ladies involved in this collaboration. You’ll be thrilled when you discover these amazing blogs to start following.

DIY Ombre napkins and place cards

DIY Ombre Place Cards


DIY Ombré Napkins

How to create ombre napkinsSupplies:

Cotton Dinner Napkins || Fabric Paint {I used Martha Stewart multi-surface paint} || 2 Plastic Cups || Flat Paintbrush || Water || Wax Paper || Iron


Fabric paint and napkins to create ombre napkinsThe How- to:

Step 1: Wash your cotton napkins and iron.  This is such an important step that you can’t skip.  Without doing this, the paint will take on the wrinkled pattern rather then have a clean look.

Step 2:  Soak each napkin in water and twist out the excess water.  You’ll want your napkins damp for this project.

Wet your napkins so that they are damp before applying fabric paint.

Step 3: Cut a piece of wax paper bigger than your napkin and place on a flat surface.  Place your napkin on top of the wax paper.

Step 4: Fill one plastic cup with water and squirt a quarter size amount of fabric paint into the other plastic cup.  Start by pouring a small amount of water into the paint cup and mix.  I poured about 1/2 an inch of water to begin with.

Pour a quarter size of paint in a cup before adding water.

Slowly add water to fabric paint

Step 5: Dip the paintbrush into the diluted paint and apply on the bottom of the damp napkin across the width and 2 inches up the napkin.

Start applying paint to the bottom of the napkin to start the ombre look

Step 6: You’ll repeat step 5, but each time you do, you’ll add a little more water to the paint cup.   This will create the ombré look due to the paint color fading as you work up the napkin.  Stop once you paint halfway up the napkin.

Add more water to the paint cup as you paint up the napkin.

Step 7: Repeat for each color/napkin.  Tip: I painted all my pink ombré napkins first, rinsed out my paint cup, and continued with the other colors.

Step 8: Allow your napkins to dry overnight.  Once they are fully dry, seal the paint by ironing each napkin. 

Ombre napkins for a Summer Floral Party

Creating a spring look with ombre napkins

DIY Ombré Place Cards

How to create ombre watercolor place cards

Supplies:

White Cardstock || Scissors || Square Stencil || Watercolor Paint || Small Container for Water || Small Paintbrush || Pencil || Ultra Fine Tip Black Sharpie 

Supplies needed to create ombre place cards

The How-to:

Step 1: Using a square object or stencil, trace as many squares as needed on your cardstock paper.  I used one of my business cards as an easy and quick object to trace.

Trace and cut out your place cards using white card stock.

Step 2: Cut out each square and place to the side.

Step 3: Using a small paintbrush, apply watercolor paint and a very small amount of water to the paintbrush. Apply the paint to the top of a square.  You’ll want the first few strokes of paint to be very thick and vibrant.

Start by applying a thick amount of watercolor paint to the top of your place card.

Step 4: This time only apply a generous amount of water to the paintbrush.  Drag the paint down you’ve already applied on the square by using your water soaked paintbrush,  You will move the paintbrush back and forth without lifting it up.  This will create the desired ombré look.  Repeat with your other colors and cards.

Add more water to the paintbrush and move the paint downward to create the ombre appeal.

Step 5: Allow your cards fully dry. If you’re great at handlettering, go ahead and use your sharpie to write the names on your cards.  If not, lightly use a pencil to write the names in cursive and trace over with a sharpie.  To create a calligraphy font, thicken your downstrokes by drawing a line parallel to your downstrokes. Fill in the space and allow your new thicken line to blend in with your upstrokes.

Create calligraphy by handlettering with a pencil and a sharpie.

Your place cards are now ready to be put on display!

Ombre Place Cards for a Summer Floral Party

Place cards with an ombre effect for a Summer Floral Party

To complete the rest of the look for your Summer Floral Party visit the links below for more gorgeous images, delicious recipes, cocktails, a scrumptious dessert table, and plenty of styling and entertainment tips and tricks.

Summer Floral Party Styled Shoot by Rachel V Photography

Tandoori Chicken Skewers by Love and Zest 

Pisco Punch by The Flair Exchange 

Raspberry Lemonade Cake by The Cumby Cupcake

Grilled Peach Burrata Panzanella Salad by Casa de Crews

Styled Summer Floral Party by Melissa Creates

Summer Floral Party Collaboration

Central Florida Bloggers gather for a collaboration for a summer floral party

Summer Floral Party Vendors

Flowers: Farm Gal Flowers

Chargers and Gold Cutlery: Set Rentals

Table: Elizabeth and Ryan of Within the Grove

Plates and Custom Menu: Oh Deer Creative

Venue: Orange Studio

Custom Cookies: Merci Bakery

Let’s keep in touch!

We have a brand new community over on Facebook, House & Home, where we’ll be chatting, sharing, and helping one another when it comes to home decor and projects. Come join us! Check it out here.

Like on Facebook || Follow on Instagram || Follow on Pinterest

Share this:

  • Click to share on Twitter (Opens in new window)
  • Click to share on Facebook (Opens in new window)

Related

Filed Under: DIY Tutorial, Food, Holiday, Recipe, Small Business

« June 2016 Watermelon Wallpaper // Free Download
DIY // Pineapple Donuts »

Comments

  1. Nichole says

    June 2, 2016 at 8:23 am

    It was so nice to meet you in person!! Your napkins, and place cards were the perfect touch the table needed! I am a semi-homemade kind of gal when it comes to crafting, but both of these projects look simple enough, even for me!

    Reply
    • ElizabethRishel says

      June 7, 2016 at 3:35 pm

      Same to you!! I am thrilled to hear that these DIY projects are simple enough to follow. Thanks for stopping by!

      Reply

Trackbacks

  1. Tandoori Chicken Skewers - love & zest says:
    June 8, 2016 at 10:18 pm

    […] DIY Ombre Napkins and Place Cards by Within The Grove Grilled Peach Burrata Panzanella Salad by Casa de Crews Styled Summer Floral Party by Melissa Creates Summer Floral Party Styled Shoot by Rachel V Photography Picaso Punch by The Flair Exchange Raspberry Lemonade Cake by The Cumby Cupcake Flowers: Farm Gal Flowers […]

    Reply
  2. Pisco Punch Recipe | The Flair Exchange®The Flair Exchange® says:
    June 2, 2016 at 12:14 pm

    […] Ombre Placards : Within The Grove […]

    Reply
  3. What to bring to a #SummerFloralParty: Grilled Peach and Burrata Panzanella Salad - Casa de Crews says:
    June 2, 2016 at 8:13 am

    […] DIY Ombre Napkins and Place Cards by Within The Grove […]

    Reply

Leave a Reply Cancel reply

Your email address will not be published. Required fields are marked *

This site uses Akismet to reduce spam. Learn how your comment data is processed.

Looking for something?

withinthegrove

Time to bet on my DIY skills! I’m attempting to Time to bet on my DIY skills! I’m attempting to make my own cement tiles for our outdoor front door area. Mainly because of what I’m saving vs buying them. Won’t be saving much on time but I’M MAKING TILES! Never thought I’d hear myself say that. Make sure to follow along because if this works out, I have a feeling a lot of you are already eyeing a spot in your home to try your own DIY cement tiles. 
 
Thank you @vintagerevivals and @abby_roadhome for showing it’s possible with your gorgeous bathroom tiles! 

#CementTiles #DiyCementTiles #DiyProject #DIYonABudget #DIYProjects
We got the call that the pool build is starting! W We got the call that the pool build is starting! Which had me scrambling to dig up all the plants that were in the way in an effort to save them. Literally down to the last second before the crew showed up. Exciting day but you know what’s even more exciting? Knowing the next crew will officially be breaking ground with the excavation phase of the build.
This time of year is full of organizing and purgin This time of year is full of organizing and purging to bring spaces back to life. But sometimes all a space needs to feel refreshed is, well, a refresh and a little attention. Your number one requested space was the living room. So I gave mine a refresh with some unique and gorgeous finds from @homesense_us . I found a few fun pots for my houseplants, a gorgeous magnifying glass, and a few other items for our coffee table and couch.

I never know what I’m going to find when I walk into Homesense since it’s always rotating with amazing finds. But I do know I’ll walk out with a few new favorites for my home at affordable prices. If you haven’t yet, I urge you to check and see if you have a Homesense near you! #DiscoverHomesense #HomesensePartner
2022, you were awesome. But I’m determined to ma 2022, you were awesome. But I’m determined to make 2023 even better! And I hope you join me! We can be one of our biggest cheerleaders, but together we’re going to do big things. Go ahead and write down a big, small and a few in-between projects you want to get done this year in your home. Kicking it off with intention and that reminder that we can do this. Ready to get started?! Let me know in the comments the first project you want to tackle!
We finally got the Christmas/winter edition of the We finally got the Christmas/winter edition of the window projection up and running! It was a hit for Halloween and just as fun for this time of year as well. I built frames wrapped with a plastic drop cloth but you can also secure the drop cloth over the windows using command strips. The videos are from @atmosfx and we use a mini projector to play them on the screen. Place a Bluetooth speaker outside and you’re in business! Such a fun addition this time of year for the exterior of your home.
It’s the last little bit of the demo we needed t It’s the last little bit of the demo we needed to do in order to give the green light for the pool to start. And 2,456 pavers later, it’s done! This was exhausting but worth the money we saved doing it ourselves. And why remove them? We’re using a different stone around the pool and we want it to be cohesive up to the house. Don’t worry, someone got one heck of a deal on these pavers, we made a little money, and someone else got them out of our driveway. I’d say that’s a win-win. Stayed tuned for the entire pool process as we enter 2023. It’s going to be pretty exciting to watch!
Our patio space has served us so well over the yea Our patio space has served us so well over the years and now it’s time for a change because we’re getting a POOL!! Sharing this with you makes it even more real because just a year ago I would have told you it isn’t in the cards for us. We’ll be breaking ground soon but first we have to remove the screen enclosure. Spoiler: we won’t be putting one back up around the pool. It has already made the biggest difference visually and SO much natural light pours into our home now with it gone. It’s going to be so exciting seeing this all unfold so stay tuned! Up next: removing the pavers.
This holiday season we were able to travel to my h This holiday season we were able to travel to my hometown for the first time in awhile. We were greeted by the most beautiful sunset on the beach. Fast forward to this week as I headed to @homesense_us for some holiday shopping, and I ended up finding a few pieces for our home that remind me of that core memory on the beach. The beautiful wicker bench caught my eye first followed by the comforter and toss pillows. Everything at amazing price points while not sacrificing style and quality. #HomesensePartner

Mixing a thrill of a find with a core memory, I guarantee you'll fall in love with your home even more as you go to decorate. Decorating your home isn't grasping on to the newest trend or what you think others would do. It's what YOU want to do. And sometimes that's based on an emotional connection. Oh, the stories your spaces will be able to tell as you decorate each one. Start with seeing if there’s a @homesense_us near you! #DiscoverHomesense #HomesenseSarasota
DIY Parchment Paper Village! I wanted to place an DIY Parchment Paper Village! I wanted to place an all white Christmas village in the transom window above our door and knew there could be an affordable way to do it. That’s when parchment paper came to mind. I can can create my own houses that can easily be seen from the inside and outside of our home, the “frostiness” of the parchment paper gives them the perfect amount of glow from the twinkle lights, and I only spent $3 on the paper! Perfect for any window in your home. Love figuring out new ways to decorate this transom window for the holidays. Will you be trying this? Great for a last minute decor idea as well!
Load More... Follow on Instagram

Sign up here to have our fresh posts delivered to your inbox!

Enter your email address:

Delivered by FeedBurner

Copyright © 2023 Within The Grove • Customized by Brave Creative Design · Log in

  • Privacy Policy
  • Terms and Conditions
  • Disclosures + Photo Usage
 

Loading Comments...