• Home
  • ABOUT
  • WORK WITH ME
  • Paint Colors
  • Shop Our House
    • Guest Bedroom
    • Front Living Room
    • Living Room with Fireplace
    • Previous Second Living Room
    • Current Playroom
    • Prior Playroom
    • Dining Room
    • Laundry Room
    • Oliver’s Bedroom
    • Guest Bathroom
    • Covered Lanai
    • Patio
    • Master Bedroom
  • CONTACT
    • Facebook
    • Instagram
    • Pinterest

Within the Grove

Join the list to receive occasional news and special updates!

Install Wall Sconces Without Running Electrical

August 27, 2018

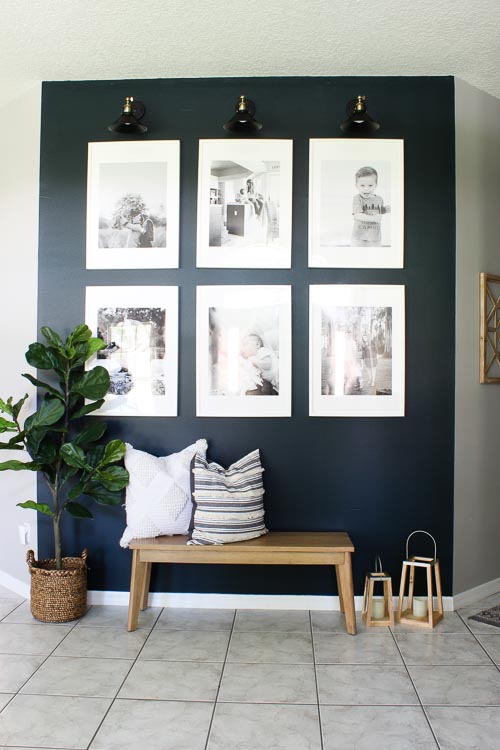
Slowly we’ve been working on our accent wall that greets us right when we walk into our home. So far the easiest part about this project has been picking out the paint color. The most difficult? Figuring out a budget friendly and easy way to hang three wall sconces above the pictures. I quickly came to a solution when Lori of The Finished Project shared Nesting with Grace’s magic light trick. This is where I tell you it’s possible to install a wall sconce without running electrical.

Install Wall Lights Without Running Electrical || Within the Grove

What is this magic light trick I’m speaking of? It’s where you can place a sconce light anywhere in your home without running electrical to have it hardwired. Sound too good to be true? We’ll here’s the secret: you attach battery operated puck lights inside each sconce as your lighting! This was a quick and affordable solution to our problem. It’s also one that doesn’t have to be permanent if we ever decide to change this space.

Install Wall Lights Without Running Electrical || Within the Grove

We’d love to show you how and what we did to create this look while spending under $100 for all the materials and successfully hanging three lights.

Install Wall Lights Without Running Electrical || Within the Grove

Materials:

  • Light fixtures of your choosing
  • Velcro (that can hold more than 3 pounds of weight)
  • Battery operated puck lights 

The three things you need to install wall lighting without running electrical. || Within the Grove

The How-To:

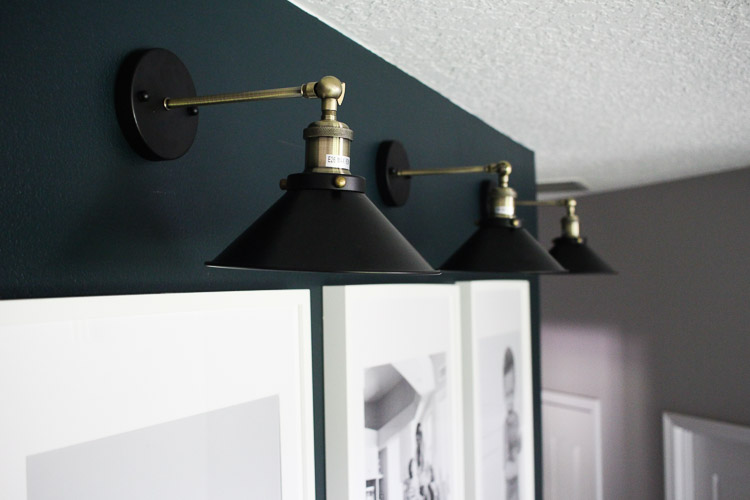
If you haven’t already, pick out the light fixtures you want to use. We went with these industrial wall sconces found on Amazon for under $22.

Using industrial wall scones for your gallery wall || Within the Grove

Installing the puck lights will only take a minute. Using the Velcro fasteners, attach one piece on the back of a puck light and cover the light bulb socket inside the light fixture with the other piece. Make sure to use Velcro that can hold more than 3 pounds of weight just to be safe. You may also have to trim the Velcro to fit the back of the light and the inside the light fixture.

How to attach puck lighting to scones. || Within the Grove

You’ll secure the puck light by pressing the two pieces of Velcro together and watch the magic happen with just the click of your remote. That’s it! Of course, you can purchase the ones without the remote but you’ll be standing on a chair or step ladder to turn your lights on and off depending on how high they are on the wall.

Using puck lighting in a wall scone to avoid running electrical. || Within the Grove

As far as installing the sconces on the wall, every light fixture will be different depending on the hardware, but also generally the same. Watch my video below to see how we attached our wall lights to the wall using just two drywall screws and bolts.

When I said this was easy, I really meant your little one can even help you install the puck lights. This magic light trick is a game changer when it comes to adding lighting in your home. Maybe you didn’t have the budget to have new lighting hardwired, didn’t want to make something permanent, or didn’t really think of placing wall lights in your home before. But with this lighting resource, you’ll be walking around your home trying to figure out where you can add lighting where you never thought was possible.

Installing lighting on gallery wall || Within the Grove

*Post contains affiliate links.

Let’s keep in touch!

We have a great community over on Facebook, House & Home, where we’ll be chatting, sharing, and helping one another when it comes to home decor and projects. Come join us! Check it out here. 

Like on Facebook || Follow on Instagram || Follow on Pinterest

Share this:

  • Click to share on Twitter (Opens in new window)
  • Click to share on Facebook (Opens in new window)

Related

Filed Under: DIY, Our Home Improvements

« How 10 Different Stains Look on Different Pieces of Wood
Three Things to Consider When Choosing Siding for Your Home »

Comments

  1. Debbie says

    October 12, 2018 at 11:48 pm

    Hi. Awsome idea. I’d so love to try this above our headboard for reading. But do you think that’s enough lighting for reading in bed (is 20 lumens the same as watts?)?

    Reply
    • ElizabethRishel says

      October 15, 2018 at 11:51 pm

      Hi Debbie! I think it would depend on a couple things. For example, if the light is just above the headboard it would probably be bright enough. Not the brightest, but would allow you to see. 1 lumen gives off the same light as a birthday candle. So take that times twenty for the brightness. I hope this helps!

      Reply
  2. Shauna says

    September 26, 2018 at 9:24 pm

    This looks fantastic. Great idea!

    Reply
  3. Suzette says

    September 14, 2018 at 6:26 pm

    I don’t understand how you would use a remote to turn them on. Could you please explain? Thanks

    Reply
    • ElizabethRishel says

      September 14, 2018 at 8:35 pm

      Hi Suzette! I would love to help! These particular puck lights are wireless puck lights that came with a remote to turn them on and off. Of course, you can purchase puck lights without a remote and you just have to press each one to turn them on and off. I hope this helps!

      Reply
  4. Pat says

    August 27, 2018 at 2:27 pm

    What a great way to be greeted when walking in to your home! I can’t wait to try this idea. Thanks for sharing!

    Reply
    • ElizabethRishel says

      August 27, 2018 at 2:36 pm

      Hi Pat! Thank YOU for stopping by! Please share when you do. I’d love to see how you try this in your home.

      Reply

Trackbacks

  1. 7 Rekomendasi Warna Cat untuk Dinding Rumah - Depo Semut says:
    December 16, 2020 at 9:44 pm

    […] Image by Within The Grove […]

    Reply
  2. 効果的な照明で部屋をおしゃれに一変させる方法 | zubora-beauty 大人女性のきれいな暮らし says:
    June 4, 2020 at 7:02 am

    […] credit:http://withinthegrove.com […]

    Reply
  3. Optez pour un mur de cadres – FANNY PATUREL says:
    October 28, 2019 at 12:41 pm

    […] Source : Withinthegrove […]

    Reply
  4. Home Projects from 2018 - Within the Grove says:
    December 31, 2018 at 12:08 am

    […] This navy wall is something I would do over and over again. We love it! It has actually made us realize our design style and we’ve started using darker hues throughout our home. See more of the wall here and how we installed the lights without running electrical. […]

    Reply

Leave a Reply Cancel reply

Your email address will not be published. Required fields are marked *

This site uses Akismet to reduce spam. Learn how your comment data is processed.

Looking for something?

withinthegrove

The waterline tile and decking are both done! With The waterline tile and decking are both done! With the limestone making the biggest difference with this pool update. It’s stunning!! Very exciting to see our entire pool area installed. We’re almost there!! Just the interior finish to go and then it’s time to fill the pool. 

•Pavers are limestone in Myra White 
• If you’re local to Central Florida, @caapavers installed ours! 
• Waterline tile is by NPT in the color Carbon.
DIY TILE REVEAL! The front door is styled and now DIY TILE REVEAL! The front door is styled and now taking the time to soak these tiles in! I kept it simple with the decor and took away the rug. If you've been here for a little bit, you know I love to place a rug underneath my wooden doormat. But letting these tiles SHINE is a must. Still can’t believe I made these! Head to the last image. I installed an imperfectly perfect tile as a little nod to these being handmade. DIY tile blog post coming your way soon! Grabbing packages from my front door just became even more exciting. 

Front door color: Black Magic by Sherwin-Williams
House Color: Cloud White by Benjamin Moore
Decor: You can find it on my LTK through my profile!
Right when we thought the pool excavation day was Right when we thought the pool excavation day was exciting, the gunite was installed! We’re about halfway through the pool build and we officially have the shell of the pool done. This all happened so fast. I’m talking about two weeks. The waterline tile and decking up next!
This will forever be a project where I will say: “ I MADE THESE TILES!” What would have cost me close to $2,000 to buy, I was able to make them for $350. I started experimenting with how to make them and nailing down the perfect black color 8 weeks ago. Let that sink in! This has been such a labor of love. 20 hours went into making the tiles. Two weeks worth of demo + installation. And a lot of learning curves in between. This project is so much more than saving money. It’s the process I went through and what I pushed myself to learn and do to get to this moment. We can do hard things!! Cheers to this project being done. How about we make a front door next? JUST KIDDING!! But a new front will be happening!

Thank you @vintagerevivals for showing that making cement tiles is a project one can tackle and @abby_roadhome doing the same with this amazing pattern!
The tiles are in place! 🎉 I’m not done yet bu The tiles are in place! 🎉 I’m not done yet but this is certainly a part of the project that needs to be celebrated. Grout is up next to call this project a wrap. It has been a process but one of the most rewarding ones when it comes to projects I’ve tackled in our home.
IT IS TIME! I have been waiting for this moment to IT IS TIME! I have been waiting for this moment to smash these front door tiles ever since we moved in. And it felt so dang good! Here’s what I’m doing to prep the concrete slab for the tile install: 

1. Remove old tile
2. Use an angle grinder with a diamond grinding blade to remove the thin set and paint. 
3. Wash the slab
4. Apply two coats of Hydro Ban to create waterproofing barrier from the moisture in the concrete slab and to help with crack isolation.
Another exciting step for the pool: Excavation day Another exciting step for the pool: Excavation day! We officially broke ground. It was the coolest thing to watch. Rebar and gunite up next.
250 cement tiles made!! 20+ hours went into making 250 cement tiles made!! 20+ hours went into making these tiles and we’re going to celebrate making it to this point! I questioned myself during the last push when molds started failing, tiles weren’t turning out, and I was just flat out tired. If there’s a project to test patience, this is the one. But want to know the craziest part? I’d do it all over again. What an awesome process being able to make my own tiles. And the part we’ve all been waiting for is coming up next: INSTALL!! Tiles, don’t fail me now.
This pretty much sums up the progress of making 25 This pretty much sums up the progress of making 250 cement tiles. But I’m halfway through! The moment I finish the last tile is the moment I knock out the old tile. Let’s do this!
Load More... Follow on Instagram

Sign up here to have our fresh posts delivered to your inbox!

Enter your email address:

Delivered by FeedBurner

Copyright © 2023 Within The Grove • Customized by Brave Creative Design · Log in

  • Privacy Policy
  • Terms and Conditions
  • Disclosures + Photo Usage
 

Loading Comments...