


When using stain on wood, it’s just as magical as it is tricky. You see, you may fall in love with the stain color shown on the can, but it may end up looking completely different once you apply it on a piece of wood. Why does this happen? Depending on the type of wood you’re staining, the color of the stain can change. You have to take into account the hardness and undertones of the wood you’re using. Both of these things affect the stain color. I’m hoping today I can save you a headache and a lot of time by showing you 10 different stains and what they look like on 4 different types of wood that you can find at Home Depot and Lowe’s.

Use this post as a guide for your next project as you’re picking out the best shade of stain to use. We tested a variety of natural, light, medium, and dark stains on pine, poplar, whitewood, and red oak to give you plenty of options. Don’t let another project upset you because the stain you thought you would love, you ended up not liking at all. And before we get started and as a quick tip, we used a pre-stain wood conditioner on each piece to help prevent any blotches when applying the stain.
1. Minwax Pickled Oak
If you’re wanting to preserve the natural wood color (and possibly go even slightly lighter), I recommend using Pickled Oak. It brought out the natural tones while slightly lightening each type of wood piece. It also appeared to make the wood look softer. This is a great stain to have on hand!

2. Minwax Weathered Oak
Weathered Oak is generally used as a lighter to medium stain color. It pulls hints of gray which helps to give it the weathered look. If you’re wanting to go slightly darker than the Pickled Oak or wanting stain with hints of brown and gray, you should probably give Weathered Oak a try.

3. Minwax Classic Gray
Every single piece of wood took on a gray hue including the red oak. This Classic Gray stain creates the perfect weathered look without over-saturating with too much gray. Which also means the wood grains still show through the stain color. Classic Gray tends to be slightly blotchy so make sure to use pre-conditioner with this stain color.

4. Varathane Sunbleached
I’ve never used Varathane’s Sunbleached before and all I kept thinking of was bleaching wood furniture. To my pleasant surprise, it did lighten the wood with hints of white and gray once I applied it to the pieces of wood. This stain truly softens the wood tones and creates a calming feeling. If I had to choose, the poplar is my favorite. This stain is a gorgeous color!

5. Varathane Briarsmoke
Briarsmoke is my long lost medium stain that I’ve been searching years for. It’s my go to stain because of the brown and gray undertones you see once it’s applied. At least with the whitewood, pine, and poplar pieces. And to be honest, on the pine it looks like a true brown without as much gray. You’ve got to give this stain a try!

6. Minwax Golden Oak
Golden Oak is a great medium color to use when you don’t want to go too light or dark. At times it seems to pull brown undertones while other times I see yellow. Just use with caution if you’re wanting to stay more on the brown side of stain. Otherwise, it’s a great medium stain to use that also allows the wood grains to still show through.

7. Minwax Special Walnut
If you’ve never heard of Special Walnut, you won’t forget it now! Special Walnut is one of the go-to brown stains that isn’t too dark. You can see that this stain consistently pulls a brown hue with the exception of the red oak for obvious reasons. I tend to view Special Walnut as a lighter brown stain.

8. Minwax Early American
From the results on the pieces of wood, Early American is a muted brown stain that can show a gray undertone. In other words, it isn’t a bold brown yet a subtle brown that can be perfect for that dresser you’ve been wanting to stain. This isn’t the color I expected at all when looking at the color on the front of the can.

9. Minwax Provincial
Look no further if you’re wanting a stain that’s a dark brown without going too dark. This is the sister to Early American where it takes the stain color just a shade or two darker and minus the gray.

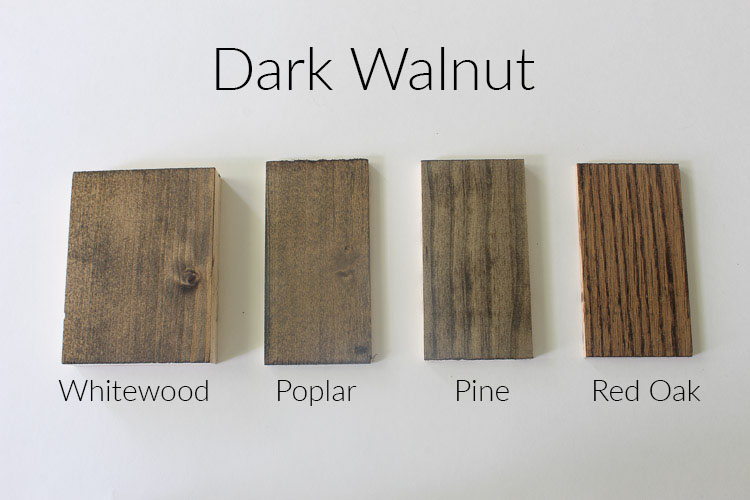
10. Minwax Dark Walnut
Dark Walnut is a favorite among many when it comes to using a dark brown stain. It doesn’t lean towards being red at all and has a beautiful richness to it. If you’re wanting to go even darker than this, I recommend trying Jacobean.
Now that we’ve explored all 10 stains on pine, poplar, red oak, and white wood, I have one more thing to share with you. I thought it would be great to show you all the stains on the same piece of wood so you can easily compare them. This is something great to pin if you know you’re going to be working with pine, for example, and you need help deciding on the best stain color for your project when it comes to pine.
Red Oak

Poplar

Whitewood

Pine

I truly hope this post is beneficial for you as you start to tackle your next project that involves stain. It should save time, headache, and help you come to a quick decision on which stain you want to use. And who knows, maybe today you discovered a new favorite stain color. For me? Briarsmoke, Special Walnut, and Sunbleached are three of my favorites!
Let’s keep in touch!
We have a great community over on Facebook, House & Home, where we’ll be chatting, sharing, and helping one another when it comes to home decor and projects. Come join us! Check it out here.
Like on Facebook || Follow on Instagram || Follow on Pinterest

Thank you so much for these comparisons. You helped me select a color for my poplar wood project.
THANK YOU! I’ve often gotten results that didn’t even close to what was expected due to different wood types. This will save me from yelling curse words and having to buy 4 different samples to try and the sanding to remove it.
so good. thank you so much for putting this together!
Thank you so much, this was very helpful
this was great! thank you
What Scott said…lol! This was very helpful. Thank you!
고양이 발정기
How 10 Different Stains Look on Different Pieces of Wood – Within the Grove
파라오카지노
How 10 Different Stains Look on Different Pieces of Wood – Within the Grove
더나인카지노
How 10 Different Stains Look on Different Pieces of Wood – Within the Grove
릴게임사이트
How 10 Different Stains Look on Different Pieces of Wood – Within the Grove
เล่นสล็อต
How 10 Different Stains Look on Different Pieces of Wood – Within the Grove
노견
How 10 Different Stains Look on Different Pieces of Wood – Within the Grove
강아지 눈물
How 10 Different Stains Look on Different Pieces of Wood – Within the Grove
라이브카지노
How 10 Different Stains Look on Different Pieces of Wood – Within the Grove
소형 강아지 종류
How 10 Different Stains Look on Different Pieces of Wood – Within the Grove
릴게임 야마토
How 10 Different Stains Look on Different Pieces of Wood – Within the Grove
더킹카지노주소
How 10 Different Stains Look on Different Pieces of Wood – Within the Grove
[…] Apply stain on the sides, top, and bottom of the faux shelf. I tested three different stains and ultimately went with Flagstone by Varathane. Let me tell you, my friends, it’s my new favorite stain color! It’s the perfect balance of being a natural wood color mixed with a hint of brown. Perfection. Of course, this stain will look different on different types of wood. You can see the blog post where I chat all about that here. […]
FANTASTIC comparisons! This is so straightforward and easy to consume without having to read a novel between each picture. You let the pictures speak for themselves. And I certainly appreciate you clarifying the brands of stain you used. It’s great being able to see how the same stain will react on different species of wood, but following it up with a comparison of the individual wood species and all the stains is brilliant. Kudos to you for the work and time you put into this.