


DIY Faux Floating Shelves


At some point in time, I’m sure we’ve all come across closets that are full of those glamorous wire shelves. You know the kind I’m talking about! The white ones where things either fall through, don’t stand up straight, the dust gets in all the little areas, and they overall just aren’t that great to look at. I mean, let’s just take a look at my laundry room closet that also needs a lot of attention when it comes to organizing it as well.

I have a love/hate relationship with wire shelves. In other words, I love to hate them. Especially since it lead me to try the best hack yet in our home: building faux floating shelves that slide right over the existing wire shelves. Without having to remove a single wire shelf, I created the look of wood floating shelves that completely transformed this closet.


This stunning hack is renter and homeowner friendly that will have you running to your local home improvement store today to give it a try. So, are you wondering how you can spend less than $50 and get rid of the wire shelves haunting you in the closets of your home? Buckle up, this diy is a good one!

Materials
1/4 inch sheet of plywood – I was able to use a 4′ x 8′ sheet for all 5 shelves
1″ x 3″ pine – I bought mine in 6′ sections. You want to make sure you have enough to go the width of each shelf in the front.
Brown general purpose paper
Marker
Scissors
Jigsaw
Tape measure
Miter saw
Router
Wood glue
Brad Nailer
1″ nails for brad nailer
Stainable wood filler
80 grit and 220 grit Sandpaper
Stain – I used Flagstone by Varathane
Polycrylic in Satin
** This post contains affiliate links.
The How-To
Before we dive all in, I want to explain this shelf and how it’s concealing the wire shelf. We will basically be using plywood to place on top of the wire shelf with a pine board attached to the front of the plywood. This front piece will conceal the front part of the wire shelf giving it the illusion of a wooden floating shelf. Are you still with me? Okay, great! Here’s how to create the faux wooden shelves and to have them fit perfectly.

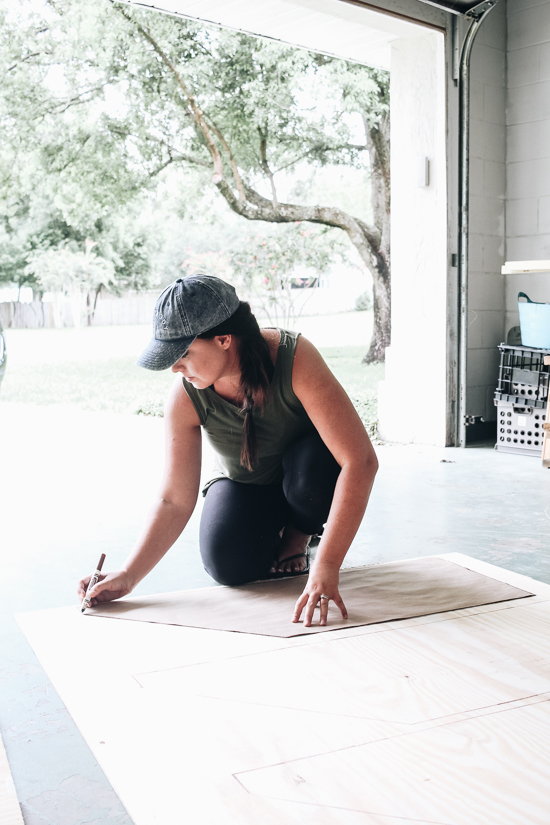
The first thing you’ll want to do is take the measurement of each shelf by measuring the width and depth. I saved myself a little time by getting the exact measurement of each side of one shelf and creating a cut out of those measurements with shipping paper. I made sure my cut out stencil aligned with every shelf.

This is where you’ll grab your 1/4″ piece of plywood and trace however many shelves you have using your stencil. Keep in mind, to have the grain going the same way when tracing the top pieces. I had to get creative with mine so they didn’t all line up the same way but I was okay with that!

It’s time to cut out your top pieces. Clamp your piece of plywood down securely and using a jigsaw, slowly cut out each piece. You’ll want to take your time with this step so that you cut straight sides. Of course, you can use a table saw for this step as well just in case you don’t have a jigsaw. Give the edges a quick sanding after you’re done cutting them out.

Before I attached the front piece, I did a dry fit with each top piece on a shelf. I was battling the brackets of the wire shelves so I had to slightly cut the width of each wooden shelf slightly for that snug fit. You’ll also want to number your shelves so you know which wire shelf it goes to.
Front the front piece, measure the width of each shelf individually and cut the piece of 1 x 3 pine accordingly. Keep the front piece and shelf paired together so you don’t get them mixed up which could result in a not perfect fit. Using a router, you’ll route a ledge along the top, backside of each piece of pine board.

You’ll want to route the pine board about half the width and at the same depth of the piece of pine wood. This will ensure that the plywood will be flush with the pine board once they’re placed together. This is the ledge where you’ll be placing the plywood piece on top of. The goal? To hide the piece of plywood from the front to help give the illusion of an actually floating shelf.

It’s time for the moment we’ve all been waiting for: piecing the faux floating shelf together. You’ll apply wood glue along the ledge, put your piece of plywood in place, and secure it using a brad nailer and 1″ nails. You’ll place a nail going from the top of the shelf into the piece of plywood that will then go into the pine board. Place a nail every 8 inches or so.

Once the wood glue fully dried, I filled in the nail holes with wood filler. Pro tip: make sure to use wood filler that is stainable! This is also a great time to fill in any gaps where the plywood and pine board meet. I let my wood filler cure and harden overnight. I then gave my shelves a good sanding using 80 grit sandpaper for the initial sand and a 220 grit sandpaper for the smooth finish. Make sure that you have smoothed out all of the wood filler so that when you go to stain it, it doesn’t even look like it was ever there.

Apply stain on the sides, top, and bottom of the faux shelf. I tested three different stains and ultimately went with Flagstone by Varathane. Let me tell you, my friends, it’s my new favorite stain color! It’s the perfect balance of being a natural wood color mixed with a hint of brown. Perfection. Of course, this stain will look different on different types of wood. You can see the blog post where I chat all about that here. You can also seal your shelves by applying two coats of polycrylic in clear satin. Make sure to lightly sand between each coat.

Now you get to run to the closet you’re making over and install your new floating shelves by simply sliding them over the wire shelves. That’s literally all you’re doing but it looks like you ripped out the wire shelves and installed actually floating shelves (which is a whole other type of DIY). It takes seconds and it completely transforms your closet.


I was utterly shocked by the difference it made in ours. I couldn’t wait to get it organized and did just that with our laundry room refresh to get it functional and organized.

I can’t wait to see you try these in your home! You can also check out my video here over on Instagram where I walked you through every single step I shared with you here. This is perfect for anyone that is a visual learner like me! I’d love for you to tag me in your projects so I can celebrate you turning your house into a home that you love!

Let’s keep in touch!
We have a brand new community over on Facebook, House & Home, where we’ll be chatting, sharing, and helping one another when it comes to home decor and projects. Come join us! Check it out here.
Like on Facebook || Follow on Instagram || Follow on Pinterest

Hi, I just came across your tutorial on covering wire shelves! It’s awesome???? Just wish I could operate all those tools you used. Also wanted to say you have a beautiful home and love all the paint colors you used. They all flow together pretty smoothly????
I can’t wait to try these wire shelving covers. We are building a new house, and they come with wire racks.
Loved this so much I had to do it!! It looks amazing! Thanks for the in depth tutorial!
[…] if you’re happy with the current number of shelves in your linen closet, check out Within the Grove’s faux floating shelves tutorial. She covered her wire shelves with plywood to get a very similar […]
I love this and can’t wait to make them for my pantry. I just had a question about the brackets on the side. my wood won’t sit flush against the wall because of the brackets. my brackets are not flat therefore part of the sides are exposed. is there a way to work around that?
Hi! Great question! Are you referring to the brackets being slightly higher (not level) with the wire shelving? If so, ours are similar and we got the wooden shelf as close to the wall as possible. Once everything was in place, we haven’t even noticed!
How do you route the plywood?
[…] linen closet on Instagram and mentioned that I didn't love the shelves. A follower sent me this ah-mazing tutorial from Liz at Within the Grove. I knew I had to do something similar in our […]
How so you get the shelves to go in when the doorframe is smaller than the closet width?
where did you buy that flooring? love it!
Can you please telL me what to do with the brackets that hold up the shelves?
[…] Wire Shelving Faux Floating Shelves from Within the Grove […]
Does anyone make these for purchase??
So are the faux shelves secured to the wire shelf or just sitting on top?
They just rest on top of the wore shelves.
Wire…..
[…] I came across a fairly inexpensive way to cover up wire shelving. Liz from Within the Grove made DIY Faux Floating Shelves that are so easy and beginner […]
This is the best hack I’ve come across! Love it. Thanks for sharing. Will be doing this to my closet.
Do you have to make the line with the router? Trying to figure out if it’s necessary since I don’t own one…
[…] and re-install them, but that was another project doomed for the Pinterest graveyard. So when I saw this awesome makeover from Within the Grove, I opted to DIY some wire shelf overlays […]