


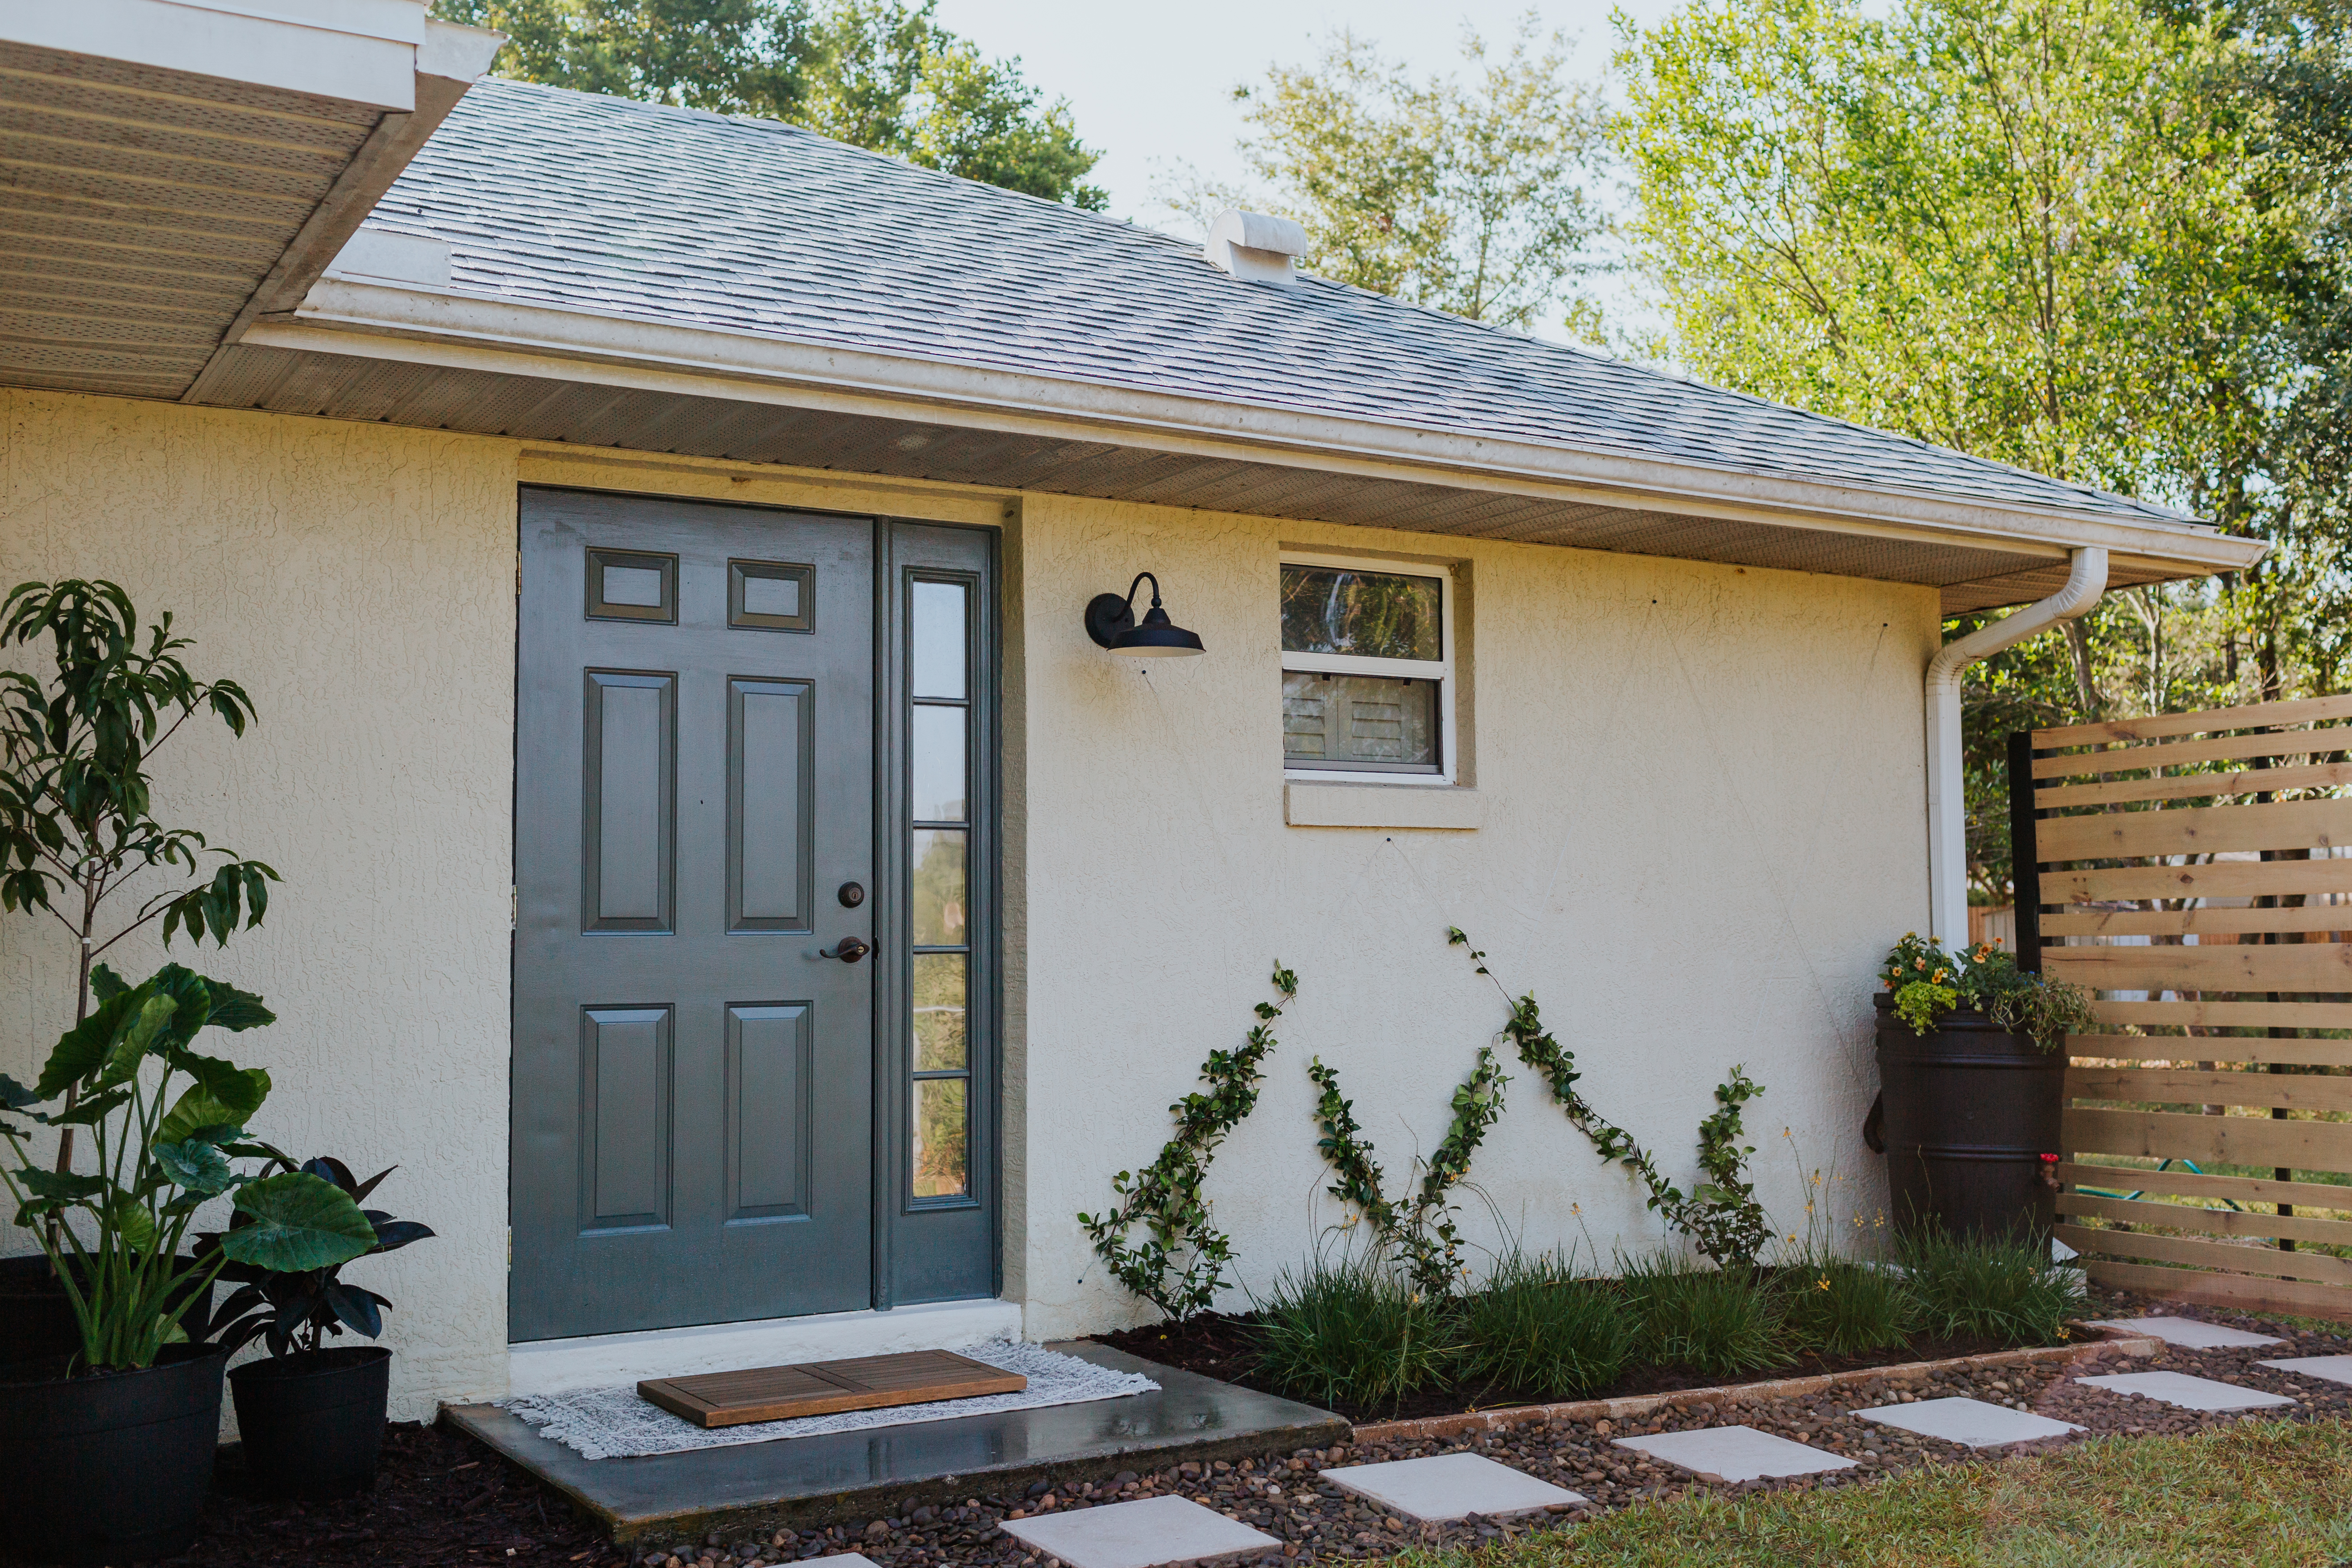

I had been dreaming of the day when I could finally create a DIY diamond trellis on an exterior wall of our home. I absolutely adore the look of a wire trellis and think they add so much character to a home. I finally found the perfect spot and made it part of this bigger project.

Using confederate jasmine, it turned out exactly how I envisioned it. And the best part? After knowing exactly what we needed to do, it was a 30-minute project from start to finish. And let’s not forget, pretty budget-friendly! Let’s dive into how you can create a wire diamond trellis on the exterior of your home. Keep in mind this tutorial is for a stucco home but you’ll get a general idea. Wanting to save this project for later? Make sure to pin it!
Picking the Best Vine for a DIY Wire Trellis
I chose confederate jasmine because I wanted something simple and lush, that would also grow fairly quickly. But there are so many different kinds of climbing vines that would work for this project. I recommend heading to your local garden nursery and asking for advice to find the best climbing plant for your vision and your climate.
Some of the most common climbing vines used for this kind of project are creeping fig, trumpet vine, jasmine, mandevilla or bougainvillea – just to name a few!
What You’ll Need for a DIY Diamond Trellis
- Hammer Drill (makes it easier to drill into stucco)
- Drill bit slightly smaller than your concrete screws
- Concrete screws
- Galvanized wire
- Confederate Jasmine (I found ours at Home Depot)
- Marker
** Some of these links are affiliate links. Thank you for supporting this blog of mine to make content like this possible!

How to Make a Diamond Trellis with Wire
Step One: Planning the Design
Before we even drilled our first hole in the wall, we sketched out an image of our wall. This helped us figure out exactly where we wanted to place the screws to create the diamonds. There’s a small window we had to work around so this helped tremendously. Refer to the image below (the white circles) to see where we placed our screws.
We wanted to create fairly large diamonds to fill up the space, but you can use any diamond pattern you want. A series of smaller diamonds would also look really pretty!

Step Two: Adding the Screws
Using a marker, we marked where we needed to drill a hole for each screw. Using a hammer drill with a drill bit meant for concrete, made it 10 times easier to drill into the stucco. You want your drill bit slightly smaller than the concrete screw you’ll be using.
If your house is not stucco, you’ll need to use a different kind of screw and drill bit. Make sure to do some research to determine the kind you need for your home’s exterior surface.

Once you have your holes drilled, you’ll screw in the concrete screws. Don’t screw them in all the way. You want them slightly sticking out so you have something to wrap the galvanized wire around.
Step Three: Attach Your Wire to the Screws
Starting with the bottom left screw, wrap the wire around it several times so that you know it won’t go anywhere. From there, take the wire to the upper concrete screw that’s at a diagonal and wrap the wire around this screw a few times. Refer to the image below to see the order in which I wrapped my wire. Side note: it was two different pieces of wire I used.

Step Four: Plant Your Climbing Vine
Now that the DIY wire trellis is ready, you’ll plant confederate jasmine (or whatever climbing vine you choose) in front of each screw at the bottom of the trellis. I didn’t plant one on the far right because of the rain barrel blocking that spot.
I found that it’s best to purchase confederate jasmine that’s already on a mini trellis. They’re going to have an abundance of long vines to give you a great start. Once planted, you’ll wrap the vines that can already reach the wires around the wire itself.

That’s it! It’s a very budget-friendly and quick project that you can do in an afternoon.
Training Your Vine
While climbing plants will climb all on their own, you’ll want to pay close attention to their growth and movement over the first few months especially. Some plants need a little extra training to wrap around and grow along the DIY diamond wire trellis.
As your vine grows, you can train it in a few ways:
- Simply wrap the vine around the trellis every once in a while to ensure that it is moving up the wire.
- Use plant ties to help the plant grow in the pattern you want. Simply use the ties to attach parts of the fine to the wire as it grows. You can remove them later or leave them if the vine’s leaves cover it.
Maintaining Your DIY Diamond Trellis Wall
Now that we’ve lived with this diamond trellis wall for several years, I’ve learned a lot about getting it to grow well and keeping it looking beautiful.
Understanding how to properly water your climbing vines is an important part of maintaining the trellis wall. The confederate jasmine I used grows well even if it doesn’t have access to enough water because they are drought tolerant (perfect for the hot Florida summers!). Still, it thrives when it’s being properly watered.
Confederate jasmine do best with consistent, deep watering rather than frequent shallow watering. Only water your plants if you notice that the soil is dry and crumbling. Then, water the soil so it saturates the ground deeply – about 5-6 inches from the surface of your garden bed.
Water them every 10 days to 3 weeks, depending on the weather. If it’s a very hot season, you’ll want to water them about twice per week. But make sure to check the soil first to determine if it really needs watering.
It’s also so important to continue to maintain this trellis by always checking it for vines that have grown that you can wrap around the wires. You’ll also want to trim the vines once they reach the top and have nowhere else to go. Otherwise, they’ll start to grow on your home and roofline.

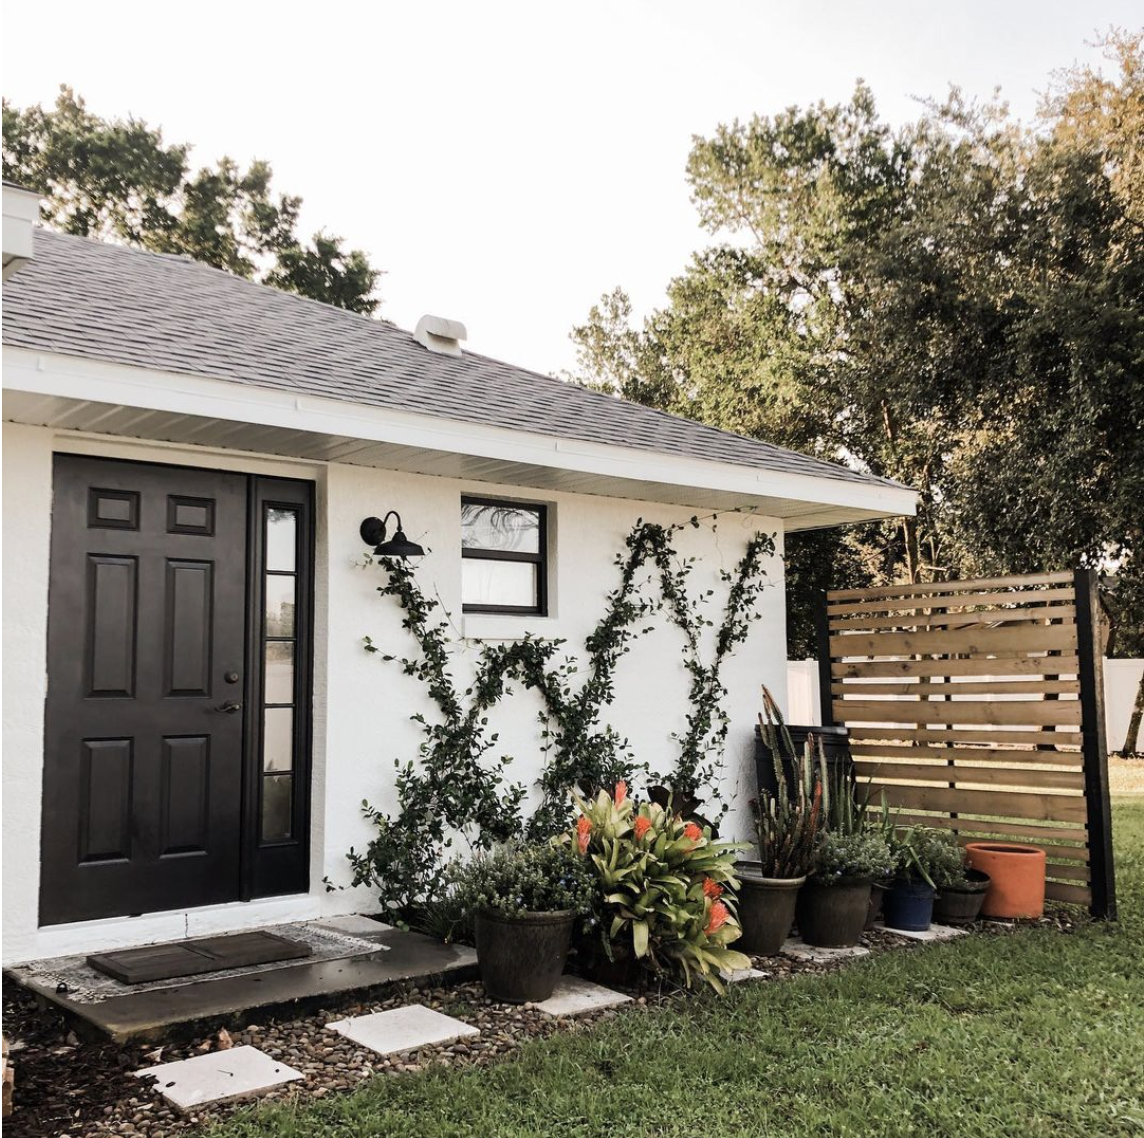
UPDATE: This is what our trellis looks like about 2 months later!
Depending on your climate, it usually takes one to two growing seasons to see it fully grown in. For us, it took about a year and a half to completely fill in and they’re still going strong many years (and an exterior house painting project) later!
FAQs About Installing a DIY Wire Trellis
What is the best wire to use for a trellis?
When choosing wire for a trellis, consider the plant’s weight and the trellis design. While something very thin like chicken wire might hold up the vine at first, it will start to sag as the vines grow thicker and your diamond shapes won’t look as clean. Consider using trellis wires specifically designed for espalier techniques, which are made to hold up the weight of a growing vine.
Is it cheaper to make your own trellis?
You can absolutely buy a pre-made trellis to install on the side of your home, but they can be pretty pricey – especially if you’re trying to cover a large wall. Do a search for wall trellises online and you’ll find they range in price from about $50 to hundreds of dollars (not including the plants!). This DIY diamond trellis wall cost much less than that since I had the tools I needed to install it already.
Can you make a DIY diamond trellis on any house?
Yes, absolutely! If you’re applying this to brick, siding, etc. you’ll want to do a little research since this tutorial is about stucco. But they do make screws for brick and siding. It’s possible but you’ll just want to double-check the screws you’ll use and the rest of this tutorial remains the same. Happy gardening, my friends!

Let’s keep in touch!
We have a brand new community over on Facebook, House & Home, where we’ll be chatting, sharing, and helping one another when it comes to home decor and projects. Come join us! Check it out here.
Like on Facebook || Follow on Instagram || Follow on Pinterest
