


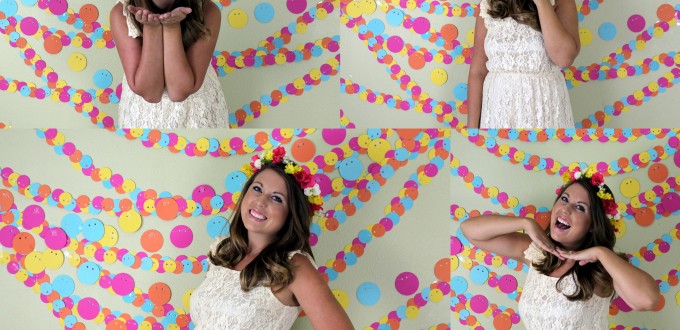

 I love a great time getting together with friends and I love even more capturing moments of laughter and fun. We are often so busy that dinner gatherings, parties, and cookouts are often thrown together last minute. I’ve always been a fan of photo booths because they get people involved with fun photos that normally wouldn’t. These pictures also provide laughter and memories for when the get together is over.
 I’ve created a simple DIY tutorial on making a photo booth backdrop using only a few materials and a little bit of your time {great for those last minute get togethers}. Since I already had most of the materials at home, I only spent $8 creating this backdrop! Exciting, I know! I used to make these garlands for my Etsy shop using my sewing machine. I realized that not everyone has a sewing machine, so this tutorial is also a way to create these paper garlands without the use of one. So grab your favorite movie, a comfy spot, and let’s get crafting!
Here’s the how-to:
Supplies:
12 x 12 scrapbook paper in desired colors {I used 4 colors, 10 sheets of each color} || Hole puncher || Tape || White sewing thread || Scissors || 1.75 inch circle punch || 3 inch circle punch
 How To:
Step 1: Using your circle punch, punch out circles from your scrapbook paper. You will need more circles than what you think! You will also need your scissors to cut the edges off that you have already punched so that you can use the paper in the middle. I used 6 sheets of each color for the 1.75 inch circles. This created 8 garlands with a length of 7 1/2 feet.

 Step 2: Once your circles have been cut out, use your hole punch to create two holes on each circle. I punched 3-4 circles at a time for a faster process.
 Step 3: Cut an 8 foot section of white sewing thread. Using the holes you just created, weave the circles onto the thread in your desired pattern.
 Go ahead and slide the first 4 circles down to the end of the thread. You will want to leave at least 3-4 inches of thread at the end {this piece of thread will make it easier to hang the garland on the wall}. Place a tiny piece of tape over the piece of thread securing it to the circle. This will prevent your circles from falling off.
 Step 4: Continue weaving your circles onto the thread until you have reached the other end. Leave 3-4 inches of thread. You will need to continuously {and carefully} slide your circles down the thread as you add them. Remember to slide them together without any spaces between the circles to get the desired look.
 Step 5: Once you have reached the other end, place a piece of tape over the thread securing it to the circle just like you did with the first four circles. Your garland is now done! Only 7 more to go {or however many you need} and you can begin putting together your photo booth wall!
 These garlands for photo booths are great for a last minute get together, a party that you are planning, and can even be used as party decor by draping the garland across the front of a display table. I choose my fun and vibrant colors with it being summer. Play with color schemes and pick colors that match your theme! Don’t have a party planned? You can still make these paper garlands and wrap them around a piece of cardboard to save for a later time.
 || TIPS ||
**The size of the circles pictured in the tutorial below are the 1.75 inch circles. You repeat the same process with the 3 inch circle punch if you decide you want varying sized circles. I also opted to space the 3 inch circles about two inches apart {securing each circle with a piece of tape} on the string to create a different type of garland.
**I hung my garland using double sided tape. Don’t be shy! Apply as much as you need. I found that this type of tape worked best.
** You may also use yarn, twine, etc. I preferred sewing thread because it can’t be seen in pictures.
Let’s keep in touch!
We have a brand new community over on Facebook, House & Home, where we’ll be chatting, sharing, and helping one another when it comes to home decor and projects. Come join us! Check it out here.
Like on Facebook || Follow on Instagram || Follow on Pinterest

[…] August than with a DIY tutorial just for you! The other week I shared with you a way to create a photo booth backdrop for any occasion. When that tutorial was all said and done, I had what felt like 1,000 paper […]
Super cute!
Meghan, you rock! Thanks for the comment! 🙂