


Hello August! I can’t think of a better way of starting the month of August than with a DIY tutorial just for you! The other week I shared with you a way to create a photo booth backdrop for any occasion. When that tutorial was all said and done, I had what felt like 1,000 paper dots scattered all around me from punching holes in the circles. I immediately knew I had to think of a craft that involved polka dots from a hole puncher. You know how I am about polka dots!

This post contains affiliate links; learn more on our about page and thanks for supporting Within the Grove by shopping through our links!
Today’s fun DIY tutorial involves creating a canvas that will only take about 30 minutes of your time {give or take a few}. Of course it involves two of my favorite things: polka dots and gold {glittery gold at that}! Not only does this put to use those fun polka dots you get from using a hole puncher, but it is a perfect DIY gift that you can make for someone. Think housewarming, baby shower, birthday, or for a classroom!
Here’s the how-to:
Supplies:
Canvas {I used a 12 x 12} || 4 pieces of scrapbook paper each a different blue hue || 1 sheet of gold glitter scrapbook paper || ElephantPaint palette || Paintbrush || Mounting tape Stencil by WTG || Glue || Fine blue glitter || Hole Puncher || Scissors || Gray acrylic paint || || Printer || Cardstock paper
 Step 1: Squeeze your gray paint onto the paint palette and paint your canvas using your paintbrush. Once you have painted one complete coat, you may use a hairdryer for quicker drying time. I did this so that I could paint my second coat right away. Allow your second coat to dry as you prepare the rest of the materials.

Tip: I mixed white paint with my gray paint until I reached my desired shade of gray. I could not find the shade of gray I wanted in the store.
 Step 2: Print and cut out theElephant Stencil. Click the image below to download the stencil.
 Step 3: Place your piece of gold scrapbook paper with the gold side facing down on a flat surface. Depending on which way you want your elephant to face on your canvas, place your elephant cut out accordingly on the piece of scrapbook paper. Use a pencil to carefully trace around the elephant.
 Step 4: Cut out your new gold elephant. Take your time with this step for smoother lines.
 Step 5: Using your hole puncher, go ahead and punch out circles from each shade of blue you picked out while your canvas continues to dry. I did not even use a quarter of each sheet and had plenty of polka dots to use!
 Step 6: Flip your gold elephant cut out over so that the gold is facing down. Using the mounting tape, cut small pieces to place on the back of the elephant.

 Step 7: Once you have your tape on the elephant, peel the backing off and firmly press your elephant onto the canvas but don’t press too hard. The awesome part about this tape is that it gives your elephant a 3D look and is much quicker than painting an elephant on the canvas.

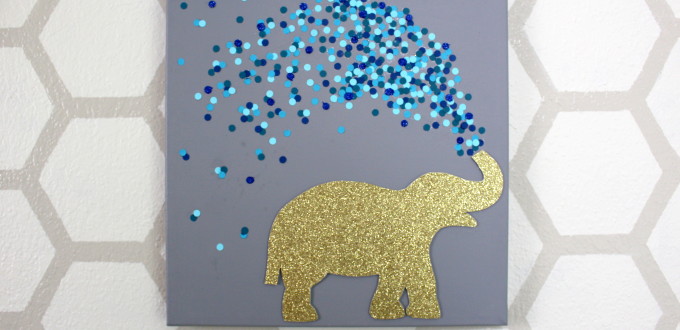
 Step 8: Now for the fun part! Put a small dot of glue on your canvas and place a polka dot on top of the glue dot. Continue this process by alternating the polka dot colors to create the look of water being sprayed by the elephant. Be creative and the best part about this step is the fact that you can continue to add and take away from areas as you see fit. Not sure what direction to go? Lightly trace a line to show the direction you want your dots to go and use my picture as a guide!


 Step 9 (optional): I wanted to make a few of my polka dots glittery to add dimension to the water. On top of my darkest polka dots, I placed a dot of glue and covered it with fine blue glitter. Shake your excess glitter off once you are done.
Tip: Shake your glitter onto a piece of paper. Fold the piece of paper in half and carefully pour the left over glitter back into the jar.

 Step 10: Use a Q-tip to remove any excess glitter around the circles.
 I love the fun that this piece brings to a space! The abstract look of the water using the paper polka dots is my favorite part. It creates a rich and vibrant look that took very little effort. I would love to see the ones you create! You can even change yours up by making your background and/or your elephant a different color. Either way share your wall art with me and don’t forget to use the hashtag: #WTGtutorial
Have fun creating!
Let’s keep in touch!
We have a brand new community over on Facebook, House & Home, where we’ll be chatting, sharing, and helping one another when it comes to home decor and projects. Come join us! Check it out here.
Like on Facebook || Follow on Instagram || Follow on Pinterest

Let’s keep in touch!
We have a brand new community over on Facebook, House & Home, where we’ll be chatting, sharing, and helping one another when it comes to home decor and projects. Come join us! Check it out here.
Like on Facebook || Follow on Instagram || Follow on Pinterest

[…] Such a fun DIY Elephant inspired canvas. Take a look at the tutorial here. […]
Use sequins instead of punching dots out of the blue card
Hi James! You are absolutely right! Thanks for sharing.
Hi! What paint did you use for this?
Hi Audrey! I used the satin acrylic paint by Martha Stewart (love her paint)! I mixed a little bit of the Martha Stewart white with the Arrowhead Gray. I hope this helps. . thanks for checking out my project!
[…] to order another set from The Flair Exchange to add extra flair in my classroom this year! My DIY 30 Minute Canvas Art also made an appearance. A great gift to make for your child’s teacher to place in his or […]