


Creating a Modern Wood Accent Wall


This post contains affiliate links for your shopping convenience. Click here to read my full disclosure policy.
Before we dive into all the fun details of this modern wood accent wall, there’s something I need to say. I officially completed a DIY woodworking project on my own beginning to end. If you’re new here or hearing this for the first time, there’s a back story to this. We recently flipped our guest bathroom in 33 days for the One Room Challenge. It was an amazing experience but it left us exhausted. Well, that is until I decided to enter the Refresh Your Walls Blogger Challenge by HomeRight just days after completing the bathroom.

But there was a catch. Ryan had already fully committed to not starting another home project until after the holidays a.k.a. 2019. So, what do I do? I announce to my Instagram buddies I’m going to learn how to use wood working tools and complete this project 100% on my own from start to finish. Because if you say it on Instagram, it has to happen, right? So, now you know why I’m so thrilled to say I completed this project on my own, it turned out amazing and you can do it too!

* HomeRight and Clare sponsored this post but all opinions are my own. Thank you for supporting the brands that make this blog and projects like this possible!
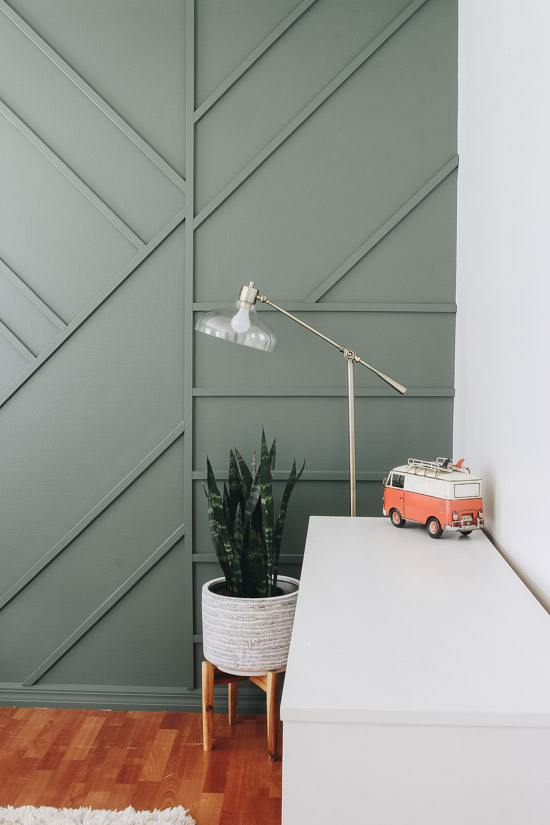
I decided to focus on Oliver’s bedroom since we’re about to transition him to a big boy room in the coming months. But I knew I couldn’t just paint a wall. It had to be a little more special than that. That’s when I spotted a modern wall with wood detail on the front cover of Do It Yourself Magazine and knew that’s what I wanted to try.

I also already knew the exact paint color I wanted to use: Current Mood by Clare. It’s a moody green that’s full of all kinds of perfection when it comes to a bold wall. I couldn’t think of a better color for a little boy’s room. For the remaining walls in the bedroom, I went with Whipped (also by Clare). It’s the same color we used in our guest bathroom. It’s a creamy white that flows beautifully with the moody green.

Now, let’s chat about this wall. I’m a firm believer in not re-inventing the wheel and found Lindi of Love Create Celebrate’s tutorial on how to build this type of wall. With her tutorial in hand, I jumped right in! The only difference in our methods was how and when I painted. Which I’m so excited to share about because it saved me so much time on this project!
Before even thinking about attaching the MDF boards to the wall, I decided to paint the wall first. Want to know a little secret? I didn’t even use a paint tray. I used HomeRight’s Paintstick E-Z Twist which allowed me to suck the paint into the handle of the roller directly from the can. Then with a simple twist of the handle, the paint moved from the handle to the roller.


This meant no running back to reload on paint every few strokes and it ended up covering an 8-ft x 8-ft area before reloading. You can purchase it at Lowe’s Home Improvement which can be found on a wire rack next to the paint counter (or here on Amazon). Here’s a quick video of me showing you how to use it!
Next up I decided to use my HomeRight Super Finish Max Paint Sprayer to go ahead and paint all of the MDF boards. Just in case you’re wanting to try this in your home, I used a table saw to rip down a large piece of MDF board down to 1 inch sections (the MDF board itself was 1/2 an inch thick). After all the painting was done, all I had left to do was measure, cut, and attach the MDF strips to the wall with a brad nailer.


I did end up filling in the nail holes with wood putty, caulking all of the seams and touching those areas up with paint to create a flawless finish. But, my friends, it was all done within a weekend as Oliver’s room went through a complete transformation. Here’s what his room looked like when moved into our home and what it looks like now with this wall refresh. 

And then there’s a little something that brings me so much joy. From Oliver’s playroom, as you enter the hallway, you get an amazing view of the new accent wall while getting a view other parts of our home. You can see first hand how our home is coming to together.

This budget friendly project ended up having a huge impact on this room where it doesn’t even feel like the same space. And to say I’m proud is an understatement. Ryan did end up offering help, he even cut a piece of wood, but I kindly declined. I wanted to prove it to myself that I could do it and I did! I want to encourage you to try something new this week in your home. Step out of your comfort zone and let’s do this together while transforming our homes by completing one project at a time!


Thank you to HomeRight for inviting me to participate in their Refresh Your Walls Blogger Challenge and to Clare for providing the gorgeous paint!
Let’s keep in touch!
We have a brand new community over on Facebook, House & Home, where we’ll be chatting, sharing, and helping one another when it comes to home decor and projects. Come join us! Check it out here.
Like on Facebook || Follow on Instagram || Follow on Pinterest

Wow! I love the outcome of your project! It looks classy and unique.
[…] am so in love with this space from Within The Grove! This is definitely a bit trendy, but the clean lines and freshness of this look I think will keep […]
So I saw the wood design wall in a house before it was as popular as it is. It was so many years ago I don’t remember this part. I want to do it on our stairs going down and on a wall in living room. They are textured. Can I do this over texture?
Hi! That is so awesome! Our walls have a slight texture to the (similar to orange peel) and we did this wood detail right over it!
[…] Check out: Creating a Modern Wood Accent Wall […]
[…] Check out: Creating a Modern Wood Accent Wall […]
Hi! Anyway you can provide a step to step tutorial on there placement of the board? Attempting to do this in a guest room and I’m a novice at all this.
Thanks!
[…] of navy accent wall, but it took me a few months to find the perfect idea. When I stumbled across this gorgeous nursery from Liz at Within the Grove, I immediately knew this was going to be our bedroom’s accent wall. […]
This color looks much lighter than the other pictures of current mood by Clare that I have seen. And much lighter than the sample I just got from them in the mail. Is it the lighting?
[…] Within the Grove Almost Makes Perfect Simply Sara D. […]
[…] you’re short on budget but big on creativity, trim is a great product to play with. Liz from Within The Grove created interesting geometric designs and an added element of texture with 1-inch trim boards she […]
Did you have a pattern or step by step instructions on how to do this wall? I love it and would like to do this as an accent wall in my dining room.
[…] Photo Source […]
[…] Original Source […]
[…] love the creative placement of the wood panels in this adorable nursery. The pattern is beautiful. This wood-paneled wall is such an eye-catching backdrop for the crib and […]
Hello! I was wondering if you remember how much paint it took to paint the one wall and trim in Current Mood? Was one gallon sufficient?
[…] with angles to create this visually gorgeous accent wall with a tutorial by Within the Groove. This color looks great with hardwood […]
[…] Source […]
Hi!! I’m sooo obsessed with this accent wall I want my husband to replicate it in our nursery!! Can I ask how long your accent wall is?
This looks awesome! I would like to know how big the wall is as well. Thanks!
[…] Nursery Wall from Within the Grove […]
[…] DIY Modern Accent Wall […]
[…] Modern wood Accent wall from Within the grove Herringbone wall from honey built home DIY modern moulding accent wall from love create celebrate entry wall from styled to sparkle DIY Board and Batten wall from angela rose home DIY Trim Wall from young house envy wood accent wall from angela rose home wood accent wall from hannah trickett DIY Wood accent wall from love create celebrate wood feature wall from Lausnotebook board and batten from mairi helena diy chevron wood wall from mamas dance moody diy feature from this giant life diy wood slat wall from housezhu diy double raised panel feature wall from rogue engineer […]
Do you have textured walls underneath your MDF pieces? If not, do you think this would achieve the same effect for one who does? I live in an older home so all of my walls are textured and would love to be able to accomplish this project with what I have.
Hi Sarah! Our walls are slightly textured and we left them like that. We have what you call the orange peel texture. From a distance you can’t even tell on the wall but of course when you get right up close you can see it. But it’s so minor it doesn’t bother us!
If this is something you’d rather not see underneath the MDF boards you can skim coat it with joint compound to smooth out the wall.
How did you cut the MDF board into 1 inch strips with a miter saw? I’m prepping to do this project and I’m a tad bit confused in that step. Thanks!
I love this wall! Amazing color and the added texture really adds to the space. I have only been doing different painting ideas for accent walls, but might need to try something like this soon!
This looks GREAT!
[…] And here’s what his room looks like after creating the textured wall design. This budget friendly project certainly had a huge impact in this space. See more of Oliver’s room here. […]
Sooooo pretty! Love that wall color.
You did SO GREAT! This turned out so so amazing and I am oh so impressed that you did it ALL yourself. You go girl! I also loveeee this color, it looks way darker in the can but on the wall it almost looks like my guest bathroom paint color. So pretty! <3
Absolutely love it! The color is to die for… perfectly mature but still kid friendly! You did so good!
You did amazing!!!! We close on our house on Monday and cant wait to start on some projects. You are so inspirational and I love every article!
Absolutely gorgeous Liz! Had no doubt you could complete this on your own! You are such an inspiration friend!
As my grandbaby says, “Amazing”!
WOW! This nursery is sooo chic! I LOVE the moody green accent wall. You’re so crafty with the wood – so cool!