


This post is sponsored by Harvest in collaboration with Markerly. Although I received compensation to share my experience, all thoughts are my own.
I’m pretty much obsessed with any garden I can get my hands on. It doesn’t matter if it’s fruits, vegetables, herbs, or flowers. I’m not picky at all! My mother taught me how to garden by letting me get my hands dirty alongside her starting at an early age. I learned two things very quickly to grow a successful garden. Talk to your plants and use the best soil around. Maybe not the talking as much as the soil.

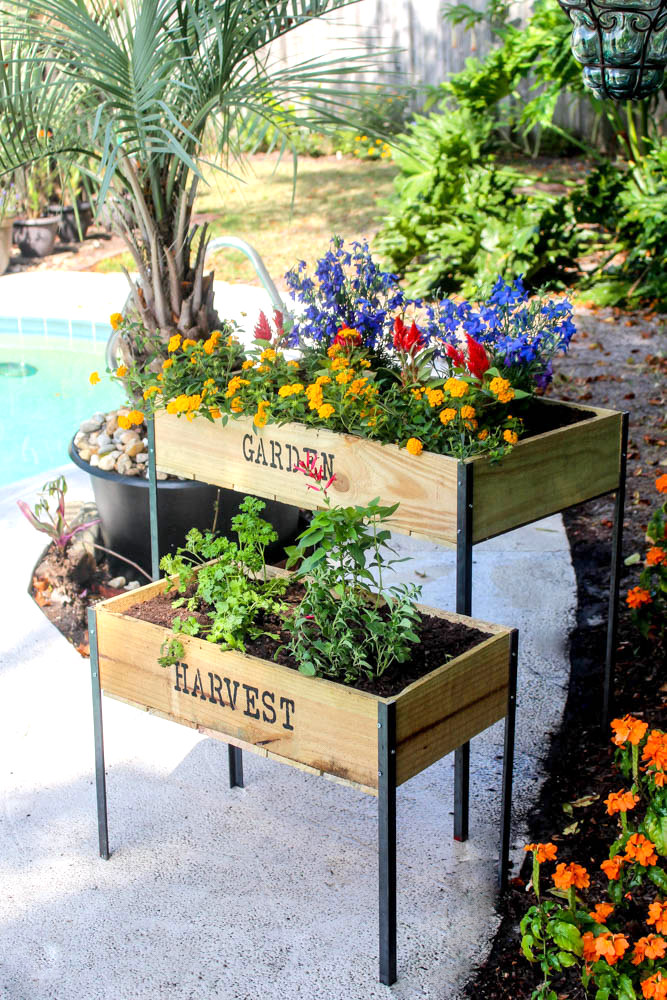
To say thank you to my Mom, I’ve decided to build her raised garden boxes for Mother’s Day to display around her pool. I wanted to make something that has a lasting impact and continues to give back. I’ll be sharing with you how to build a set of your own plus the soil to use to set up a successful garden. When using Harvest’s Organic Raised Bed Mix, I know that I’m planting with ‘clean’ soil. What do I mean? It’s compost-rich soil that’s without chemicals, pesticides, and preservatives.

Harvest takes organic food waste and lawn scraps and turns them into amazing gardening products. This in return feeds the Earth and people to create a more sustainable environment. Think of it this way: The food you throw away today could become the soil to help you grow your produce tomorrow. How cool is that? Time to start building your raised garden boxes so you can get your hands on this amazing soil to grow and harvest your produce and flowers.

Alright, Let’s Do This!
Supplies:
1 Bag of Harvest’s Organic Raised Bed Mix || Flowers || Herbs || Shovel|| Drill ||Drill Bit for Metal || Wood Screws || 3 Steel Angles at 1/8 inch x 1/2 inch x 6 feet || Saw || Measuring Tape || Pencil || Hack Saw with Steel Cutting Blade || 4 – 4 inch x 6 feet Fence Board || 3 – 6 inch x 6 feet Fence Board || Optional – Wood Glue

Cut List:
Large Raised Garden Box-
2 – 6 inch x 6 feet fence boards @ 30” (front and back boards)
2 – 6 inch x 6 feet fence boards @ 18” (side boards)
7 – 4 inch x 5 feet fence boards @ 19” (bottom slats)
4 – Steel Angles @ 27” (legs)
Small Raised Garden Box-
2 – 6 inch x 6 feet fence boards @ 26” (front and back boards)
2 – 6 inch x 6 feet fence boards @ 14” (side boards)
5 – 4 inch x 5 feet fence boards @ 15” (bottom slats)
4 – Steel Angles @ 18” (legs)
The How-Two:
Step 1:Start by cutting all of your pieces of wood and steel angles. You’ll use a saw for the wood pieces and a hack saw with a steel cutting blade for the steel angles. I’ll be showing you how to create the larger raised garden box within these steps.


Step 2: Using the wood screws, drill two screws to secure an 18” side piece to a 30” front piece. This will create a L shape. Continue by attaching the other side piece using two more wood screws.

Optional step – Apply wood glue for extra support before securing with wood screws.

Step 3: Attach the back piece of wood by drilling two wood screws on each end into the side pieces. You now have a rectangular shaped box.

Step 4:Take your 19” boards (the thinner ones), and line them up along the bottom of your box. Space them out evenly where you have a slight crack between each board. This will help the water drain from your raised garden box.

Step 5: Attach the 19” boards by screwing in one wood screw on each end of the boards. Your garden box is now completed and it’s time to attach the legs.

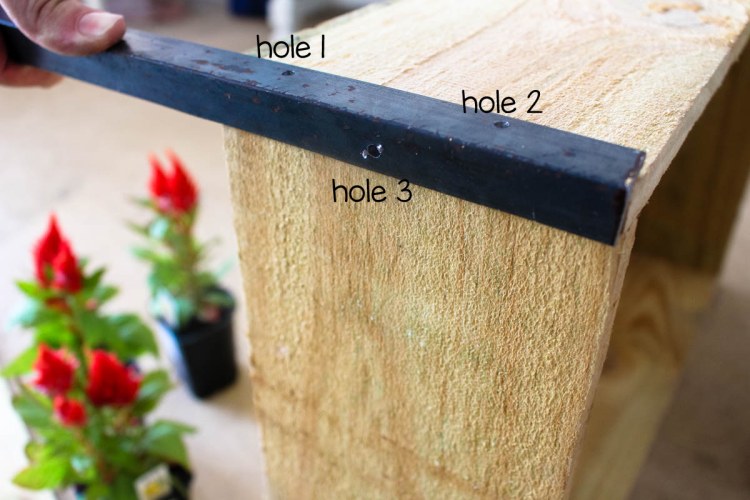
Step 6: Take one steel leg and drill 1 hole on one side and 2 holes on the other side using the drill bit for metal. This is how you’ll secure the leg to the garden box. Make sure the steel leg is flushed with the top of the garden box with the holes at the top. Repeat with the other three legs.

Step 7: Attach each leg to the corners of the garden box by securing them with the wood screws. It’s easiest to turn the garden box on it’s side to attach the legs.

Optional Final Step:Using a stencil brush, a lettered stencil, and black paint, stencil your favorite garden wording to the front of your raised garden boxes. I picked “garden” and “harvest” for my two boxes.

Your raised garden box is now complete! Seriously, how cute are they? Repeat Steps 2-7 for the smaller garden box using the smaller wooden and steel pieces you previously cut.

Time to Get Organized and Start Planting

Easily create a beautiful garden by first filling your garden boxes with Harvest’s Organic Raised Bed Mix. 1 bag was enough to fill both raised garden boxes while having a huge impact. This soil slowly releases nutrients to feed the flowers and herbs.

You can find green-minded soil at your local Lowe’s. Better yet, everything in this post came from this home improvement store. I love it when it’s a one-stop project. Here’s where you can find the soil:

The richness of this organic soil is evident with the first handful. And, with more than 2,000,000 tons of waste being kept of out the landfills thanks to Harvest, you know this is amazing soil. They’re all about committing to sustainable gardening and reducing waste.


So needless to say, don’t just garden, Harvest! It’s time to plant the flower and herbs. In my large box I planted my flowers. I’m all about helping to bring the bees back this year. Not only does this quality soil allow flowers to bloom to their fullest potential, but it creates a healthy gardening spot for my family with it being chemical free. Time to get those hands dirty, little one.


In my smaller gardening box I planted a few of my favorite herbs: oregano, cilantro, parsley, and pineapple sage. Being organic as much as possible with my foods, I love knowing I’m providing organic soil for my herbs to flourish in. Especially when planting pineapple sage. The leaves of this herb smell just like a pineapple. It’s magical.

One amazing aspect about these raised garden boxes, is that they can be used time and time again. You’ll be doing your part to help reduce landfill waste and improving the world around us. They are also portable. Place them around your pool, on your back patio, balcony, or front porch. Life just got a little sweeter. Keep in mind that over time the soil will settle. To give it the boost it needs, add 1”-3” of Harvest’s Organic Raised Bed Mix into the top 6 inches of the existing soil.

I’m thrilled with how these raised garden boxes turned out. Especially with “garden” and “harvest” stenciled on the front to give it an organic look. So, what are you waiting for? Head to your nearest Lowe’s to pick up your supplies for your soon-to-be raised garden boxes, Harvest’s Organics Raised Bed Mix, and your favorite flowers and herbs. What will you be placing in your garden boxes? Let me know by using #TheHarvestEffect in your social media shares!
Be sure to follow Harvest on social media:
Facebook | Twitter | YouTube | LinkedIn | Pinterest | Instagram

Let’s keep in touch!
We have a brand new community over on Facebook, House & Home, where we’ll be chatting, sharing, and helping one another when it comes to home decor and projects. Come join us! Check it out here.
Like on Facebook || Follow on Instagram || Follow on Pinterest

[…] Source: Within The Grove […]
[…] withinthegrove […]