• Home
  • ABOUT
  • WORK WITH ME
  • Paint Colors
  • Shop Our House
    • Guest Bedroom
    • Front Living Room
    • Living Room with Fireplace
    • Previous Second Living Room
    • Current Playroom
    • Prior Playroom
    • Dining Room
    • Laundry Room
    • Oliver’s Bedroom
    • Guest Bathroom
    • Covered Lanai
    • Patio
    • Master Bedroom
  • CONTACT
    • Facebook
    • Instagram
    • Pinterest

Within the Grove

Join the list to receive occasional news and special updates!

One Spot DIY // Hand Lettered Sun Hat

May 11, 2017

Dare I say that my 30th birthday is quickly approaching? I’m fully prepared to embrace my 30’s after how good my 20’s were to me. Having a June birthday also means summer is right around the corner. Growing up my birthday revolved around three things: school getting out for the summer, the beach, and celebrating with those closest to me. I realized the other day that I need a beach hat to shade my face (sign of turning 30) when I celebrate this year. I opted for a floppy hat but decided to add a little sequin flair. Birthday girl has to sparkle, right?

These adorable sun hats are popping up all over the place with hand lettering adorning the rim. I knew when I found these colorful sun hats in the Target One Spot for $5, I had to attempt to make one of my own. It was so successful, I made 4. Oops.

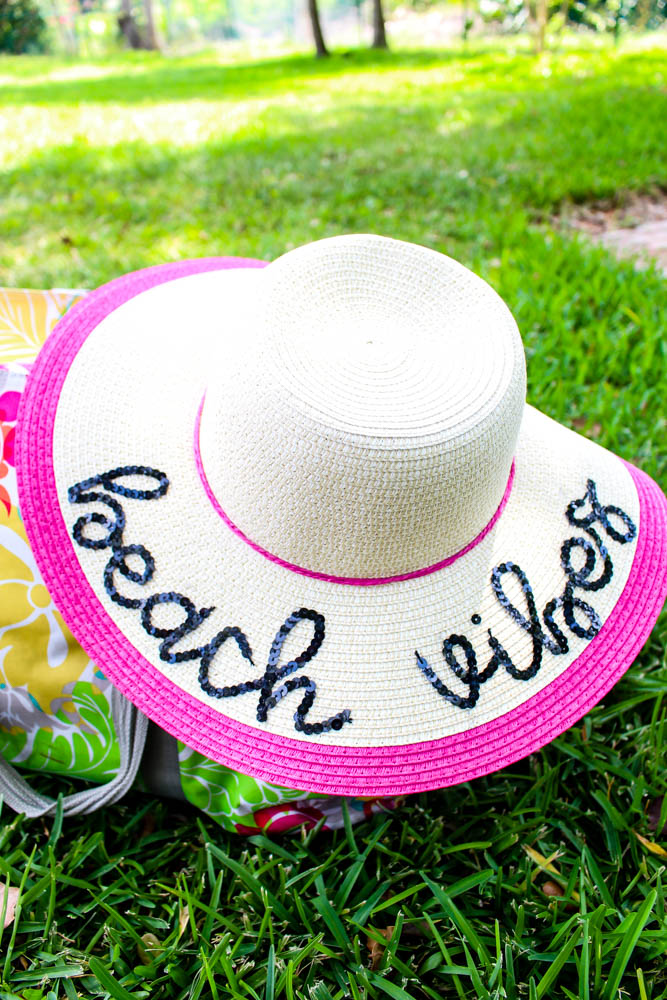
If you’re heading to the beach, lake, river, or simply out in the sun, you need one of these hats! In as a little as 30 minutes you can also have a sequined hand lettered sun hat to take with you. Don’t worry about getting the hand lettering look. I’ve got you covered where you will have flawless lettering on your sun hat.

Let’s Do This!

Supplies:

|| Sun Hat || Black Sequin Ribbon || Scissors || Amazing Goop || Carbon Paper || Pencil || Printout of Quote || Awl Sharp Tool (You can also use a stylus)

The How-To:

Step 1: Download and print the quote for your sun hat. Click below to download the one of your choosing:

beach vibes || hello sunshine || Momma Mouse

Step 2: Cut around each word and then cut apart each letter. This will allow you to curve the words around the hat. Otherwise the wording will be too straight.

Step 3: Place a piece of carbon paper underneath the first letter. Make sure the lighter side of the carbon paper is facing up. Using your sharp tool, trace over each letter. Use a new piece of carbon paper for each letter. This will trace the wording onto the sun hat.

Step 4: As you trace each letter, take the time to trace over the markings on the hat with a pencil. This will help you tremendously when gluing the sequins on the hat. 

Step 5: Apply the Amazing Goop by tracing each letter with the glue. You’ll trace the letters one at a time.

Step 6: After you’ve applied the glue to a letter, it’s now time to apply the sequin ribbon over the glue. Use your awl tool or stylus to move the sequin ribbon around once it’s down. You want rounded edges, not jagged, with your lettering.

Step 7: Repeat these steps until your wording is complete.

TIP: When applying the ribbon sequins, try to use one continuous strand. There will be times where you will have to cut the ribbon in order to start a new letter. Just keep in mind that you want to connect the letters for the hand-lettered/calligraphy look.

Step 8: Allow the glue to dry overnight before use.

This is seriously one of the cutest DIY projects I’ve completed. It’s budget friendly with amazing results! When you’re able to trace the lettering onto your sun hat, you don’t have to worry about your handwriting not coming out how you want it to. Time to go show off your cute, new sun hat.

Let’s keep in touch!

We have a brand new community over on Facebook, House & Home, where we’ll be chatting, sharing, and helping one another when it comes to home decor and projects. Come join us! Check it out here.

Like on Facebook || Follow on Instagram || Follow on Pinterest

Share this:

  • Click to share on Twitter (Opens in new window)
  • Click to share on Facebook (Opens in new window)

Related

Filed Under: Uncategorized

« Free Printable // Find Me Under the Palms Print
DIY Raised Garden Boxes with Organic Soil »

Leave a Reply Cancel reply

Your email address will not be published. Required fields are marked *

This site uses Akismet to reduce spam. Learn how your comment data is processed.

Looking for something?

withinthegrove

The waterline tile and decking are both done! With The waterline tile and decking are both done! With the limestone making the biggest difference with this pool update. It’s stunning!! Very exciting to see our entire pool area installed. We’re almost there!! Just the interior finish to go and then it’s time to fill the pool. 

•Pavers are limestone in Myra White 
• If you’re local to Central Florida, @caapavers installed ours! 
• Waterline tile is by NPT in the color Carbon.
DIY TILE REVEAL! The front door is styled and now DIY TILE REVEAL! The front door is styled and now taking the time to soak these tiles in! I kept it simple with the decor and took away the rug. If you've been here for a little bit, you know I love to place a rug underneath my wooden doormat. But letting these tiles SHINE is a must. Still can’t believe I made these! Head to the last image. I installed an imperfectly perfect tile as a little nod to these being handmade. DIY tile blog post coming your way soon! Grabbing packages from my front door just became even more exciting. 

Front door color: Black Magic by Sherwin-Williams
House Color: Cloud White by Benjamin Moore
Decor: You can find it on my LTK through my profile!
Right when we thought the pool excavation day was Right when we thought the pool excavation day was exciting, the gunite was installed! We’re about halfway through the pool build and we officially have the shell of the pool done. This all happened so fast. I’m talking about two weeks. The waterline tile and decking up next!
This will forever be a project where I will say: “ I MADE THESE TILES!” What would have cost me close to $2,000 to buy, I was able to make them for $350. I started experimenting with how to make them and nailing down the perfect black color 8 weeks ago. Let that sink in! This has been such a labor of love. 20 hours went into making the tiles. Two weeks worth of demo + installation. And a lot of learning curves in between. This project is so much more than saving money. It’s the process I went through and what I pushed myself to learn and do to get to this moment. We can do hard things!! Cheers to this project being done. How about we make a front door next? JUST KIDDING!! But a new front will be happening!

Thank you @vintagerevivals for showing that making cement tiles is a project one can tackle and @abby_roadhome doing the same with this amazing pattern!
The tiles are in place! 🎉 I’m not done yet bu The tiles are in place! 🎉 I’m not done yet but this is certainly a part of the project that needs to be celebrated. Grout is up next to call this project a wrap. It has been a process but one of the most rewarding ones when it comes to projects I’ve tackled in our home.
IT IS TIME! I have been waiting for this moment to IT IS TIME! I have been waiting for this moment to smash these front door tiles ever since we moved in. And it felt so dang good! Here’s what I’m doing to prep the concrete slab for the tile install: 

1. Remove old tile
2. Use an angle grinder with a diamond grinding blade to remove the thin set and paint. 
3. Wash the slab
4. Apply two coats of Hydro Ban to create waterproofing barrier from the moisture in the concrete slab and to help with crack isolation.
Another exciting step for the pool: Excavation day Another exciting step for the pool: Excavation day! We officially broke ground. It was the coolest thing to watch. Rebar and gunite up next.
250 cement tiles made!! 20+ hours went into making 250 cement tiles made!! 20+ hours went into making these tiles and we’re going to celebrate making it to this point! I questioned myself during the last push when molds started failing, tiles weren’t turning out, and I was just flat out tired. If there’s a project to test patience, this is the one. But want to know the craziest part? I’d do it all over again. What an awesome process being able to make my own tiles. And the part we’ve all been waiting for is coming up next: INSTALL!! Tiles, don’t fail me now.
This pretty much sums up the progress of making 25 This pretty much sums up the progress of making 250 cement tiles. But I’m halfway through! The moment I finish the last tile is the moment I knock out the old tile. Let’s do this!
Load More... Follow on Instagram

Sign up here to have our fresh posts delivered to your inbox!

Enter your email address:

Delivered by FeedBurner

Copyright © 2023 Within The Grove • Customized by Brave Creative Design · Log in

  • Privacy Policy
  • Terms and Conditions
  • Disclosures + Photo Usage
 

Loading Comments...