• Home
  • ABOUT
  • WORK WITH ME
  • Paint Colors
  • Shop Our House
    • Guest Bedroom
    • Front Living Room
    • Living Room with Fireplace
    • Previous Second Living Room
    • Current Playroom
    • Prior Playroom
    • Dining Room
    • Laundry Room
    • Oliver’s Bedroom
    • Guest Bathroom
    • Covered Lanai
    • Patio
    • Master Bedroom
  • CONTACT
    • Facebook
    • Instagram
    • Pinterest

Within the Grove

Join the list to receive occasional news and special updates!

DIY // Get Over Being Sick Hand-Lettered Bucket Kit

November 14, 2016

This shop has been compensated by Collective Bias, Inc. and its advertiser. All opinions are mine alone. #GetUnderTheRim #CollectiveBias

Get over being sick with this DIY bucket kit - Within the Grove

As many of you know, I’m loving my new role of Kindergarten teacher turned into stay at home mom. But one thing that will always be present in both jobs are germs.  I’ll never forget coming home with the dreaded stomach bug one school year as I ”casually” passed it on to my husband. Miserable, right? Now being a mom to my little one, I’m more proactive than ever with keeping germs away. That’s when the light bulb went off! We’re always creating get-well baskets for loved ones. Those are wonderful but what about all those icky germs?! That’s when I thought I would create a Get Over Being Sick Bucket Kit.

Help someone feel better soon with this kit - Within the Grove

What’s the first thing you do after being sick especially if it’s your whole household?  You frantically clean every surface you can think of to prevent a relapse of the stomach bug.  Help a friend out by gifting them a Get Over Being Sick Bucket Kit with all of the essentials to help them create a germ free environment.  The cute bucket will certainly bring a smile to their face also! Seriously, this is a game changer!

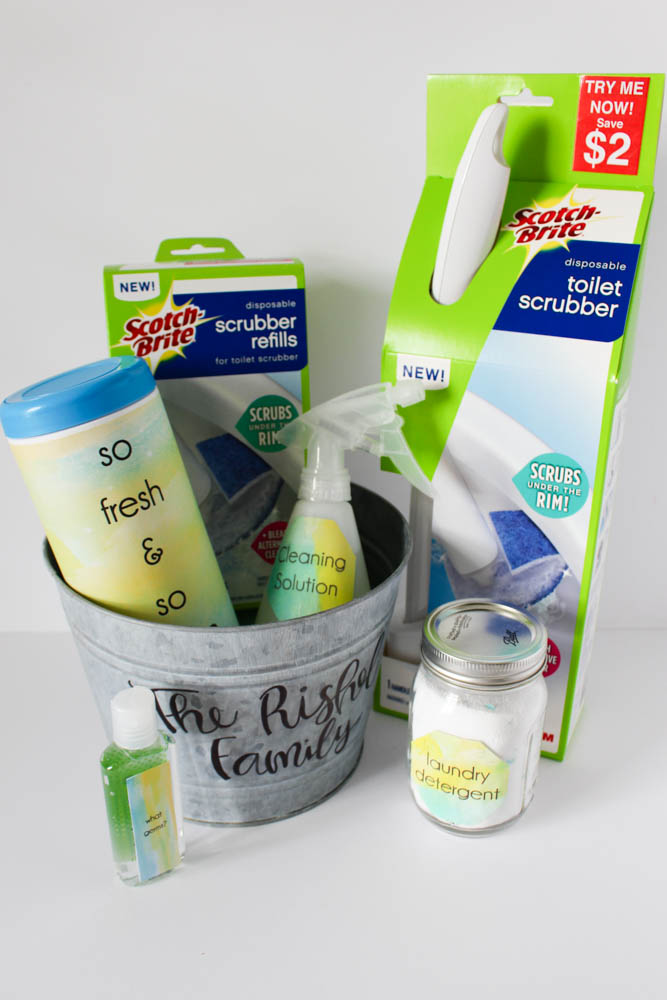
What’s in my Get Over Being Sick Kit you just might ask? Let me show you!

Get over being sick bucket kit materials - Within the Grove

1. Hand-lettered Farmhouse Bucket

This bucket provides a unique way to display the contents of the kit. It also adds a personal touch for the family you are gifting it to! You’ll find the tutorial for this hand-lettered bucket in the post today.

2.  Wipes

Disinfecting wipes are a must for quickly cleaning surfaces.

3. Laundry Detergent

My bedding is the first thing to hit the washer once I’m on the mend.  Plus, have you ever heard anyone complain about clean, fresh smelling sheets?

4. Cleaning Solution

Need to deep scrub to make sure all of the germs are gone? Grab a bottle of homemade cleaning solution from the kit to get the job done!

DIY Cleaning supplies for your home - Within the Grove

5. Tissues and Hand Sanitizer

You might feel well enough to clean but the sniffles could still be lingering.  Grab a box of tissues as you make your way around the house.  But certainly don’t keep spreading the germs. Use hand sanitizer when possible.

6. Scotch-Brite® Disposable Toilet Scrubber and Scotch-Brite® Disposable Toilet Scrubber Refills

Time to get real. You come home with the stomach bug and you’ll be spending more time in the bathroom rather than sleeping the sickness away in bed. When it’s all said and done you’ll need to clean your toilet ASAP.  The Scotch-Brite® Disposable Toilet Scrubber and Scotch-Brite® Disposable Scrubber Refills are the bee’s knees. With the Scotch-Brite™ scrubbing power it provides, you’ll never again miss a spot underneath the rim.

Scotch-Brite™ Disposable Toilet Scrubber - Within the Grove

I know what you’re thinking.  It’s your least favorite part to clean and the last thing you want to do. This cleaning tool scrubs the germs you’ve been leaving behind in just seconds without you even getting your hands dirty.  Think about it!  It has a built-in bleach cleaner, the scrubbers are disposable after use, refills will never leave you stuck with germs, and the shape will have your toilet rim clean in seconds so you can get back to recovering. Can it get any easier than that?

Clean under the rim with Scotch Brite - Within the Grove

7. Magazines, Candles, and a Card, Oh My!

After reading the get well card placed in the kit, your friend or family member can kick their feet up, light their new seasonal candle, and get lost in a new magazine. It’s the perfect way to relax after cleaning.

Relax after a day of cleaning - Within the Grove

So where did I find the containers and the Scotch-Brite Disposable Toilet Scrubber and refills? My favorite neighborhood store: Target. I was browsing the One Spot which turned into walking down almost every aisle in Target. That happens to everyone, right?  All of a sudden I spotted my new favorite cleaning product.

Want to grab one for yourself? Below you’ll find a picture of where you can find the Scotch-Brite Disposable Toilet Scrubber and the Scotch-Brite Disposable Toilet Scrubber Refills the next time you’re needing a sparkling bathroom.

Scotch Brite found in Target - Within the GroveWhile you’re putting the Scotch-Brite Brand products in your cart, go ahead and add this Target Cartwheel Offer for an extra 15% off from November 13th through the 19th.  Also, don’t forget to look for the $2 coupon on each box!

Coupon for Scotch Brite at Target - Within the Grove

Need more inspiration on why this is a must-have in your cleaning bucket? Check out what other bloggers have to say here. 


DIY Hand-Lettered Bucket

Ready to create a Get Over Being Sick Bucket Kit of your own?  After purchasing all of your items for the kit, follow these easy steps to write the name of the family of the bucket in hand-lettering style.

DIY hand lettered bucket - Within the Grove

Supplies

Bucket || Permanent Maker || Pencil || Family name printed in a calligraphy font

Supplies to create a hand lettered bucket - Within the Grove

The How-To

Step 1: Find your favorite calligraphy font and type the name of the family. Use this as a reference when writing the name on the bucket.  This certainly helped me!

Step 2: Using the pencil, write the family name on the bucket.  Dive right in! Use the printed family name as your guide. It’ll easily erase if you make a mistake.

Write the family name in pencil

Step 3: Trace over the pencil marks with a permanent marker.  Erase any stray marks once you’re done.

Creating a hand lettered bucket with a family name - Within the Grove

Step 4: Now for faking the calligraphy look. You’re going to draw a line to make every down stroke in your writing thicker.  This will create calligraphy styled lettering.

Create a thicker down stroke for the calligraphy look - Within the Grove

Step 5: Color in the down strokes to complete the look!

Hand letter calligraphy on a bucket - Within the Grove

How will you help your friends and family the next time they are sick? This Get Over Being Sick Kit will certainly make their lives easier, especially knowing they are kicking the sickness to the curb! Is there anything else you would add to your kit? Leave it in the comments below! Not sure? Here’s more inspiration coming your way!

Scotch-Brite at Target

on Facebook

on Twitter

on Pinterest

on Instagram

Thanks so much for supporting the brands that make Within the Grove possible!

Let’s keep in touch!

We have a brand new community over on Facebook, House & Home, where we’ll be chatting, sharing, and helping one another when it comes to home decor and projects. Come join us! Check it out here.

Like on Facebook || Follow on Instagram || Follow on Pinterest

Share this:

  • Click to share on Twitter (Opens in new window)
  • Click to share on Facebook (Opens in new window)

Related

Filed Under: DIY Tutorial

« Decor Daydreams // Foyer Organization
Decorating the Guest Bathroom for the Holidays »

Comments

  1. kristi@ishouldbemoppingthefloor says

    November 14, 2016 at 9:42 pm

    Oh man…the stomach bug is the worst!! I don’t know anyone who wouldn’t LOVE receiving a fun basket like this when they’re dealing with that mess. And these toilet scrubbers are truly fantastic. Loved your lettering tutorial, too!! #client

    Reply
    • ElizabethRishel says

      November 15, 2016 at 11:17 pm

      It seriously is the worst! It would make getting sick just a tad bit easier.

      Reply
  2. Renee says

    November 14, 2016 at 7:19 pm

    This is brilliant! After a recent sickness here I went out and bought a TON of disinfecting supplies. I wish I would have had something like this on-hand.

    Reply
    • ElizabethRishel says

      November 15, 2016 at 11:16 pm

      Thank you! Go ahead and make it for the next time. I have mine on stand-by. Hopefully we won’t need it.

      Reply
  3. Taylor - Lights Camera Catwalk says

    November 14, 2016 at 3:18 pm

    This is such a cute idea and love your hand-lettering!

    Xx Taylor
    http://lightscameracatwalk.com

    Reply
    • ElizabethRishel says

      November 15, 2016 at 11:16 pm

      Hi Taylor! Thank you! Let me know if you give it a try.

      Reply
  4. Ashlyn says

    November 14, 2016 at 3:16 pm

    Looks soooo good!! Great job!

    Reply
    • ElizabethRishel says

      November 15, 2016 at 11:15 pm

      Thank you Ashlyn!

      Reply
  5. Mar says

    November 14, 2016 at 12:18 pm

    Oh the dreaded flu season… boooo! This is such a cute gift idea!

    Reply
    • ElizabethRishel says

      November 15, 2016 at 11:14 pm

      Thank you! Fingers crossed we both don’t need this kit!

      Reply

Leave a Reply Cancel reply

Your email address will not be published. Required fields are marked *

This site uses Akismet to reduce spam. Learn how your comment data is processed.

Looking for something?

withinthegrove

A little garden magic just by adding some solar li A little garden magic just by adding some solar lights. Notice the starburst pattern they give off? My favorite part! These would also work great along a deck railing, the top of a wooden fence, or on the side of stairs. I added both solar lights you see here to my Amazon shop!
Round 2 (and final!) for the grass install in our Round 2 (and final!) for the grass install in our backyard. Dang, does it feel GOOD to finally say that! It has been a long time coming and a little sweat equity saved us so much by doing it ourselves. Next on the backyard to do list is turning it into a tropical oasis by planting the flower beds. Think huge birds of paradise! Time to start planning.
It has been 6 years since we moved into our home a It has been 6 years since we moved into our home and visualized the potential our backyard would one day have. The first few years were spent clearing out and claiming our property back . Two years ago we built our dream garden, last year we built the play area that feels more like a magical treehouse, and this year we added a pool (still pinching myself every day). We’re seeing our hard work over the years starting to come together as we approach the finish line of installing grass and landscaping that’s going to bring it all together. As I always say, stay tuned because you know I’m going to share it all with you! And a little reminder for you to keep going because home takes time.
The garden is cleaned up, prepped, and ready for t The garden is cleaned up, prepped, and ready for the summer crop. What started as a single garden box has transformed to this garden space over the past few years. Favorite thing about it: being tucked away in this cozy corner with the winding paths throughout it. One thing I would do differently: using pea gravel instead of the granite rocks we went with. These rocks hurt! Pea gravel is smooth enough to comfortably walk barefoot on.
The grass is in! Saying BUH BYE to the dirt around The grass is in! Saying BUH BYE to the dirt around the pool for the first time since December when we broke ground. We spent the past few weeks installing irrigation throughout our backyard and around the pool. Yesterday we finally had the sod delivered and within a few hours it got us one step closer to finishing our backyard oasis. We still have a long ways to go, but my goodness does it feel good to see this part done! And we can finally check off the final inspection for the pool build.
What does it cost to fill a 16,000 gallon pool wit What does it cost to fill a 16,000 gallon pool with a garden hose? Our total came to $229! Does this total surprise you? This of course can greatly vary depending on where you live and your situation. For us, we live in Florida and on county water. We only pay water fees and not sewage. The water company did not give us a discount. We filled the pool right at the start of our billing month so this is it! Have you filled up a pool before? I’d love for you to share your cost, pool size, and location if you feel comfortable doing so!
We have a 16,000 gallon pool and filled it up with We have a 16,000 gallon pool and filled it up with a single water hose. And we for sure had some questions! Answering them here:

• Why not use a water truck? We weren’t in a rush, it was the best way to end this project watching it fill up, and it would have been more expensive. 

• Why not use our local fire station? Our local fire department doesn’t do this and it isn’t very common that most do. We wouldn’t ask if they did. 

• Did our water company give us a discount? Nope. Most water companies will take off the sewage fee but we only pay for water and not sewage where we live. We did notify them so they wouldn’t turn our water off thinking it was a leak. 

• What is that on the end of your hose? We added a filter on the hose to help reduce iron, scale, any other heavy metals and containments to help give our pool a fresh start. 

• How long did it take? 51 hours 

I’ll be sharing the cost soon so make sure to add your guess in the comments!
Pizza nights are back! And one thing we’re addin Pizza nights are back! And one thing we’re adding since our screen enclosure is gone, are these Bitefighter LED String Lights by @tikibrandproducts . You’ve seen us use them in our playset area and now for our patio area. They give us the ambiance we need at night while helping to fight off the mosquitoes as a 2 in 1 solution. There’s no odor, no mess, and they will last all season long. Cheers to the summer nights ahead! #ad #TIKIbrand
Protecting outdoor furniture for the summer!

It’s time to give your outdoor furniture the best start for summer and to help it last long term. Here are some things you can do to protect your outdoor furniture as we enter the summer season:

1. If you have wood furniture, it’s time to seal it! I use Thompson’s Waterseal on all my outdoor wood furniture except for teak. This protects it from moisture, sunshine, and mold/mildew.

2. Easiest way to help keep cushions clean is by spot cleaning throughout the season. I use 30 Seconds Outdoor Cleaner for quick, fresh looking cushions. 

3. To really protect cushions, Shield H2O provides a water repellent treatment that repels moisture and spills, which in return helps prevent mold and mildew. 

4. Have teak furniture? Use a teak SEALER and not an oil. Teak oil is a short term solution and easily washes out with rain. Time to seal it to last long term! 

I have everything I used in my Amazon storefront under outdoor.
Load More... Follow on Instagram

Sign up here to have our fresh posts delivered to your inbox!

Enter your email address:

Delivered by FeedBurner

Copyright © 2023 Within The Grove • Customized by Brave Creative Design · Log in

  • Privacy Policy
  • Terms and Conditions
  • Disclosures + Photo Usage
 

Loading Comments...