


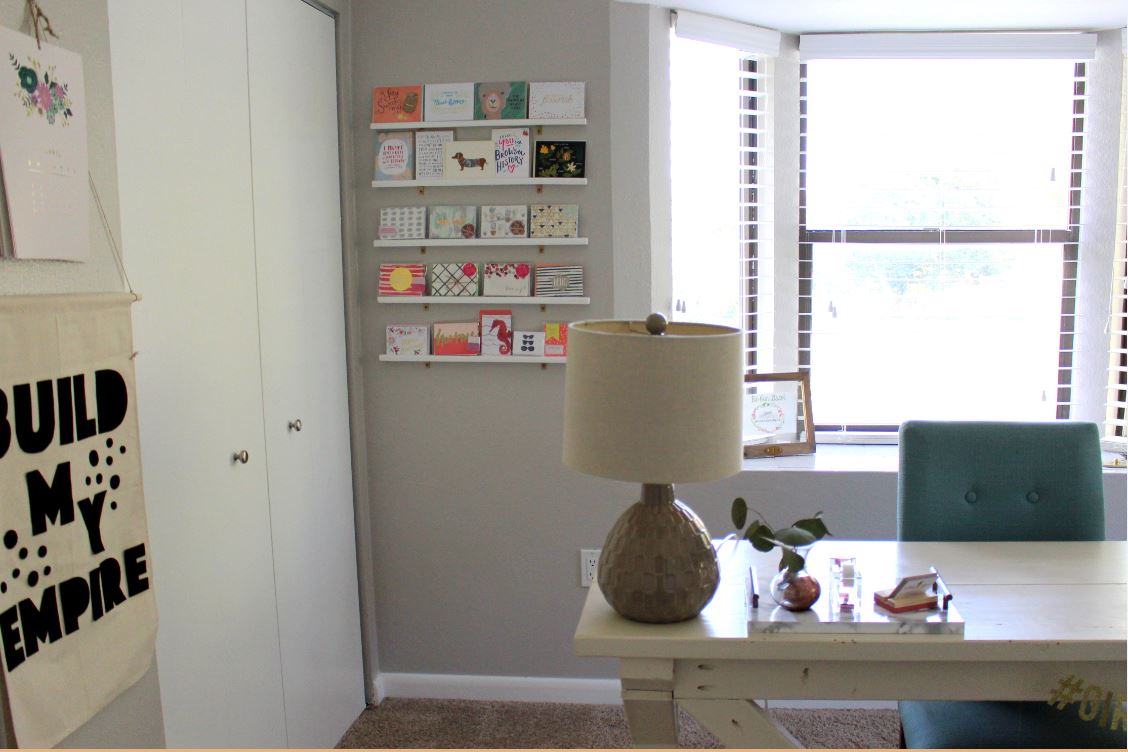


Little home projects simply make my heart happy. And this DIY greeting card display wall is the perfect example. It’s perfect for displaying Christmas cards each holiday or showing off your own personal greeting card collection any time of the year.
I first created this project back when I was pregnant with my son. Ryan and I had emptied out my home office to start transforming it into the nursery. We moved my home office to our large guest bedroom at the front of the home and that has been our office space ever since.
It’s undergone quite a transformation since then (including a DIY plywood desk for my husband), but the greeting card wall is still a much-loved part of this space.

How to Display Greeting Cards on Wall
This DIY card holder came to be during the process of moving my office all those years back. After a lot of organizing, online yard selling, and wishing I could have a glass of wine to ease the stress of the chaotic mess, I stumbled upon one little fantastic discovery: I’m a greeting card hoarder.
Honestly, this is something I couldn’t be prouder of. I love snail mail, receiving a handwritten letter, and giving friends and family a surprise card when they need it the most. There was only one problem, all of the cards were sadly shoved into a box where I couldn’t see them. Whenever I needed one, the box exploded all over the floor and I had a huge mess to clean up.
My solution? Build a custom DIY greeting card display wall. Dreamy, right? The best part is that this simple project can be made by anyone! I love the idea of using this as a DIY Christmas card holder and then displaying kids artwork, postcards or your very own greeting card collection the rest of the year.

What You Need to Build a Wooden Greeting Card Display Wall
Want a DIY greeting card display wall of your own? Create one by giving up one of your afternoons and recruiting a friend with a few power tools if you don’t have any of your own. Here’s what you’ll need:
Supplies:
White paint (I used a $2.50 white paint sample from Lowe’s)
Paintbrush
Gold spray paint
Saw (A jigsaw will do the job also!)
Coarse sandpaper
Measuring tape
Pencil
Drill
Router
1/4″ straight shaft for the router
1″ x 2″ wooden boards (I bought 2 boards, 8 feet in length)
2 Corner braces per board
How to Make a DIY Card Holder
While you need a few different power tools to make this greeting card display, it’s actually really simple. Follow along with the steps below to learn how to display greeting cards at home.
Step 1: Cut Your Wood
Cut your pieces of wood into 2 feet sections or longer depending on your wall. I found this to be the perfect length. I ended up making five 2-foot boards for my display wall, but you can make as many as you need for the size of your wall or the number of cards you have to display.

Step 2: Create a groove
Using the router, create a straight groove down the entire length of the board. This is where your cards will sit on the display wall. I placed my groove down the center of the board. Repeat for each board.


Step 3: Sand the boards
Using the coarse sandpaper, sand the edges and ends of each board. You can also use a hand sander if you have one.

Step 4: Paint the boards
Paint all sides, including the grooves, white. Allow the pieces to fully dry. While the boards are drying, spray paint the corner braces gold. Don’t forget to spray paint the screws also! Tip: If you’re using pieces of wood longer than 2 feet for your wall, you may need more than two corner braces per board.

Step 5: Attach the corner brackets
On the bottom of your board, measure 5 1/2 inches from each end and mark by drawing a line using a pencil. Place the corner bracket on the inside on the line (closest to the end) and flushed with the back side of the board. Tip: Make sure to place the brace on the board so that the piece going down will be flushed with the wall. Otherwise, you won’t be able to hang it!

Step 6: Installation
Evenly measure on your wall where you’ll be hanging the boards by marking in the circle where the screw will go. I placed a 6 inch space between each board. Tip: Don’t forget to not only have an even space between each board, but also make sure the boards are centered evenly on the wall.
Once everything is lined up, use the remaining screws to attach the bottom portion of each corner bracket (and shelf) to the wall.

Step 7: Fill your wall!
This is definitely the best part: filling your greeting card wall! If you’re like me and always have a stash of greeting cards waiting to be sent, then this is a great way to keep them organized and see them every day. But you can also use this wooden card display shelf as a DIY Christmas card holder seasonally.

Filling Your DIY Greeting Card Display Wall
I also make sure to snatch a great card whenever I find one. If you’re looking for a great place to buy greeting cards, I’ve got three for you!
RIFLE PAPER Co. – I. Love. This. Store. Rifle Paper is a stationary and lifestyle company that is based out of Winter Park, FL. The artists that create these greeting cards know how to pull at my heart strings. Good news? You can buy online and find them internationally.
Paper Goat Post – If you live in Central Florida, this is a shop you’ve got to visit! Paper Goat Post carries an abundance of greeting cards from local artists and beyond.
Target – Their One Spot is spot on for $1 blank cards. They also come in a set of 8. It makes the price even better.
Common Questions About Displaying Greeting Cards at Home
Anytime I share this DIY greeting card display wall I get a bunch of questions about how I actually use it and other ideas to display cards on the wall. Here are some of the most popular questions I get:
How do you display greeting cards on the wall?
First of all, I use this custom display shelf, of course! Because I use mine to display my greeting card collection vs cards I’ve received in the mail, I like to stack all cards of the same design with their envelopes and set them into the shelf’s groove together. This way it’s easy to see all my different cards and grab one whenever I need it.
What do you do with old greeting cards?
Because I have such a big greeting card collection there’s not really space on these shelves for saving old greeting cards I get in the mail. But I absolutely love greeting cards and holiday cards and love to hang on to special ones. I’ve often thought about building another set of these DIY greeting card display shelves just for displaying old cards. You could absolutely use these shelves for that purpose!
How do you display Christmas cards without damaging the wall?
If you’re looking for more of a seasonal card display that won’t put holes in your wall, then this project might not be for you. You could try attaching these shelves to the wall with a no-drill shelf bracket like these brackets from Amazon. Cards are lightweight enough that it would probably stay secure throughout the holiday season.
Then you could remove the shelves when you’re ready to stop displaying Christmas cards on the wall. But even with adhesive brackets, some damage could be done to the wall.
How do you display cards in your house?
Do you have your own creative solutions for displaying greeting cards or holiday cards in your house? Let me know in the comments or tag me in a post showing off your greeting card display DIY on Facebook, Instagram or Pinterest!
Let’s keep in touch!
We have a brand new community over on Facebook, House & Home, where we’ll be chatting, sharing, and helping one another when it comes to home decor and projects. Come join us! Check it out here.
Like on Facebook || Follow on Instagram || Follow on Pinterest
