• Home
  • ABOUT
  • WORK WITH ME
  • Paint Colors
  • Shop Our House
    • Guest Bedroom
    • Front Living Room
    • Living Room with Fireplace
    • Previous Second Living Room
    • Current Playroom
    • Prior Playroom
    • Dining Room
    • Laundry Room
    • Oliver’s Bedroom
    • Guest Bathroom
    • Covered Lanai
    • Patio
    • Master Bedroom
  • CONTACT
    • Facebook
    • Instagram
    • Pinterest

Within the Grove

Join the list to receive occasional news and special updates!

Home Project // Front Porch Landscaping

February 29, 2016

Flowerbed for the front porch area

Things have been busy around the Rishel household that seemed to give us a slight break from the technology and social media world! We’ve done some traveling, visitors came into town, we were busy at work, and caught up on life in general {with sweet moments mixed in throughout} these past few weeks.  It was a beautiful weekend here in Orlando and with our first ‘free’ weekend in awhile, we took full advantage of something on our home to-do list: adding landscaping to the front porch.

I have a love/hate relationship with our front porch.  I’m use to the southern porches I grew up on in the south. There are a few steps to walk up to get to the porch, rocking chairs and/or a swing, a few hanging Boston ferns, and of course reading a great book with sweet tea in hand.   Our porch is more like a covered sidewalk {which is nice with all the rain we get in Florida} with a small section where we can place seating. We’ve placed a bench and a small side table in this area for now.

Creating a sitting area for your front porch

Because this layout was new to me, I was stumped as to what to do with the landscaping and design. Especially without a ‘porch’ to decorate in front of and a reliable place to hang the Boston ferns.  If you know how to hang Boston ferns with non-wood material, let me know!

So here’s the process of transforming part of our front yard starting with a few before pictures.  It’s only the beginning of our landscaping adventure with our front yard and this past weekend proved to be a great start to our yard’s potential.

Front yard before adding landscaping

Without any height change between our yard and the porch, we knew we wanted to create a barrier between the two using shrubs.  It didn’t take long to agree on Boxwood hedges to create a wall full of lush greenery along our front porch space.  We headed to Home Depot and purchased 14 Boxwoods and a few bags of dark brown mulch.

IMG_8992

We spray painted where we wanted to remove our grass {and yes, dying grass in some areas due to limited sunlight).  This ensured that we created our flowerbed evenly with the same space throughout.

Spray paint a line where you will remove grass to create a flowerbed.

Removing grass for flowerbed

Removing all grass and weeds before creating a flowerbed

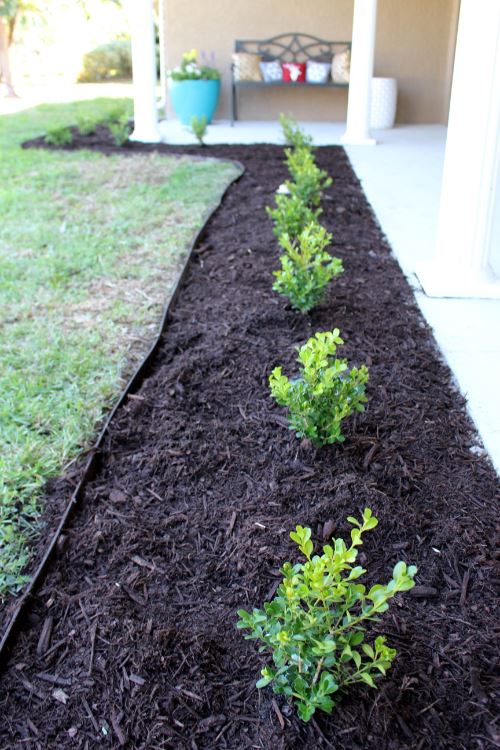
Once the grass was removed, we spaced the Boxwoods and started planting.  I was even able to recruit my Mom for the day to help which was a blast!

Spacing boxwoods about 2 to 3 feed apart when planting

It took no time to plant the hedges thanks to Florida sand and not running into any other tree roots.  We then edged our flowerbed with dark brown edging {it looks great with the house color}.

Watering your plants while planting them and before covering them with soil

Evenly planting boxwoods

Last step was spreading the dark brown mulch throughout that we got a great deal on.  The mulch was originally $2.50 a bag and we got it 6 for $10!

Using dark brown mulch in flowerbed

We even planted a pop of color in my large teal pot next to our bench to help bring it all together.

Adding a pop of color in flower pots

Even though the Boxwood hedges are just babies, we can’t wait to see them grow!  We are going to shape them into rounded hedges rather than going with the boxy look.  Next up?  Lights and landscaping along the driveway and a large flowerbed underneath our bay window and down the length of the house. We aren’t done quite yet, but it’a certainly a great start!

Finished landscaping using boxwoods around front porch area

Using boxwoods to line the front porch area

Front porch after planting boxwoods

Let’s keep in touch!

We have a brand new community over on Facebook, House & Home, where we’ll be chatting, sharing, and helping one another when it comes to home decor and projects. Come join us! Check it out here.

Like on Facebook || Follow on Instagram || Follow on Pinterest

Share this:

  • Click to share on Twitter (Opens in new window)
  • Click to share on Facebook (Opens in new window)

Related

Filed Under: Home of the Rishels, Home Project, Landscaping, Our Home Improvements

« February Wallpaper 2016 // Free Download
// Family of Three // »

Comments

  1. Jessica says

    March 6, 2016 at 10:05 am

    Looks really nice!

    Reply
    • ElizabethRishel says

      April 3, 2016 at 10:18 am

      Thank you so much Jessica!!

      Reply

Leave a Reply Cancel reply

Your email address will not be published. Required fields are marked *

This site uses Akismet to reduce spam. Learn how your comment data is processed.

Looking for something?

withinthegrove

A little garden magic just by adding some solar li A little garden magic just by adding some solar lights. Notice the starburst pattern they give off? My favorite part! These would also work great along a deck railing, the top of a wooden fence, or on the side of stairs. I added both solar lights you see here to my Amazon shop!
Round 2 (and final!) for the grass install in our Round 2 (and final!) for the grass install in our backyard. Dang, does it feel GOOD to finally say that! It has been a long time coming and a little sweat equity saved us so much by doing it ourselves. Next on the backyard to do list is turning it into a tropical oasis by planting the flower beds. Think huge birds of paradise! Time to start planning.
It has been 6 years since we moved into our home a It has been 6 years since we moved into our home and visualized the potential our backyard would one day have. The first few years were spent clearing out and claiming our property back . Two years ago we built our dream garden, last year we built the play area that feels more like a magical treehouse, and this year we added a pool (still pinching myself every day). We’re seeing our hard work over the years starting to come together as we approach the finish line of installing grass and landscaping that’s going to bring it all together. As I always say, stay tuned because you know I’m going to share it all with you! And a little reminder for you to keep going because home takes time.
The garden is cleaned up, prepped, and ready for t The garden is cleaned up, prepped, and ready for the summer crop. What started as a single garden box has transformed to this garden space over the past few years. Favorite thing about it: being tucked away in this cozy corner with the winding paths throughout it. One thing I would do differently: using pea gravel instead of the granite rocks we went with. These rocks hurt! Pea gravel is smooth enough to comfortably walk barefoot on.
The grass is in! Saying BUH BYE to the dirt around The grass is in! Saying BUH BYE to the dirt around the pool for the first time since December when we broke ground. We spent the past few weeks installing irrigation throughout our backyard and around the pool. Yesterday we finally had the sod delivered and within a few hours it got us one step closer to finishing our backyard oasis. We still have a long ways to go, but my goodness does it feel good to see this part done! And we can finally check off the final inspection for the pool build.
What does it cost to fill a 16,000 gallon pool wit What does it cost to fill a 16,000 gallon pool with a garden hose? Our total came to $229! Does this total surprise you? This of course can greatly vary depending on where you live and your situation. For us, we live in Florida and on county water. We only pay water fees and not sewage. The water company did not give us a discount. We filled the pool right at the start of our billing month so this is it! Have you filled up a pool before? I’d love for you to share your cost, pool size, and location if you feel comfortable doing so!
We have a 16,000 gallon pool and filled it up with We have a 16,000 gallon pool and filled it up with a single water hose. And we for sure had some questions! Answering them here:

• Why not use a water truck? We weren’t in a rush, it was the best way to end this project watching it fill up, and it would have been more expensive. 

• Why not use our local fire station? Our local fire department doesn’t do this and it isn’t very common that most do. We wouldn’t ask if they did. 

• Did our water company give us a discount? Nope. Most water companies will take off the sewage fee but we only pay for water and not sewage where we live. We did notify them so they wouldn’t turn our water off thinking it was a leak. 

• What is that on the end of your hose? We added a filter on the hose to help reduce iron, scale, any other heavy metals and containments to help give our pool a fresh start. 

• How long did it take? 51 hours 

I’ll be sharing the cost soon so make sure to add your guess in the comments!
Pizza nights are back! And one thing we’re addin Pizza nights are back! And one thing we’re adding since our screen enclosure is gone, are these Bitefighter LED String Lights by @tikibrandproducts . You’ve seen us use them in our playset area and now for our patio area. They give us the ambiance we need at night while helping to fight off the mosquitoes as a 2 in 1 solution. There’s no odor, no mess, and they will last all season long. Cheers to the summer nights ahead! #ad #TIKIbrand
Protecting outdoor furniture for the summer!

It’s time to give your outdoor furniture the best start for summer and to help it last long term. Here are some things you can do to protect your outdoor furniture as we enter the summer season:

1. If you have wood furniture, it’s time to seal it! I use Thompson’s Waterseal on all my outdoor wood furniture except for teak. This protects it from moisture, sunshine, and mold/mildew.

2. Easiest way to help keep cushions clean is by spot cleaning throughout the season. I use 30 Seconds Outdoor Cleaner for quick, fresh looking cushions. 

3. To really protect cushions, Shield H2O provides a water repellent treatment that repels moisture and spills, which in return helps prevent mold and mildew. 

4. Have teak furniture? Use a teak SEALER and not an oil. Teak oil is a short term solution and easily washes out with rain. Time to seal it to last long term! 

I have everything I used in my Amazon storefront under outdoor.
Load More... Follow on Instagram

Sign up here to have our fresh posts delivered to your inbox!

Enter your email address:

Delivered by FeedBurner

Copyright © 2023 Within The Grove • Customized by Brave Creative Design · Log in

  • Privacy Policy
  • Terms and Conditions
  • Disclosures + Photo Usage
 

Loading Comments...