


Looking for a large, modern planter box for your favorite indoor plants? Follow along with these step-by-step plans for a DIY indoor planter box and you could make your own this weekend!

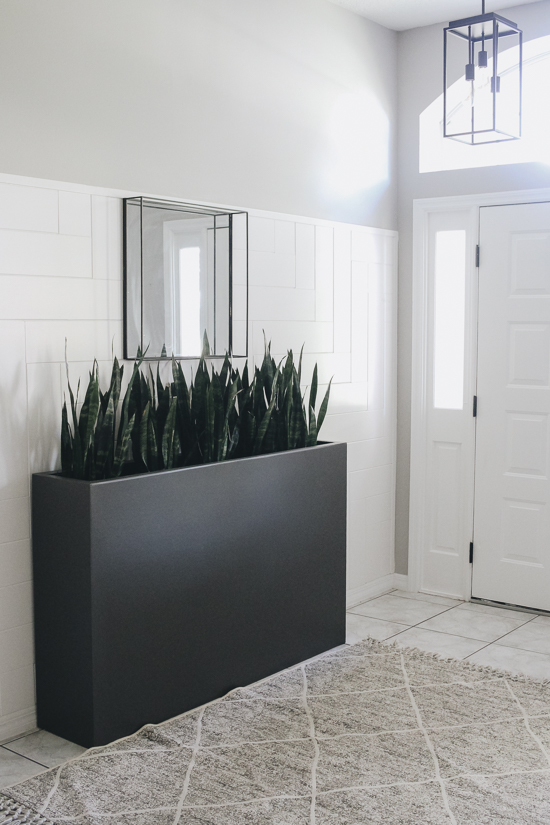
About a year before I finally built my own DIY planter box, I had my eye on a large metal one for the entry of our home. But the price tag was beyond what I would personally pay for one.
Our wheels started turning and I asked my husband if we could build one to make it look like the metal one I found online. And guess what? We did! That’s right – a DIY faux metal planter box made with just wood, plywood and black paint!
Even better? You can build your own large DIY indoor planter box for around $50. Keep reading for the full materials list and tutorial.

Important Project Note
This particular tutorial that I’m sharing with you is for indoor use only. This is built out of plywood and painted to make it look like metal. If you allow this to sit outside, even in a covered area, you run the risk of it warping and not holding up over time. Inside, you’re good to go! I’ll get more into my trick for planting inside the planter at the end of this post.

What You’ll Need for DIY Indoor Planter Box
Tools List
- Miter Saw
- Jig Saw
- Drill
- Kreg Jig
- Brad nailer
Materials List
- 2 x 2 lumber
- 1 x 2 lumber
- 1 1/2″ pocket screws
- 1″ brad nails
- Wood glue
- Quarter inch sanded plywood
- Wood filler
- 100 and 220 grit sandpaper
- Paint + paint supplies
How to Build a DIY Large Indoor Planter
The very first thing you need to do is determine the size you want your planter box when it comes to the width, height, and depth. This will help you determine your cut list for the boards and plywood.
For example, ours is 58″ W x 36″ H x 12 D. The great thing about building your own indoor planter box is that you can build a size that will work best for the space you’re putting it in.
Step One: Measure and Cut the Frame
Once you have your measurements, you’ll start building the frame of the planter box. You’ll be using 2 x 2 pieces of lumber for the frame. Start with the front and back walls of the planter box. Using a miter saw, cut the 2 x 2 vertical side pieces to your desired height and the top and bottom pieces to your desired width.
Important: Whatever width you decide on, subtract the width of your side pieces before cutting the top and bottom pieces. You have to factor in the side pieces to your overall width since you’ll be attaching them to your top and bottom pieces. otherwise, you may get a planter box that is 4 inches wider than you actually want.

Step Two: Build the Frame
Attach the 2 x 2 pieces together by drilling a pocket hole in the left and right side of the top and bottom piece using a Kreg Jig tool.


Apply wood glue on the end of each top and bottom piece that you just drilled. Starting with the top piece, line it up to the side pieces so that they are flush at the top. Drill a screw through the hole into the side piece of lumber. You’ll do this on both sides and then repeat for the bottom piece.

Step Three: Build the Planter Shelf Frame
Now, imagine building this large indoor planter and filling the entire thing with dirt. Yup, not going to happen. Instead, we’re going to build a shelf about a foot down from the top of the planter box. This way we get the visual effect of a large planter box but a smaller section to place our plants in.
From the top of each frame you just built, measure down 12 inches.

Now using the 1 x 2 lumber, you’ll cut a piece that goes the width of the interior side of the side pieces for each frame. Attach the board at the 12-inch mark using the same method of wood glue, the Kreg jig, and a screw on each side. Make sure the board you’re attaching is flush with the outer edge of the side pieces and that the Kreg jig holes are facing the inside part of your planter box. Repeat for both frames.


Step Four: Put the Frames Together
It’s time to piece the two frames together. You’ll cut 6 pieces of the 1 x 2 lumber that are the depth you want your planter shelf. Remember to factor in the width of the pieces you’ll be attaching them to when measuring because you’ll want to subtract that number.

Once all 6 pieces are cut, drill a hole in each end using the kreg jig. Go ahead and insert the screw and drill it into the hole (but stop before it breaks through the end of the board). You’ll also want to go ahead and apply wood glue on each end.

Grab the two frames you just created and have the kreg jig holes face the inside. Attach the two frames together by screwing in the smaller pieces at the top, the bottom, and lined up with the board you attached 12 inches down from the top.
Step Five: Assemble the Planter Shelf
You’ll then want to measure the distance between the front and back piece of the board that’s 12 inches down and cut e more pieces our of the 1 x 2. Evenly space them out and you’ll only be using the same method of using a Kreg Jig and wood glue to secure them. Use a clamp to hold them in place until they are fully dry. We placed these here for extra support when placing plants on the shelf.

Refer to the image below to see as a visual to see where we just attached all 9 of these smaller pieces to build the frame.

Step Six: Attach Plywood Shelf
Next up is building the top part of the shelf. Using a jigsaw, cut out a piece of plywood that is the length and width of your planter box.

You’ll also need to cut out a section of each corner of the plywood so that around the corner pieces of the frame like a puzzle piece. You’ll see what we did in the image below. Make sure that your shelf doesn’t stick out beyond the frame on any side. If you notice an area that does, simply sand it down until it is flush.

Apply wood glue on the top of the wooden boards in the middle of the frame, place the plywood on top, and secure it in place using a brad nailer and one-inch nails.

Step Seven: Attach Plywood Front, Back and Sides
You’ll now measure the width and height for the front, back, and both sides of the planter box. You’ll cut out these pieces using your jigsaw and the plywood. Exact measurements are key here so that everything lines up nicely once you attach them to the frame.

Working with one side at a time, apply wood glue on the frame and place the piece of plywood on top. Run your fingers along each edge to make sure all the sides are flush. Secure it in place by using the brad nailer. You’ll insert the brad nails along the edge so that the nails go into the frame. Repeat for each side.


Step Eight: Finish Rough Edges
Once you have all the side pieces attached, you’ll notice that the top part of the planter box is unfinished. You’ll need to cover this top part with strips of plywood as well. To do that, measure the length of each side and you’ll use the width of the 2 x 2 board for each side. Remember, you used 2 x 2 and 1 x 2 pieces at the top but we want the finished look to appear to be the same width all around.
Cut the end of each strip at a 45 degree angle to help create even more of a finished look. Pay attention to how you cut your 45 degree angles so that they line up once you place them on top. Secure with wood glue and the brad nailer. Clamps are also a great idea to help hold them in place until they dry.


Step 9: Fill Nail Holes and Edges
You’re not done yet but certainly in the home stretch. Apply wood filler to all of the holes created by the brad nailer and where all the edges where the pieces of plywood meet. Once it is dry, sand it down with 100 grit sandpaper, followed by 220 grit sandpaper.
Step 10: Paint
Now your planter box is ready to be painted! I went with the paint colored called Peppery by Behr which helped to give the planter a metal look. I applied it using our HomeRight Super Finish max for a smooth finish and it was easier to get the inside of the planter box.
And that my friends, is how you build your own DIY indoor planter box!.

How to Use Black Paint to Look Like Metal
Because I wanted my planter box to look like the modern, metal planters I’d seen online, I knew I would need to create a faux metal look with paint. While you can buy metallic-look spray paint at the hardware store, I knew I wanted to give this box the smoothest finish possible with my paint sprayer.
To create the faux metal look, I found a black paint that looks like metal. You can choose any black paint you like. I used Peppery by Behr, but some other great options are Sherwin-Williams Iron Ore or Benjamin Moore Wrought Iron (both named after types of metal!).
Try getting the paint in a slightly glossy finish for a shiny, faux metal look.
Planting Tips for A Large Indoor Planter
A quick tip when it comes to placing plants in your DIY indoor planter box, leave them in the original pot! The snake plants that you see here are still in the original plastic pots I purchased them in. When it’s time to water them, I just take the out the front door to the driveway. It’s super easy this way and I don’t have to worry about the inside of the planter box messing up. Make sure to tag me if you build one for your home and have fun with it!

DIY Indoor Planter Box FAQ
I’ve gotten plenty of questions since I first built this indoor planter box a few years ago. Here are my answers to the most common ones.
What do you line inside a planter box with?
My indoor planter box isn’t lined. Because I place potted plants on the box’s shelf, all the soil stays clear of the planter itself. However, if you want to be able to fill the planter box with soil and plant directly in the box, you absolutely could!
I’d recommend using plywood to fully frame out the inside of the planter box shelf (adding plywood pieces to the sides of the box along the inside of the frame). Then, you can use pond liner or geotextile fabric along the bottom and sides of the planter to protect the wood.
How do you fill an indoor planter box?
If you’re planting directly in the DIY indoor planter box, then you’ll want to line the box before adding your soil. In addition to the pond liner recommended above, you could also add a layer of small rocks and gravel at the bottom of the planter to allow for better drainage.
If you’re leaving your plants in their pots like I did (I highly recommend this strategy! It’s so much easier than dealing with potting soil directly in the planter), then you could fill in around the pots with faux moss, rocks or even leave it empty.
Is it cheaper to build a planter box?
Yes, it absolutely is! While looking for a modern indoor planter box for my entryway, I saw prices ranging from about $125 to as much as $700. Building this planter only cost me $50 in materials! Costs will of course be higher if you don’t have all the tools needed for this project, but you can always rent tools from your local Home Depot or Lowe’s or borrow them from friends. I’ve also had good luck finding lightly used tools on Facebook Marketplace!
Let’s keep in touch!
We have a brand new community over on Facebook, House & Home, where we’ll be chatting, sharing, and helping one another when it comes to home decor and projects. Come join us! Check it out here.
Like on Facebook || Follow on Instagram || Follow on Pinterest

[…] Source: 21. withinthegrove 22. LizMarieBlog 23. LizMarieblog 24. […]
So beautiful! I too am curious what sheen of paint you used?
Nice! Looks way more expensive than it is! What finish did you use? Flat, eggshell, etc.