


Looking for simple, beautiful picture frames for your home? These simple DIY acrylic floating frames are an elegant project anyone can do!
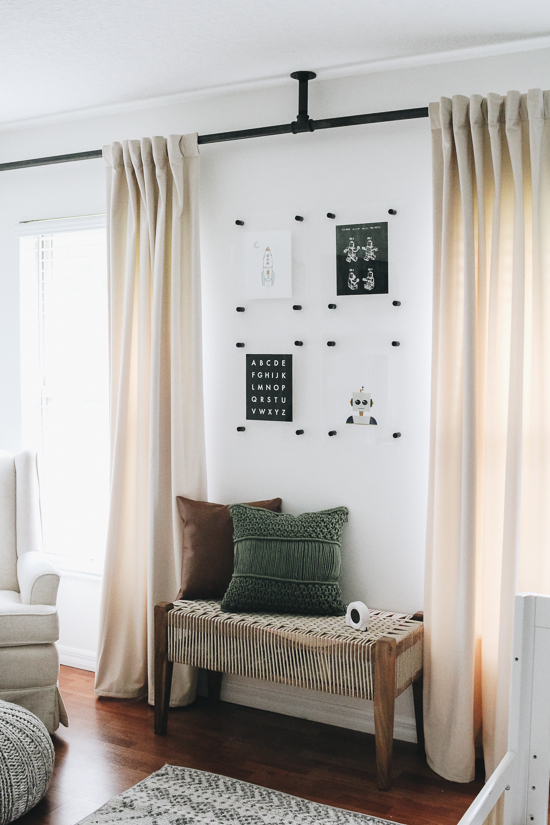
I knew as soon as we hung the new curtain rod and curtains in Oliver’s room that something needed to go between them. I wasn’t sure if I wanted a piece of artwork, a large framed picture, or a collection of images. What I did know was that it needed to be simple so it didn’t overwhelm this space on the wall.
That’s when I remembered the acrylic floating frames I created for our guest bathroom. They’re exactly what I was looking for in Oliver’s room and I’m so happy with how they turned out. I love these DIY floating frames so much, I ended up making some for our living room, too!

They’re simple, modern and lightweight, and I can easily change out the photos. They’re also kid-friendly and budget-friendly when you make the DIY version.
You can certainly buy these without having to worry about making them but most cost around $90. Pricey, I know! Target recently came out with their version but very limited in sizes. So, instead, let’s make some DIY acrylic floating frames of our own! It’s easier than you’d think.

WHAT YOU NEED FOR DIY FLOATING FRAMES
- Plexiglass cut to your desired frame size
- Painters tape
- Drill
- Mounting hardware– These include the drywall anchor screws you’ll need.
- Drill bit slightly larger than the screw of your mounting hardware. We used 1/2″ drill bit
- Second drill bit for the drywall anchor screws
- Phillips head
- Art prints – including the links to the ones I used further down
- Clear double-sided tape
**Some of these links are affiliate links.
WORKING WITH ACRYLIC AT HOME
Let’s chat about the acrylic material we’re using for these frames before we dive all in.
Is plexiglass the same as acrylic?
You’ll notice that while I’m calling these acrylic floating frames, I also include plexiglass in the materials list above. That’s because plexiglass and acrylic are essentially the same thing. They’re both made from polymethylmethacrylate (or PMMA). The main difference is that Plexiglass is a brand name, while acrylic is the generic term for the material. Think of it like the difference between Kleenex and tissues 🙂
How do you cut plexiglass to the right size?
You’re probably wondering how in the world you can cut plexiglass to your desired size at home. And that’s where my biggest tip for this project comes in…don’t cut it at home! Instead, head to your local Lowe’s and have them cut it for you!
You know my go-to place is Home Depot but sadly they don’t have the setup to cut plexiglass. I discovered that Lowe’s carries and cuts the plexiglass for free. And they do it right there on the spot in minutes! You just need to pick the thickness of your plexiglass (I went pretty thin), have your measurements ready, and head to Lowe’s to get it cut. You will need one piece of plexiglass per frame.

What is the best thickness for acrylic picture frames?
A lot of this is personal preference. I’ve seen recommended thickness for different frames ranging from 2mm-10mm, with the thicker acrylic being used for larger frames. I went pretty thin with mine. Keep in mind that you’re only using one piece of plexiglass per frame in this tutorial, so that will impact the overall thickness of the frame.
HOW TO MAKE YOUR OWN ACRYLIC FRAME
Now, this tutorial shows you how you can create these DIY floating frames by using just one piece of plexiglass. This is for two reasons: to make it more budget-friendly and it takes away the headache of trying to line up the holes perfectly that you’ll be drilling into the corners of the plexiglass.
Step 1: Prepare the plexiglass for drilling
You’ll notice that the plexiglass comes with a protective sheet on both sides of it. Leave it on! This will help prevent scratch marks as you’re drilling the holes. Next, place a strip of painter’s tape on each corner that wraps from the front to the back. This is an extra step that I take because I discovered it help the plexiglass not to crack while drilling the holes.

Visually you want every hole that you drill to be in the exact same spot of every corner. This will create uniformity. To do this, I cut out a 1 1/2″ x 1 1/2″ square out of paper. I lined it up to each corner and marked the furthest corner on the painter’s tape using a marker. This ensures that every spot that I’ll be drilling is in the same spot for each hole.

Step 2: Drill holes in the plexiglass
Now we’re ready to drill the holes! I suggest practicing on a scrap piece of plexiglass first. You should have some left over from the sheet you had Lowe’s cut.
The trick with drilling holes into plexiglass is to take your time. If you go too fast, it will heat up the plexiglass and it will crack. I have also found that if you go too slow, it doesn’t provide enough momentum to get the hole going. Figure out your rhythm as you practice.

Using a drill and a drill bit that is slightly bigger than the hardware you’ll be placing in the hole, you’ll start drilling your holes! Place the tip of the drill bit directly on the mark you made on the painter’s tape and start to drill slowly.
Drill until you’ve broken through the plexiglass and carefully and slowly remove the drill bit. If you remove too quickly in reverse, it will crack the plexiglass. If it didn’t break through, flip the plexiglass over and drill from the back going at a slow speed as well. You’ll repeat this for every corner on the frame.

Step 3: Attach your artwork to the frame
Once all of your holes are drilled, you’ll need to remove the painters tape and the protection film. You’re then ready to hang them on the wall!
But first, you need to attach your photographs or artwork. Remember how we’re only using one sheet of plexiglass? To get the artwork to stay in place, you’ll apply a tiny piece of clear double-sided tape to each front corner of your artwork.
You’ll place your artwork facedown on the plexiglass, center it, and firmly press each corner. You barely notice the double-sided tape. Here’s where you can find the artwork we used for Oliver’s room:

Step 4: Mount your DIY floating frames
To mount the frames, I use this mounting hardware that I found on Amazon and they are such great quality. Plus, they come with the drywall screws. The back half attaches to the wall, the front piece goes through the hole in the frame and then screws into the piece that you attached on the wall.


That’s it, my friends! With just a little bit of time and patience, you’ll have custom floating frames in no time! What I love the most about these is that you can make them as big or small as you want them. Plus, they beautifully add to space without being overwhelming.
Troubleshooting Common Problems with Acrylic Floating Frames
This project is pretty simple once you get the hang of it, but if you’ve never worked with acrylic before it can feel a little overwhelming! Here are some FAQs (and my answers) to help you navigate and troubleshoot some common plexiglass problems.
How do you drill a hole in acrylic without cracking it?
As I mentioned above, one of the best things you can do when cutting acrylic is to take your time. Here are a few of my other favorite tips:
- Leave the masking film on the plexiglass while drilling
- Use the right drill bit, such as a specially ground twist bit
- Always practice on a test sheet of acrylic first and pair close attention to the speed and pressure that works best.
What is the best type of drill bit for acrylic?
You can drill into thin plexiglass pretty easily at home, but if you want the cleanest holes and the lowest risk of cracking your acrylic then a step drill bit is the way to go. Step drill bits are specifically designed for plastic, and are known for creating clean holes without burrs.
What are the disadvantages of acrylic photo frames?
I’ve had these DIY acrylic floating frames in multiple rooms of my house for years now without any issues, so from my perspective, there are very few disadvantages! But there are a few things to keep in mind before choosing this project to display your photos or art prints.
Acrylic is prone to scratching, so be sure to handle them carefully when mounting, changing out photos or cleaning them. I also recommend installing them high enough on the wall that little hands won’t be able to touch them to scratch or smudge.
Acrylic can also generate static electricity, which means these can attract dust fairly easily. But of course, that’s nothing a little dusting can’t fix!
Make Your Own Floating Frames
Ready to tackle this project in your own home? Happy creating, my friends! Make sure to tag me in your photos to show off your hard work!

Let’s keep in touch!
We have a brand new community over on Facebook, House & Home, where we’ll be chatting, sharing, and helping one another when it comes to home decor and projects. Come join us! Check it out here.
Like on Facebook || Follow on Instagram || Follow on Pinterest

[…] DIY Floating Frames + Printables […]
Hi!!! Anyway you can send me a link to the hardware screws you got off Amazon I’m looking on there and i am little overwhelmed. Plus where do you buy a sheet of plexiglass I’m new with this thanks so much !!!