• Home
  • ABOUT
  • WORK WITH ME
  • Paint Colors
  • Shop Our House
    • Guest Bedroom
    • Front Living Room
    • Living Room with Fireplace
    • Previous Second Living Room
    • Current Playroom
    • Prior Playroom
    • Dining Room
    • Laundry Room
    • Oliver’s Bedroom
    • Guest Bathroom
    • Covered Lanai
    • Patio
    • Master Bedroom
  • CONTACT
    • Facebook
    • Instagram
    • Pinterest

Within the Grove

Join the list to receive occasional news and special updates!

How to Build a Wooden Doormat

December 23, 2019

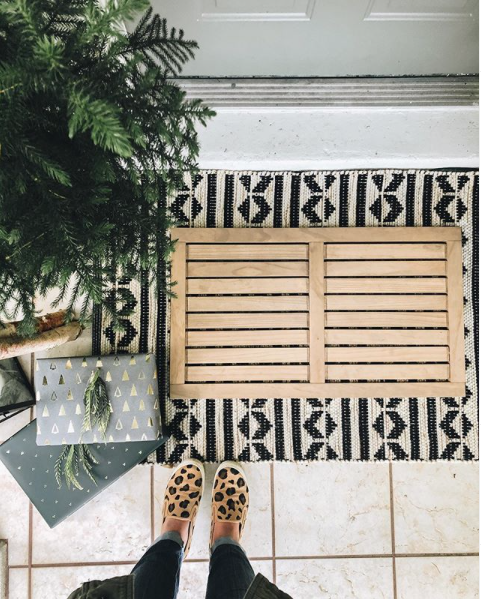
A little over a year ago I stumbled upon a wooden doormat at Target. I thought it would be the perfect doormat to layer on a rug at my front door. Little did I know I would end up buying two more for our patio door and my office door and gifting one to a family member. It’s the perfect texture and color to pair with literally any rug or to use on its own.

But sadly this particular wooden doormat has never been available online. So you have to cross your fingers to find it in store. And now it appears that it has been discontinued. Once the Targets in my area sold out of it, it was never restocked. That was a year ago. I have heard that it can still be found in some Targets. But that doesn’t help all of us who still want to get our hands on one.

So guess what? I’m showing you today how you can build the exact wooden doormat where you can even pick our own stain. This way we can all have the chance to place one of these doormats at our front door. Here’s how to build one of your own:

Here’s What You’ll Need

  • 4 – 8 foot sections of 1 x 2 pine boards
  • Measuring Tape
  • Miter Saw
  • Router
  • Kreg Jig (alternative tool would be a brad nailer)
  • Kreg Screws (1 1/4 inch)
  • Drill
  • Sander
  • Sandpaper in 120 and 220 grit
  • Bowl for water + a rag
  • Stain – I used Flagstone by Varathane 
  • Polyurethane
The How-To

The great thing about this DIY wooden doormat is that you can make it any size that you want. For this tutorial, I used the same measurements as the doormat I purchased at Target. You’ll cut your 1 x 2 pine according to the measurements shown below using the miter saw. Take your time with this step! It’s important that all of the pieces line up nicely and without gaps. When in doubt, cut the pieces a hair too long so you can sand or cut it down to the exact size.

Now, to get the look of a gap going along the sides of the middle pieces, you’ll have to route the ends. If you don’t have a router you can still piece this doormat together as is but you won’t have the gaps on the side. Which is fine! Refer to the image below with what it would look like without routing the ends.

With my measurements, there will be about a quarter of an inch gap between each of the middle pieces. So you’ll want to set your router bit so that it only takes off a quarter of an inch from the ends. This will ensure that all the gaps will be the same width. You’ll also want to set the height of your router bit to a little more than a quarter of an inch as well. You don’t want to go too deep because of the pocket holes you’ll be drilling on the back.

Using the picture below as a guide, create a pocket hole on the back of the wood pieces. The only pieces that won’t get a pocket hole are the top and bottom piece. Pay close attention to the inner sides of the middle pieces. I staggered the pocket holes so they won’t run into each other when inserting the screws. This will allow the screws to bypass one another. Another option to piece this doormat together is by using a brad nailer but it won’t be as sturdy and strong when using pocket holes and screws.

Now that all of the cutting and drilling is done, sand each piece of wood on all sides. You’ll start with a 120 grit sandpaper to remove the top layer to expose the natural wood. Follow up by using a 220 grit sandpaper for that really smooth finish. Wipe your pieces of wood down using a tack cloth to remove all of the sanding dust.

Before applying the stain, you’ll want to pre-condition your wood to help prevent blotches and uneven stain color. For pine, I’ll be using water as my pre-conditioner. It opens the grain of the wood to accept the stain and I’ve had great results with it!. Get a bowl of water and soak a rag. Wring it out so that it isn’t dripping wet but you also don’t want it damp. Rub the rag on all the sides making sure to get everywhere. Do this with all of the pieces and allow them to fully dry.

Once dry, apply your stain. You’ll want to apply the stain going in the same direction as the grain. I love the look Flagstone by Varathane. It gives the wood a little warmth and color while keeping it light and neutral. You’ll also want to take the time to seal your wood especially if it is going to be exposed to harsh outdoor elements. Seal it using polyurethane which will help seal it and make it waterproof.

Now it’s the moment you’ve been waiting for: piecing everything together! You’ll start with the frame by screwing the side pieces into the top and bottom piece. Make sure the edges are all flush. Then find the center of the top and bottom piece and the middle of the piece you’re placing in the middle of the doormat. Lines those up and attach the middle piece of wood. Refer to the image below.

Now to attach all of the middle pieces! This part took a little bit of time and patience because you want the exact same measurement between each board so all the gaps are the same and level. If you can find a spacer that’s a quarter of an inch, that will be your best way to attach them one at a time. I couldn’t find one, so I measure out the quarter of an inch gaps and marked where I needed the bottom of each wood piece to go.

Screw them in one at a time. Don’t tighten the screws all the way until you have all the pieces attached. This will help ensure that all the pieces will fit. If you encounter a wooden piece that won’t fit, you can sand a little bit off of the ends until it does.

To finish the doormat, you’ll screw an anti-skid pad on the bottom of each corner. This will not only help prevent it from slipping but will also lift the doormat up to allow the water to drain out. And for extra support, attach two thin pieces of wood along the back. Make sure the piece that you’re using is not as thick as your anti-skid pads.

You’re officially done and can now enjoy your new wooden doormat! I love how you can truly make it a custom doormat by choosing the stain color and the size you’d like it to be. Can you imagine a larger one sitting in front of double doors? It would be so pretty! If you try this project, I’d love for you to share with me! Tag me on social media or you can even send me an email. Happy building!

We also have a brand new community over on Facebook, House & Home, where we’ll be chatting, sharing, and helping one another when it comes to home decor and projects. Come join us! Check it out here.
Like on Facebook || Follow on Instagram || Follow on Pinterest

Share this:

  • Click to share on Twitter (Opens in new window)
  • Click to share on Facebook (Opens in new window)

Related

Filed Under: DIY, DIY Tutorial, Home Decor

« Hosting a Christmas Eve Brunch
Most Popular Projects of 2019 »

Comments

  1. sona says

    May 25, 2020 at 9:19 pm

    How has it held up?

    Reply

Trackbacks

  1. 45 Awesome Scrap Wood Projects You Can Make says:
    September 21, 2020 at 12:09 pm

    […] Project details: withinthegrove.com […]

    Reply
  2. 30 Awesome & Easy Scrap Wood Projects – Woodworking Master says:
    June 21, 2020 at 7:16 am

    […] Tutorial: Within the Grove […]

    Reply

Leave a Reply Cancel reply

Your email address will not be published. Required fields are marked *

This site uses Akismet to reduce spam. Learn how your comment data is processed.

Looking for something?

withinthegrove

I’ve never known how to beautifully balance this I’ve never known how to beautifully balance this wall with artwork when working with the angled ceiling and the wood wall treatment so I asked @minted to help me.

With 16,000 independent artists to choose from on their website, the work was cut out for me. Or was it? Where do I even start? What size artwork do I need? I bet you’re nodding your head with being in the same situation before. I decided to use @minted ‘s Art Styling Service where I was able to work with a designer to help me pick out artwork for this wall, the exact sizes I would need, the finish of the artwork, and the color of the frames.

And the results are amazing! This wall has now become even more of a statement piece in our home with artwork that’s our style. I never would have thought of this placement for the gallery wall but now I can’t think of anything that would work better for the space.

Shop @minted and use my code LIZART10 for 10% off art and Art Styling Services. **Some exclusions apply.

#MintedPartner #MintedRefresh #LivingRoom #LivingRoomDecor
Let’s get your summer garden started! Here are 3 Let’s get your summer garden started! Here are 3 ways you can start seeds indoors. You can’t go wrong with any of them and it honestly just comes down to the one that works best for you. Head on over to the blog to get all the details on watering, lighting, when to transplant, links to everything, and so much more!
The waterline tile and decking are both done! With The waterline tile and decking are both done! With the limestone making the biggest difference with this pool update. It’s stunning!! Very exciting to see our entire pool area installed. We’re almost there!! Just the interior finish to go and then it’s time to fill the pool. 

•Pavers are limestone in Myra White 
• If you’re local to Central Florida, @caapavers installed ours! 
• Waterline tile is by NPT in the color Carbon.
DIY TILE REVEAL! The front door is styled and now DIY TILE REVEAL! The front door is styled and now taking the time to soak these tiles in! I kept it simple with the decor and took away the rug. If you've been here for a little bit, you know I love to place a rug underneath my wooden doormat. But letting these tiles SHINE is a must. Still can’t believe I made these! Head to the last image. I installed an imperfectly perfect tile as a little nod to these being handmade. DIY tile blog post coming your way soon! Grabbing packages from my front door just became even more exciting. 

Front door color: Black Magic by Sherwin-Williams
House Color: Cloud White by Benjamin Moore
Decor: You can find it on my LTK through my profile!
Right when we thought the pool excavation day was Right when we thought the pool excavation day was exciting, the gunite was installed! We’re about halfway through the pool build and we officially have the shell of the pool done. This all happened so fast. I’m talking about two weeks. The waterline tile and decking up next!
This will forever be a project where I will say: “ I MADE THESE TILES!” What would have cost me close to $2,000 to buy, I was able to make them for $350. I started experimenting with how to make them and nailing down the perfect black color 8 weeks ago. Let that sink in! This has been such a labor of love. 20 hours went into making the tiles. Two weeks worth of demo + installation. And a lot of learning curves in between. This project is so much more than saving money. It’s the process I went through and what I pushed myself to learn and do to get to this moment. We can do hard things!! Cheers to this project being done. How about we make a front door next? JUST KIDDING!! But a new front will be happening!

Thank you @vintagerevivals for showing that making cement tiles is a project one can tackle and @abby_roadhome doing the same with this amazing pattern!
The tiles are in place! 🎉 I’m not done yet bu The tiles are in place! 🎉 I’m not done yet but this is certainly a part of the project that needs to be celebrated. Grout is up next to call this project a wrap. It has been a process but one of the most rewarding ones when it comes to projects I’ve tackled in our home.
IT IS TIME! I have been waiting for this moment to IT IS TIME! I have been waiting for this moment to smash these front door tiles ever since we moved in. And it felt so dang good! Here’s what I’m doing to prep the concrete slab for the tile install: 

1. Remove old tile
2. Use an angle grinder with a diamond grinding blade to remove the thin set and paint. 
3. Wash the slab
4. Apply two coats of Hydro Ban to create waterproofing barrier from the moisture in the concrete slab and to help with crack isolation.
Another exciting step for the pool: Excavation day Another exciting step for the pool: Excavation day! We officially broke ground. It was the coolest thing to watch. Rebar and gunite up next.
Load More... Follow on Instagram

Sign up here to have our fresh posts delivered to your inbox!

Enter your email address:

Delivered by FeedBurner

Copyright © 2023 Within The Grove • Customized by Brave Creative Design · Log in

  • Privacy Policy
  • Terms and Conditions
  • Disclosures + Photo Usage
 

Loading Comments...