


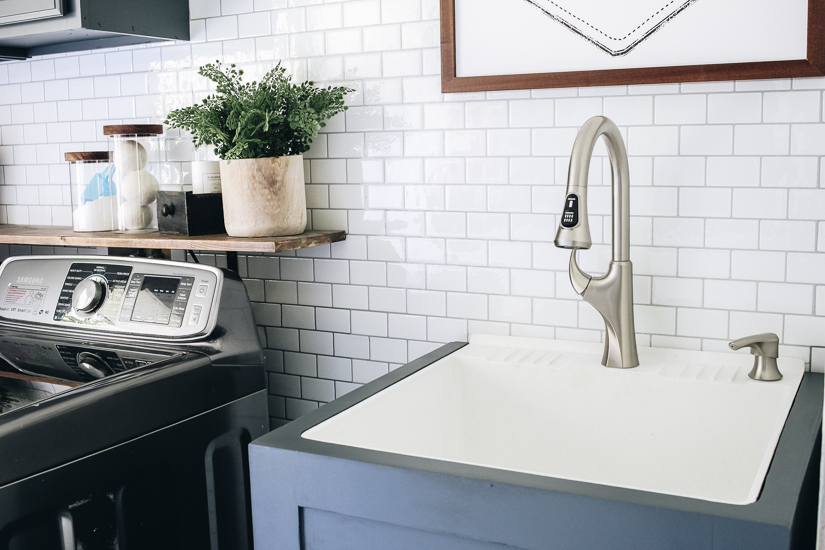


One of my favorite things about our laundry room is having a utility sink to help us clean up after our house projects. Up until a few weeks ago, it used to be an eye sore but we fixed that by building a faux cabinet to conceal the sink. Next up was focusing on switching out the faucet to truly make the sink work for us.

This is a sponsored post on behalf of Spectrum Brands but all thoughts and opinions are my own.
You, see, rinsing out tools from home projects and cleaning up messes can be, well, a mess. Our smaller faucet did it’s job but we needed something a little more powerful and functional to help us clean out our project tools without making a bigger mess. That’s when we decided to install the Miri™ by Pfister.

I’m beyond thrilled with not only the visual impact the Miri has made in our laundry room, but also the ease in using it. It meets our lifestyle of always having 2-3 home projects going on at once and being able to clean up quickly and efficiently.

Between the one handle pull down, the pull-down sprayhead to rinse out the sink and the single control soap dispenser (meaning you can pump out the soap by simply pushing with one finger if you need to), this faucet has certainly met it’s match with our family. And don’t even get me started on the Spot Defense finish that prevents fingerprints and water spots. Need I say more?

We made a few adjustments to our utility sink since we decided not to go with the deckplate that came with the Miri. After the old holes were sealed from the previous faucet, new holes were created for the Miri and the soap dispenser. We were then ready for install. Since this faucet installs from above the sink with the Top Pfit™ feature (minus the connecting the supply lines), it only took us 25 minutes to install everything.

When you realize that it takes less than 30 minutes to drastically change the look of your sink by switching out the faucet, you wonder why you didn’t do it sooner. So in case you’re inspired to do the same to a sink in your home, here’s how we installed ours for a quick home project.
The How-To

Tools needed: In addition to the parts that come with the Miri faucet by Pfister, you’ll also need an adjustable wrench. You’re then ready to start installing your faucet.

Before you even begin, make sure you turn off the water supply by turning the valves (usually found under the sink). Remove your old faucet and supply lines. You’ll also need to consider if you want to use the deckplate or not. The deckplate is decorative and can also hide any holes that you won’t be using from your previous faucet. Since we decided not to use the deckplate, we inserted the spout body straight into the center hole.

Using the install tool, we were able to secure the spot body to the utility sink by twisting the tool clockwise until the bracket was snug underneath the sink deck. My friends, it didn’t budge once this was completed.

You’ll then install the spout by removing the quick disconnect and running the hose through the spout body you just installed. Align the two pieces together in the back and give a slight push to secure them together.
Add the weight to the hose and re-attach the connector. Attach the hose to the body spout and push the piece up until it cannot be pulled down. From here, you’ll simply connect your water supply lines to the valves using the adjustable wrench for a secure fit.

The last step will be installing your soap dispenser which is as easy as taking it apart, adding your soap, securing the pieces in place and then twisting until it’s secure.

You’re now ready to turn the water on and you’re back in business! When installed properly, you’ll find that this faucet has a TiteSeal ™ for the mounting and a Pforever Seal ™ so that you won’t ever have to worry about leaks.

This is a general guide on how you can quickly install this Miri faucet dispenser. If you decide to give this a try or any other Pfister faucet, they all come with detailed instructions for a quick and easy install. Here’s a great before and after of our sink to show you the impact this faucet has on our space.


It goes to show you how even the smaller home projects can create a huge impact in a space. I hope this inspires you to try this project in your laundry room, kitchen or maybe even with an outdoor kitchen. You’ll have to let me know if you do!
Until then, let’s keep in touch!
We have a brand new community over on Facebook, House & Home, where we’ll be chatting, sharing, and helping one another when it comes to home decor and projects. Come join us! Check it out here.
Like on Facebook || Follow on Instagram || Follow on Pinterest

Your post about installing a new faucet for your utility sink is fantastic! I love how you’ve shared the entire process along with detailed photos, making it so much easier for readers to follow along. It’s great to see how you’ve transformed your space with a practical update. Thanks for sharing your DIY journey and tips with us!
Love this! Could you please share where you got the wall mounted utility sink itself. Thank you!
Of course! It was a DIY! Here’s the link: https://withinthegrove.com/how-to-hide-your-utility-sink-faux-cabinet-tutorial/
What is name of the hole filler you used for the big hole at the back/top of the sink? Thanks!!