• Home
  • ABOUT
  • WORK WITH ME
  • Paint Colors
  • Shop Our House
    • Guest Bedroom
    • Front Living Room
    • Living Room with Fireplace
    • Previous Second Living Room
    • Current Playroom
    • Prior Playroom
    • Dining Room
    • Laundry Room
    • Oliver’s Bedroom
    • Guest Bathroom
    • Covered Lanai
    • Patio
    • Master Bedroom
  • CONTACT
    • Facebook
    • Instagram
    • Pinterest

Within the Grove

Join the list to receive occasional news and special updates!

Our Navy Kitchen Reveal

January 15, 2018

Navy and White Kitchen Reveal

The time has finally arrived! Can you believe it? We’re revealing our navy kitchen and how we gave it a makover. This was one of our biggest and longest projects to date. Due to it taking a month to paint all the cabinets, ordering and returning the hardware twice, a camera lens breaking, and just life in general, we’re thrilled to finally invite you into our navy and white kitchen. YAY!!

Navy and White Kitchen Reveal

A few weeks ago I shared with you the before of our kitchen.  Before we dive into all of the details, I’d love to show you a few before and after photos! It was so much fun looking at these and realizing how much we have done to the kitchen. 

Before and after of our kitchen makeover

Before and after of our kitchen makeover

Before and after of our kitchen makeover

Before and after of our kitchen makeover

Before and after of our kitchen makeover

Before and after of our kitchen makeover

Before and After Kitchen Makeover Reveal

Before and After Kitchen Makeover Reveal

I think we can all agree there was a lot of white except for the bright pop of orange found along the top of the kitchen. The before images are actually very forgiving of the condition of the cabinets from when we first moved in. Let me give you a little close up of the damage on the cabinets. We spent about a week of scrubbing, cleaning, and repairing the cabinets before I even started painting.

Kitchen cabinet makeover

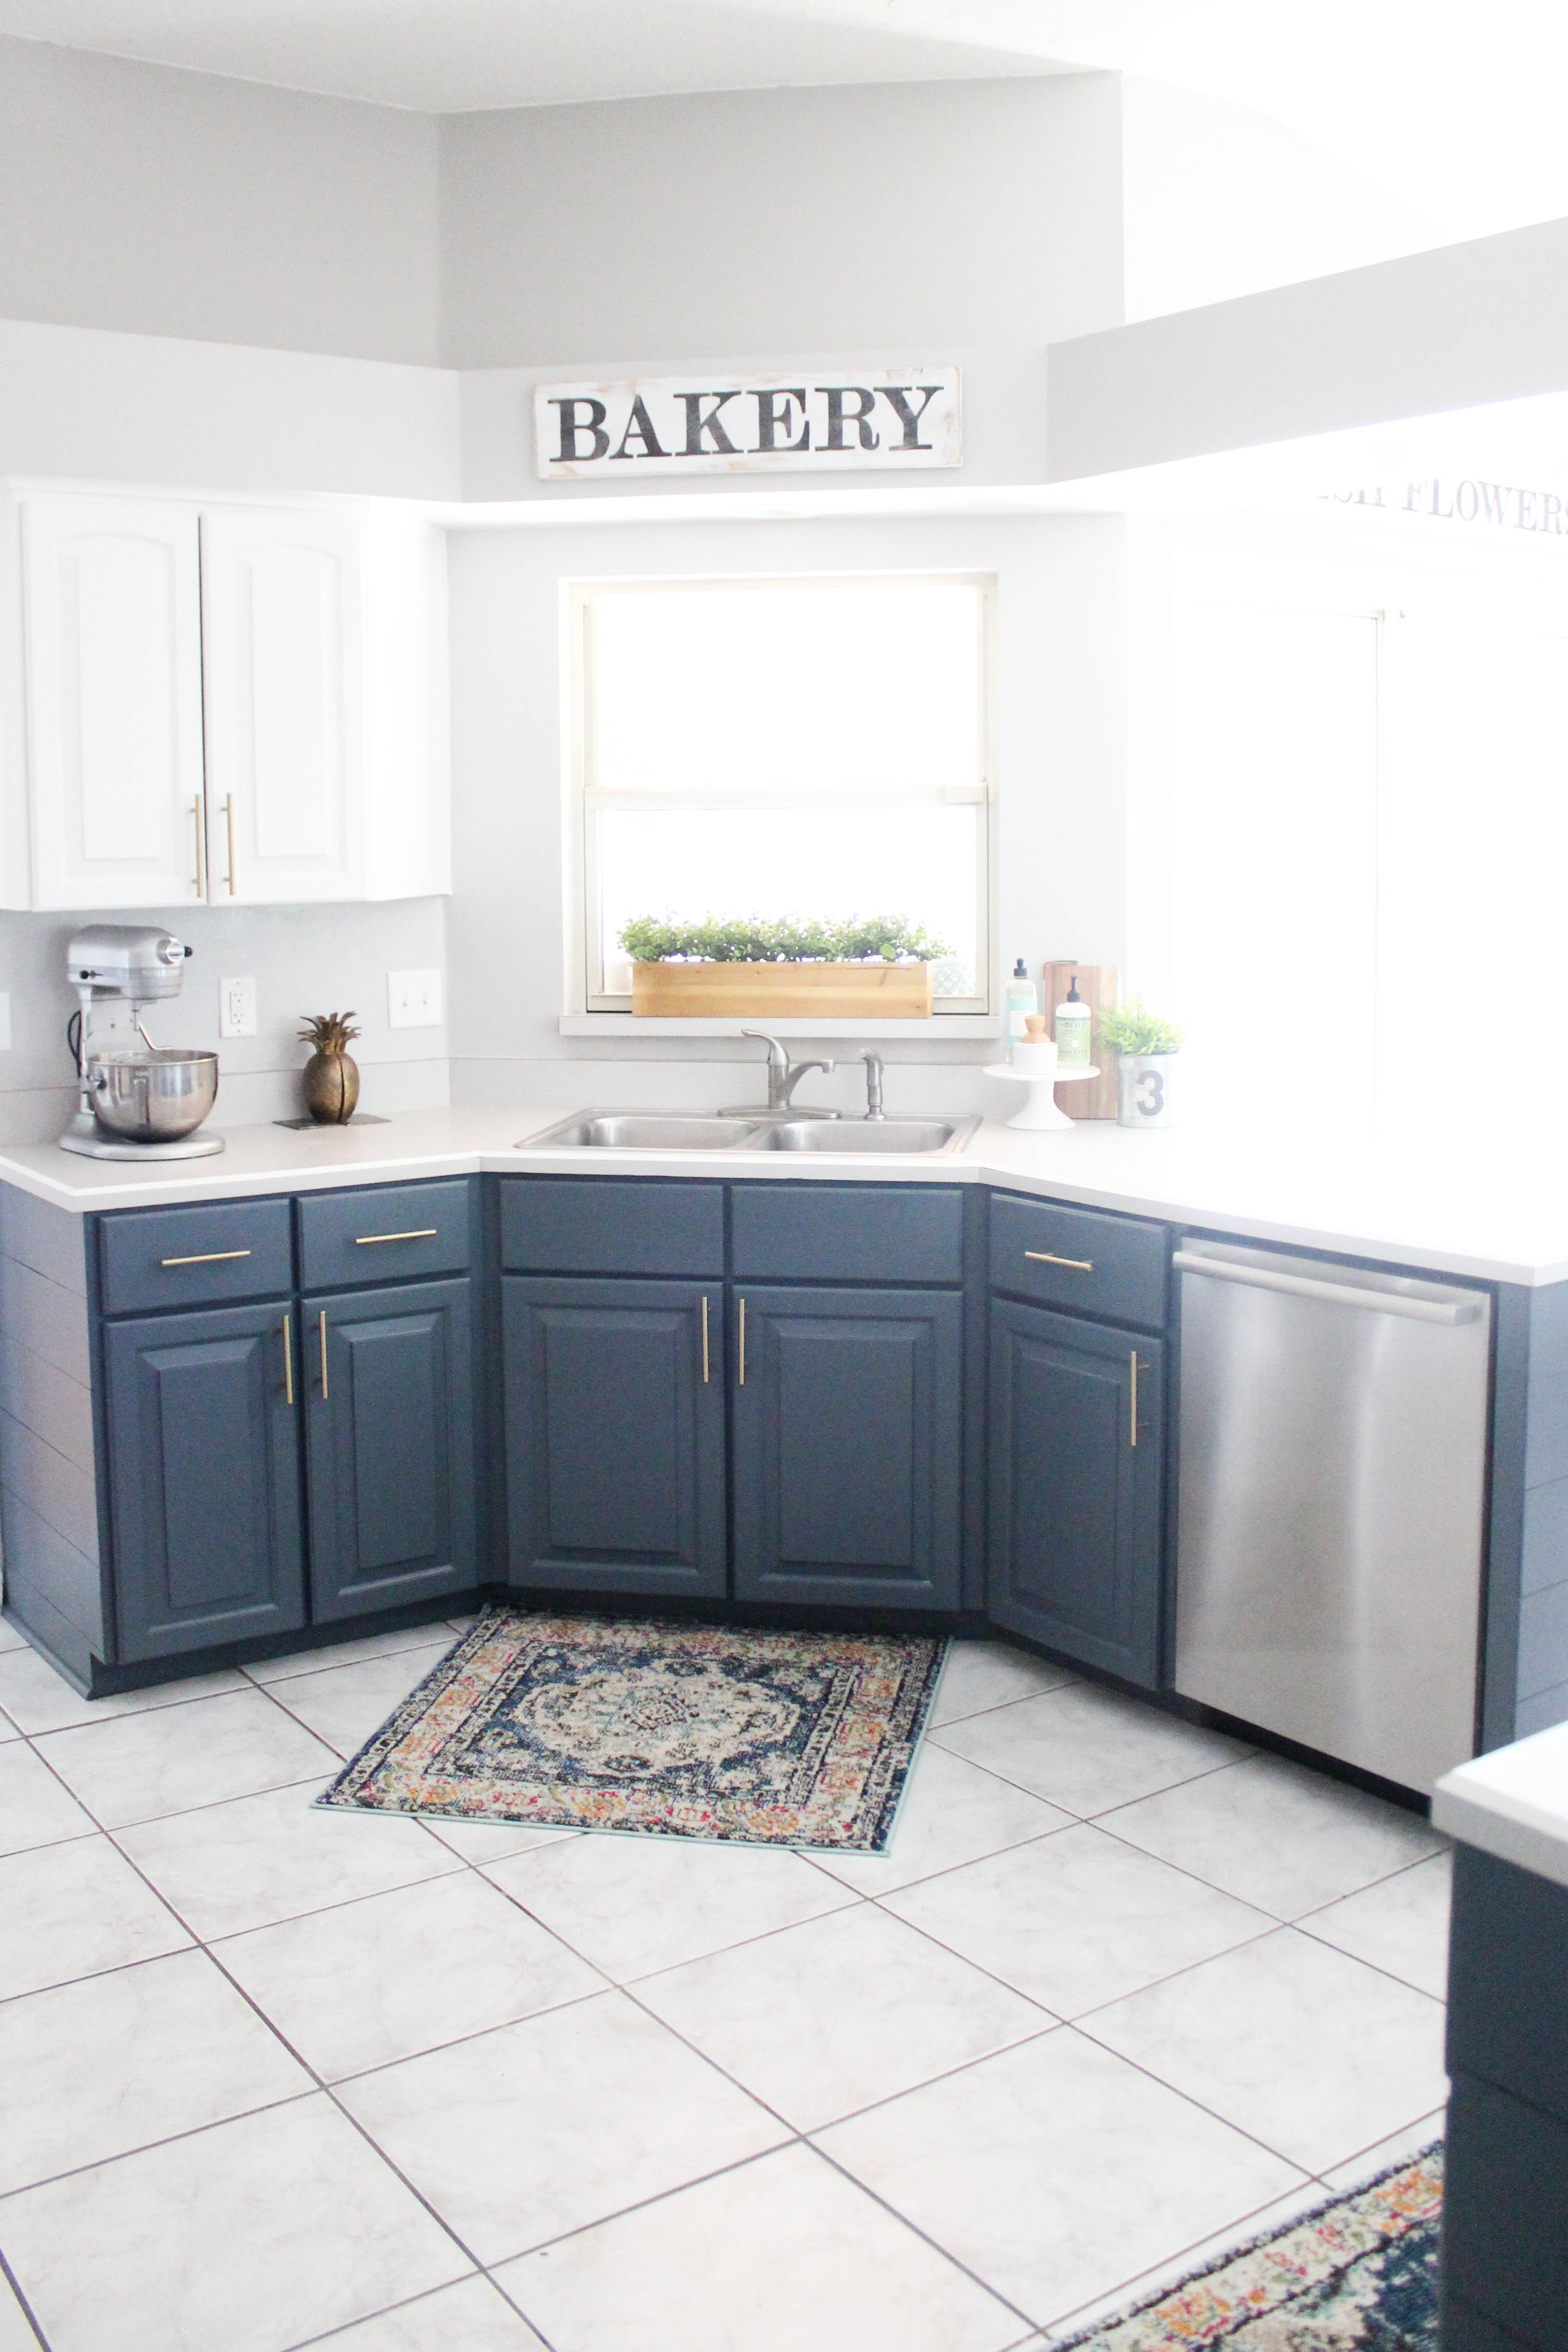
Our kitchen has been completely transformed after getting new appliances, painting the cabinets, attaching new hardware and adding a few decor pieces. I couldn’t be happier! 

Navy and White Kitchen Reveal

For the lower cabinets, we used Outerspace by Sherwin-Williams in their new Emerald line. I love this color! It’s the perfect navy with a hint of gray. We went with Emerald because very durable, we didn’t need a top coat, and I can wash the freshly painted cabinets with soap and water.

Navy kitchen cabinets

For the upper cabinets, I used Extra White by Sherwin-Williams. It’s the same color that I used on all of the trim and doors in our home. The bright white helps to balance out the light in the space and compliments the navy. The orange is gone as well and we painted the kitchen walls in Seattle, which is also the color we used throughout the main living areas of our home. I have a post all about this color and where you can find it, The Perfect Gray Paint for Any Home.

White kitchen cabinets

Knowing that we wanted champagne gold colored hardware, this was the easiest thing we picked out for the kitchen. It was ordering the correct size that proved to be difficult! We had to return and reorder a few times until we got it right. 

Champagne gold handles

We also added shiplap to the sides and backside of the bottom cabinets and it made the biggest difference! It’s probably my favorite new feature of the kitchen, especially by painting them navy as well. This part of the project only cost us $25 to complete due to using a thin plywood for the shiplap.

Using shiplap in the kitchen

Throughout our kitchen space we used three different sizes handles depending on the cabinet size. Majority of the them came from Wayfair but they were sold out of the smallest size that we needed. I was thrilled when I found them on Amazon as a Prime item and at a cheaper price.

Navy and White Kitchen Reveal

A few weeks ago I found the kitchen rugs on Joss & Main. They’re a pattern that I normally wouldn’t go with because I usually play it safe and don’t go too bold with patterns and colors. But I really wanted to step out of my comfort zone and try something different. I’m so glad that I did! I’m loving the warmth, color, and design they bring to the space. If you follow me over on Instagram, then many of you helped me pick out this rug. Thank you!!

Navy and White Kitchen Reveal

We still have a lot left to do but we’ve also done so much. Here’s where we are on our kitchen project list:

– replace appliances

– install new range hood

– paint walls

– paint upper and lower cabinets

– attach shiplap to side and back of lower cabinets

– attach new hardware

– add trim around the window

– install backsplash

– install new sink 

– build a custom island

– build wooden shelves over existing shelves

– install concrete countertops

I can’t even begin to tell you how thrilled I am to finally be sharing our kitchen makeover with all of you. We love what we’ve done so far and hope you do too! I’m thinking about doing a blog post on my process of painting the cabinets from beginning to end. Let me know in the comments below if this is something you’d like me to share. Enjoy a few more pictures of our navy kitchen makeover!

Our kitchen reveal

Our kitchen reveal

Our kitchen reveal

Our kitchen reveal

Our kitchen reveal

Let’s keep in touch!

We have a brand new community over on Facebook, House & Home, where we’ll be chatting, sharing, and helping one another when it comes to home decor and projects. Come join us! Check it out here.

Like on Facebook || Follow on Instagram || Follow on Pinterest 

Share this:

  • Click to share on Twitter (Opens in new window)
  • Click to share on Facebook (Opens in new window)

Related

Filed Under: Home Inspiration, Home of the Rishels, Our Home Improvements

« Why We’re Making Over the Playroom + Before Pictures
Home Decor and Home Improvement Sales: Week of January 15th, 2018 »

Comments

  1. kevin says

    April 5, 2020 at 7:27 pm

    can you update this review are you still happy with using sherwin williams paint? is it holding up?

    i found a youtube

    https://www.youtube.com/watch?v=1WVbAQ6_LxM

    were you said your paint is peeling off and you have to keep touching it up

    Reply
  2. Eunice says

    June 4, 2018 at 10:05 pm

    I stumbled upon your kitchen through Pinterest as I’ve been looking for the perfect navy grey color for cabinets and I’m SO inspired by your kitchen!! It’s beautiful and exactly what I want to do to mine! I’d love to know how you guys took on this project. Also, what kind of paint finish did you use? Thanks so much!

    Reply
    • ElizabethRishel says

      June 5, 2018 at 12:43 am

      I’m thrilled that you found us! And yes, the subtle hint of gray in the navy is what we love about this color. Short version: we de-greased the cabinets and cabinet doors, gave everything a light sand (careful not to sand deep scratches), applied primer, and then painted them the navy color. We used the Emerald paint found at Sherwin Williams. It’s self leveling, took two coats, didn’t require a clear coat, and you can wash it with soap and water. We used a satin sheen/finish. These were painted 6 months ago and they still look like the first day we painted them. I hope this helps!

      Reply
      • Eunice says

        June 5, 2018 at 12:47 am

        Thank you so much for your help! I’ll definitely keep this in mind when I tackle this project! 😊

        Reply
      • Christina says

        March 1, 2019 at 5:27 pm

        LOVE your kitchen! It is inspiring! How long did it take for y’all to paint the cabinets?

        Reply
  3. Alyssa says

    January 16, 2018 at 10:55 am

    Holy crap! This is so gorgeous! Love love love the handles 🙂

    Reply
    • ElizabethRishel says

      February 12, 2018 at 12:00 am

      Thank you so much Alyssa!!

      Reply
  4. Reilly says

    January 15, 2018 at 2:44 pm

    This is absolutely beautiful!! I love the color and I love how you used shiplap on the open ended cabinets more then anything! You kitchen is gorgeous and the color choice is perfect. Following on Instagram now as I love your style! thank you so much for sharing this.

    Reply
    • ElizabethRishel says

      January 15, 2018 at 3:19 pm

      Thank you Reilly! Shiplap was a game changer and probably my favorite part about the makeover. I’m thrilled that you stopped by and took the time to read it!

      Reply
  5. Shannon says

    January 15, 2018 at 2:39 pm

    Liz, this is stunning!! Your hard work paid off and it looks wonderful! I know there’s more you want to do but this is to die for!

    Reply
    • ElizabethRishel says

      January 15, 2018 at 3:19 pm

      Awe, thank you Shannon!! I appreciate you so much for taking the time to read all about it! Thank you for your sweet words.

      Reply
  6. Mylene Raspado says

    January 15, 2018 at 12:07 pm

    It’s so beautiful friend!! We can never under estimate the power of paint!! Loving all the details, and the addition of the shiplap! Can’t wait to see the rest of the kitchen unfold!

    Reply
    • ElizabethRishel says

      January 15, 2018 at 3:18 pm

      You are so right! Paint is such a game changer when it comes to transforming a home. And it’s budget friendly. Thank you so much for checking it out!

      Reply
  7. Karen says

    January 15, 2018 at 11:54 am

    Oh my gosh how beautiful!! I love the colors you chose! Such an inspiration!

    Reply
    • ElizabethRishel says

      January 15, 2018 at 3:18 pm

      Hi Karen! Thank you so much for the kind words! Thanks for checking it out.

      Reply
  8. Kristiana Wajnblom says

    January 15, 2018 at 11:51 am

    WOW! This looks incredible! I love the navy and gold together, those pulls are awesome! We have the same cabinet pulls, but in a brushed silver. I’m obsessed with the gold!

    Reply
    • ElizabethRishel says

      January 15, 2018 at 3:17 pm

      Thank you so much! I think it’s my new favorite color combo. I was hesitant at first but ended up loving them!

      Reply
  9. Elizabeth Kraft says

    January 15, 2018 at 11:48 am

    Stunning! Such a great renovation!

    Reply
    • ElizabethRishel says

      January 15, 2018 at 3:17 pm

      Thank you Elizabeth! I hope you are well!

      Reply
  10. Lauren says

    January 15, 2018 at 11:47 am

    This looks so amazing! You did an awesome job!

    Reply
    • ElizabethRishel says

      January 15, 2018 at 3:17 pm

      Thank you so much Lauren!

      Reply
  11. Aimee says

    January 15, 2018 at 9:35 am

    Yes! Please share your process for painting.

    Reply
    • ElizabethRishel says

      January 15, 2018 at 3:16 pm

      Thank you so much for taking the time to read! I think I will!

      Reply

Trackbacks

  1. Home Projects from 2018 - Within the Grove says:
    December 31, 2018 at 12:08 am

    […] appliances and it looked like a brand new kitchen! You can see the details of our kitchen makeover here and […]

    Reply

Leave a Reply Cancel reply

Your email address will not be published. Required fields are marked *

This site uses Akismet to reduce spam. Learn how your comment data is processed.

Looking for something?

withinthegrove

This pretty much sums up the progress of making 25 This pretty much sums up the progress of making 250 cement tiles. But I’m halfway through! The moment I finish the last tile is the moment I knock out the old tile. Let’s do this!
Time to bet on my DIY skills! I’m attempting to Time to bet on my DIY skills! I’m attempting to make my own cement tiles for our outdoor front door area. Mainly because of what I’m saving vs buying them. Won’t be saving much on time but I’M MAKING TILES! Never thought I’d hear myself say that. Make sure to follow along because if this works out, I have a feeling a lot of you are already eyeing a spot in your home to try your own DIY cement tiles. 
 
Thank you @vintagerevivals and @abby_roadhome for showing it’s possible with your gorgeous bathroom tiles! 

#CementTiles #DiyCementTiles #DiyProject #DIYonABudget #DIYProjects
We got the call that the pool build is starting! W We got the call that the pool build is starting! Which had me scrambling to dig up all the plants that were in the way in an effort to save them. Literally down to the last second before the crew showed up. Exciting day but you know what’s even more exciting? Knowing the next crew will officially be breaking ground with the excavation phase of the build.
This time of year is full of organizing and purgin This time of year is full of organizing and purging to bring spaces back to life. But sometimes all a space needs to feel refreshed is, well, a refresh and a little attention. Your number one requested space was the living room. So I gave mine a refresh with some unique and gorgeous finds from @homesense_us . I found a few fun pots for my houseplants, a gorgeous magnifying glass, and a few other items for our coffee table and couch.

I never know what I’m going to find when I walk into Homesense since it’s always rotating with amazing finds. But I do know I’ll walk out with a few new favorites for my home at affordable prices. If you haven’t yet, I urge you to check and see if you have a Homesense near you! #DiscoverHomesense #HomesensePartner
2022, you were awesome. But I’m determined to ma 2022, you were awesome. But I’m determined to make 2023 even better! And I hope you join me! We can be one of our biggest cheerleaders, but together we’re going to do big things. Go ahead and write down a big, small and a few in-between projects you want to get done this year in your home. Kicking it off with intention and that reminder that we can do this. Ready to get started?! Let me know in the comments the first project you want to tackle!
We finally got the Christmas/winter edition of the We finally got the Christmas/winter edition of the window projection up and running! It was a hit for Halloween and just as fun for this time of year as well. I built frames wrapped with a plastic drop cloth but you can also secure the drop cloth over the windows using command strips. The videos are from @atmosfx and we use a mini projector to play them on the screen. Place a Bluetooth speaker outside and you’re in business! Such a fun addition this time of year for the exterior of your home.
It’s the last little bit of the demo we needed t It’s the last little bit of the demo we needed to do in order to give the green light for the pool to start. And 2,456 pavers later, it’s done! This was exhausting but worth the money we saved doing it ourselves. And why remove them? We’re using a different stone around the pool and we want it to be cohesive up to the house. Don’t worry, someone got one heck of a deal on these pavers, we made a little money, and someone else got them out of our driveway. I’d say that’s a win-win. Stayed tuned for the entire pool process as we enter 2023. It’s going to be pretty exciting to watch!
Our patio space has served us so well over the yea Our patio space has served us so well over the years and now it’s time for a change because we’re getting a POOL!! Sharing this with you makes it even more real because just a year ago I would have told you it isn’t in the cards for us. We’ll be breaking ground soon but first we have to remove the screen enclosure. Spoiler: we won’t be putting one back up around the pool. It has already made the biggest difference visually and SO much natural light pours into our home now with it gone. It’s going to be so exciting seeing this all unfold so stay tuned! Up next: removing the pavers.
This holiday season we were able to travel to my h This holiday season we were able to travel to my hometown for the first time in awhile. We were greeted by the most beautiful sunset on the beach. Fast forward to this week as I headed to @homesense_us for some holiday shopping, and I ended up finding a few pieces for our home that remind me of that core memory on the beach. The beautiful wicker bench caught my eye first followed by the comforter and toss pillows. Everything at amazing price points while not sacrificing style and quality. #HomesensePartner

Mixing a thrill of a find with a core memory, I guarantee you'll fall in love with your home even more as you go to decorate. Decorating your home isn't grasping on to the newest trend or what you think others would do. It's what YOU want to do. And sometimes that's based on an emotional connection. Oh, the stories your spaces will be able to tell as you decorate each one. Start with seeing if there’s a @homesense_us near you! #DiscoverHomesense #HomesenseSarasota
Load More... Follow on Instagram

Sign up here to have our fresh posts delivered to your inbox!

Enter your email address:

Delivered by FeedBurner

Copyright © 2023 Within The Grove • Customized by Brave Creative Design · Log in

  • Privacy Policy
  • Terms and Conditions
  • Disclosures + Photo Usage
 

Loading Comments...