• Home
  • ABOUT
  • WORK WITH ME
  • Paint Colors
  • Shop Our House
    • Guest Bedroom
    • Front Living Room
    • Living Room with Fireplace
    • Previous Second Living Room
    • Current Playroom
    • Prior Playroom
    • Dining Room
    • Laundry Room
    • Oliver’s Bedroom
    • Guest Bathroom
    • Covered Lanai
    • Patio
    • Master Bedroom
  • CONTACT
    • Facebook
    • Instagram
    • Pinterest

Within the Grove

Join the list to receive occasional news and special updates!

New Homeowner Holiday Basket with a DIY Ornament

December 5, 2016

This shop has been compensated by Collective Bias, Inc. and its advertiser. All opinions are mine alone. #LoveAmericanHome #cbias #CollectiveBias

New homeowner basket with DIY ornament

Like many, this time of year is my absolute favorite! Decorating my home, as you know, is at the top of my list every holiday season. It’s our 3rd Christmas in our lovely abode and it still feels like the first. When decorating, I always place holiday candles throughout my home as the finishing touch to create a joyful atmosphere. Plus, it’s partially due to having so many memories growing up of my mom doing the same. 

Do you ever have that moment when you smell a fragrance and it instantly takes you back to a memory? Yankee Candle gets me every time. Probably because it’s my go to candle to gift to family and friends for their home. Can you blame me? Well, I fell into candle glory the other day when I was grabbing a few holiday decor pieces at Walmart. Did you know Walmart carries American Home™ by Yankee Candle® and in the fragrances that bring warm holiday cheer? This means we can buy our favorite holiday fragrance in a candle while shopping for groceries!

The perfect candle to give as a gift

Here’s where I found them:

American Home™ by Yankee Candle® at Walmart

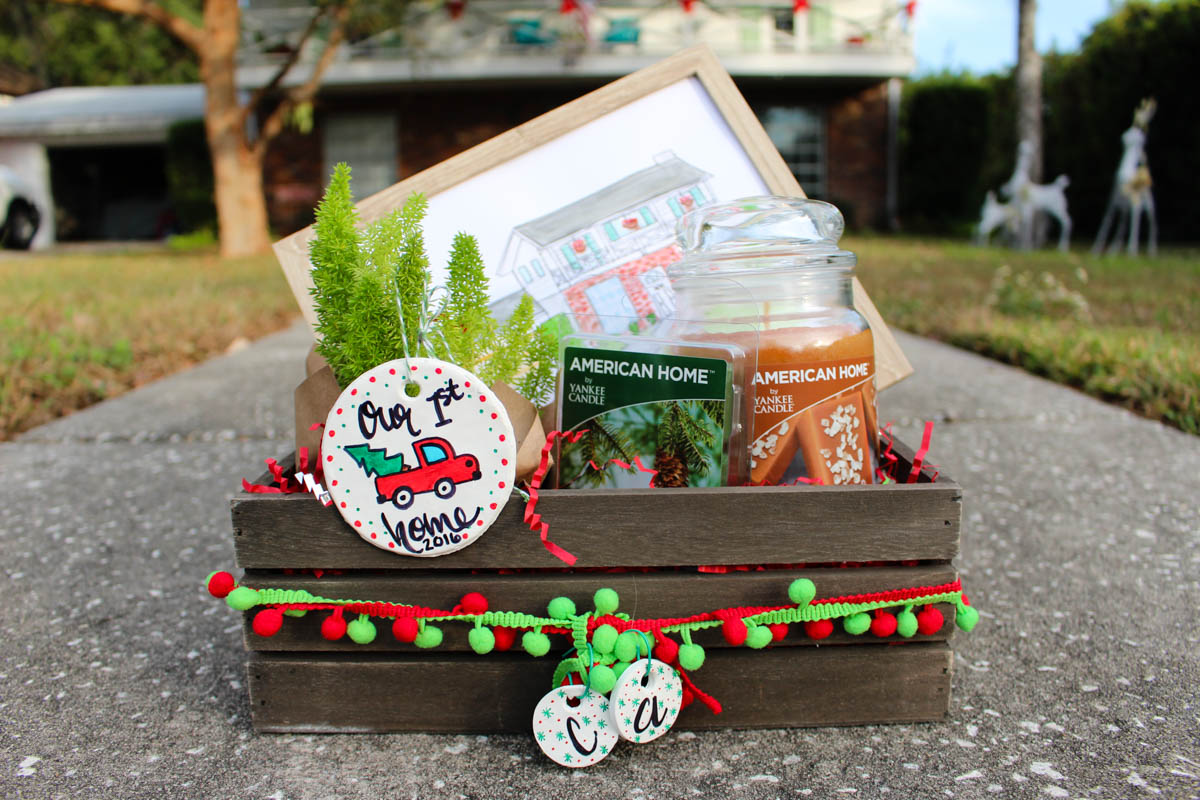
With such great quality, I also had to buy a few for my new neighbor. But just handing the new homeowners the American Home™ by Yankee Candle® fragrances wouldn’t do. There’s something special about decorating your home for the first time as the holidays arrive, so I decided to create a new homeowner holiday basket to celebrate their first Christmas in their new home. Get all of the details below: 

New Homeowner Holiday Basket

Holiday basket for new homeowner

1. Watercolor Image of the New Home

I’ve always loved painted watercolor images of homes. I knew this would be perfect for the New Homeowner Holiday Basket. I snapped a picture of my neighbors home and created this picture. I hope this is something they’ll cherish for years to come of their first home.

Watercolor Painting of house

2. DIY Ornament

Ever since my 1st Christmas (I won’t tell you how long ago that was), my family and I always get a new ornament on Christmas Eve. This ornament represents something that happened in that current year. I’ve decided to pass this tradition on to my neighbors by gifting them an ornament that reads “Our 1st Home”. What’s even better is that I have the full tutorial on how to create your own ornament later in the post. 

House address ornament

3. American Home™ by Yankee Candle® Products

American Home™ by Yankee Candle®

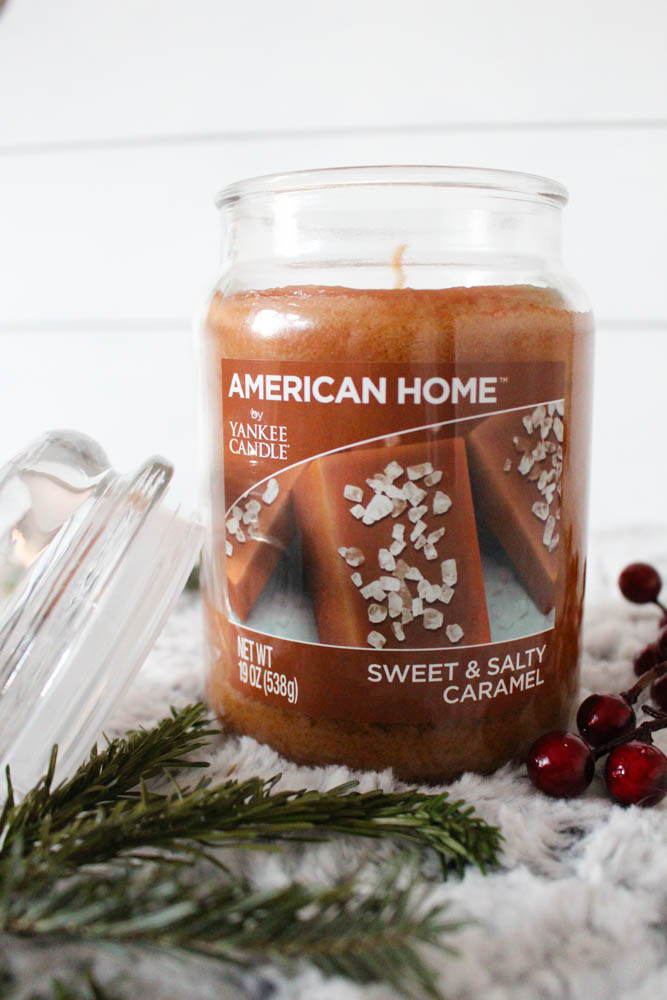
Like I said before, holiday candles and fragrances set the mood for a holiday atmosphere instantly. The candle and wax cubes by American Home™ by Yankee Candle® are the whole inspiration behind this New Homeowner Holiday Basket. I grabbed the Sweet & Salty Caramel candle along with the Fresh Balsam Fir wax cubes during my recent trip. I feel like these are real-life fragrances we want in our home throughout the holiday season!

Wax cubes by American Home™ by Yankee Candle®

I’m so excited for my neighbors to use these products! American Home™ by Yankee Candle®  products have a rich fragrance that last a long time while providing a clean burn. I know that I’ll be making frequent stops at Walmart to take advantage of these candles being exclusively sold there!

Yankee Candle for the holiday season at Walmart

But before we move on to the next item in the holiday basket, I learned a few awesome tips and tricks about American Home™ by Yankee Candle® products: 

|| Every single time you light your candle, allow the entire top layer to become a fragrant pool of liquid wax. Why? You’ll get the best possible fragrance for your home.

|| Cut your candle wick to 1/8 of an inch to ensure your flame isn’t too large. We don’t want to go through the candle too quickly!

|| When burning your candle, always place it on a heat resistance surface, keep it out of drafts (hello ac vent), and never leave it unattended while lit.

|| When only 1/2″ of the wax remains, it’s time to say goodbye to your candle but hello to a new one! 

|| As always, make sure to follow user instructions to a tee for American Home™ by Yankee Candle® products.

4. Indoor Plant

A home always needs a pop of greenery to place somewhere as home decor. I wrapped this plant in shipping paper, added red ribbon, and it was the perfect addition to this holiday basket.

Adding house plants to a gift basket for new homeowners

5. Wooden Crate

The last thing you’ll need is a cute wooden crate or box to place your items in. I wrapped ribbon around mine and added letters that represent my neighbor’s names. Left over clay will go a long way! 

wooden-crate-for-goodies

Place all of these items in your basket and you’ll have the perfect new homeowner gift. What’s wonderful about this basket, is that I would love to get all of these items for my home!  

In order to make your new homeowner basket unique, besides the amazing holiday candles, you’ll need to make your own custom ornaments for the recipient. Check out below how to do just that!


DIY Clay Ornament

Supplies:

Oven Bake Clay || Paint Pens || Rolling Pin || Twine || Glass Casserole Dish || Straw || Glass Cup

Materials to create clay Christmas ornaments - Within the Grove

The How-To:

Step 1: Go ahead and heat your oven according to the instructions on the oven bake clay. My particular clay needed the oven set to 350 degrees. While your oven heats up, soften your clay by rolling it into a ball.

Soften the clay before making the ornaments - Within the Grove

Step 2: Roll out your clay to your desired thickness using the rolling pin. Don’t make it too thin! Mine were almost a quarter of an inch thick.

Rolling out clay for ornaments - Within the Grove

Step 3: Using the rim of your glass cup, cut out a circle. If you have a circle cookie cutter, this will do the job also. I was also able to cut out a few smaller circles out of the leftover clay.

Creating Christmas ornaments with clay - Within the Grove

Step 4: Take the end of the straw and press down into the clay circle to create the hole for the twine to go through. 

How to make your own Christmas ornaments

Step 5: Place your circles in the glass casserole dish and place in the oven. Bake your clay according to the directions on the package. Be very careful with this step because you don’t want your ornaments to burn. For my ornaments, I had to bake them for 15 minutes for every quarter inch in thickness. 

Using baking clay to make ornaments

Step 6: Once the ornaments have baked and cooled off, paint your designs using the paint pens. Then simply attach the twine so that the ornaments can be hung.

DIY Painted clay ornaments

How will you welcome your new neighbors or your friends that just bought their new home this holiday season? Hopefully with an American Home™ by Yankee Candle® for instant holiday charm and a custom ornament made by you! If you don’t have time to put together a holiday basket, simply gifting one of these amazing candles would be the perfect gift! Seriously, have you ever met someone that didn’t love a great candle, especially one by American Home™ by Yankee Candle®? I didn’t think so! These candles meet all of your gifting needs with friends, family, and neighbors. Just pop a bow on top and you’re ready to gift as many candles as you’d like and even keep a few for yourself. I suggest the Fresh Balsam Fir for this time of year! 

Tell me in the comments below your favorite fragrance. Especially after you go exploring these candles at your local Walmart after reading this post. You know where I’ll be! Don’t have time to make it to Walmart? Don’t worry, you can purchase American Home™ by Yankee Candle® here. Need a little more inspiration? Get inspired by seeing what other bloggers are doing with their fragrances here.

American Home by Yankee Candle is perfect for a gift basket to a new homeowner

Thank you for supporting the brands that make Within the Grove possible!

Let’s keep in touch!

We have a brand new community over on Facebook, House & Home, where we’ll be chatting, sharing, and helping one another when it comes to home decor and projects. Come join us! Check it out here.

Like on Facebook || Follow on Instagram || Follow on Pinterest

Share this:

  • Click to share on Twitter (Opens in new window)
  • Click to share on Facebook (Opens in new window)

Related

Filed Under: Christmas, DIY Tutorial

« Holiday Table Blog Hop 2016 // Within The Grove
Free Printable // Merry Christmas Red Truck Print »

Comments

  1. Jenna Wood says

    December 5, 2016 at 9:45 pm

    I adore all of these ideas- Are there any homes for sale on your block, I want to be your neighbor! #client

    Reply
    • ElizabethRishel says

      December 13, 2016 at 1:40 pm

      There actually is! When are you moving in!?

      Reply

Leave a Reply Cancel reply

Your email address will not be published. Required fields are marked *

This site uses Akismet to reduce spam. Learn how your comment data is processed.

Looking for something?

withinthegrove

A little garden magic just by adding some solar li A little garden magic just by adding some solar lights. Notice the starburst pattern they give off? My favorite part! These would also work great along a deck railing, the top of a wooden fence, or on the side of stairs. I added both solar lights you see here to my Amazon shop!
Round 2 (and final!) for the grass install in our Round 2 (and final!) for the grass install in our backyard. Dang, does it feel GOOD to finally say that! It has been a long time coming and a little sweat equity saved us so much by doing it ourselves. Next on the backyard to do list is turning it into a tropical oasis by planting the flower beds. Think huge birds of paradise! Time to start planning.
It has been 6 years since we moved into our home a It has been 6 years since we moved into our home and visualized the potential our backyard would one day have. The first few years were spent clearing out and claiming our property back . Two years ago we built our dream garden, last year we built the play area that feels more like a magical treehouse, and this year we added a pool (still pinching myself every day). We’re seeing our hard work over the years starting to come together as we approach the finish line of installing grass and landscaping that’s going to bring it all together. As I always say, stay tuned because you know I’m going to share it all with you! And a little reminder for you to keep going because home takes time.
The garden is cleaned up, prepped, and ready for t The garden is cleaned up, prepped, and ready for the summer crop. What started as a single garden box has transformed to this garden space over the past few years. Favorite thing about it: being tucked away in this cozy corner with the winding paths throughout it. One thing I would do differently: using pea gravel instead of the granite rocks we went with. These rocks hurt! Pea gravel is smooth enough to comfortably walk barefoot on.
The grass is in! Saying BUH BYE to the dirt around The grass is in! Saying BUH BYE to the dirt around the pool for the first time since December when we broke ground. We spent the past few weeks installing irrigation throughout our backyard and around the pool. Yesterday we finally had the sod delivered and within a few hours it got us one step closer to finishing our backyard oasis. We still have a long ways to go, but my goodness does it feel good to see this part done! And we can finally check off the final inspection for the pool build.
What does it cost to fill a 16,000 gallon pool wit What does it cost to fill a 16,000 gallon pool with a garden hose? Our total came to $229! Does this total surprise you? This of course can greatly vary depending on where you live and your situation. For us, we live in Florida and on county water. We only pay water fees and not sewage. The water company did not give us a discount. We filled the pool right at the start of our billing month so this is it! Have you filled up a pool before? I’d love for you to share your cost, pool size, and location if you feel comfortable doing so!
We have a 16,000 gallon pool and filled it up with We have a 16,000 gallon pool and filled it up with a single water hose. And we for sure had some questions! Answering them here:

• Why not use a water truck? We weren’t in a rush, it was the best way to end this project watching it fill up, and it would have been more expensive. 

• Why not use our local fire station? Our local fire department doesn’t do this and it isn’t very common that most do. We wouldn’t ask if they did. 

• Did our water company give us a discount? Nope. Most water companies will take off the sewage fee but we only pay for water and not sewage where we live. We did notify them so they wouldn’t turn our water off thinking it was a leak. 

• What is that on the end of your hose? We added a filter on the hose to help reduce iron, scale, any other heavy metals and containments to help give our pool a fresh start. 

• How long did it take? 51 hours 

I’ll be sharing the cost soon so make sure to add your guess in the comments!
Pizza nights are back! And one thing we’re addin Pizza nights are back! And one thing we’re adding since our screen enclosure is gone, are these Bitefighter LED String Lights by @tikibrandproducts . You’ve seen us use them in our playset area and now for our patio area. They give us the ambiance we need at night while helping to fight off the mosquitoes as a 2 in 1 solution. There’s no odor, no mess, and they will last all season long. Cheers to the summer nights ahead! #ad #TIKIbrand
Protecting outdoor furniture for the summer!

It’s time to give your outdoor furniture the best start for summer and to help it last long term. Here are some things you can do to protect your outdoor furniture as we enter the summer season:

1. If you have wood furniture, it’s time to seal it! I use Thompson’s Waterseal on all my outdoor wood furniture except for teak. This protects it from moisture, sunshine, and mold/mildew.

2. Easiest way to help keep cushions clean is by spot cleaning throughout the season. I use 30 Seconds Outdoor Cleaner for quick, fresh looking cushions. 

3. To really protect cushions, Shield H2O provides a water repellent treatment that repels moisture and spills, which in return helps prevent mold and mildew. 

4. Have teak furniture? Use a teak SEALER and not an oil. Teak oil is a short term solution and easily washes out with rain. Time to seal it to last long term! 

I have everything I used in my Amazon storefront under outdoor.
Load More... Follow on Instagram

Sign up here to have our fresh posts delivered to your inbox!

Enter your email address:

Delivered by FeedBurner

Copyright © 2023 Within The Grove • Customized by Brave Creative Design · Log in

  • Privacy Policy
  • Terms and Conditions
  • Disclosures + Photo Usage
 

Loading Comments...