• Home
  • ABOUT
  • WORK WITH ME
  • Paint Colors
  • Shop Our House
    • Guest Bedroom
    • Front Living Room
    • Living Room with Fireplace
    • Previous Second Living Room
    • Current Playroom
    • Prior Playroom
    • Dining Room
    • Laundry Room
    • Oliver’s Bedroom
    • Guest Bathroom
    • Covered Lanai
    • Patio
    • Master Bedroom
  • CONTACT
    • Facebook
    • Instagram
    • Pinterest

Within the Grove

Join the list to receive occasional news and special updates!

One Room Challenge Week 2: What We Learned About Demo

October 11, 2018

We’re beyond excited to be a part of the One Room Challenge as guest participants. This has been on our home bucket list for a few years now and finally the timing was right for us to participate. Over the next six weeks we’ll be giving our outdated guest bathroom the attention that it deserves. . . finally. We’re taking it down to the studs and creating an entirely new space. We hope you enjoy watching the process just as much as we enjoy creating a new space. 

PREVIOUS WEEK

Week 1


Hey friends! We can officially say that’s a wrap for one full week of the One Room Challenge as we’re headed into another one. I’m pretty proud of what we accomplished and shocked we still have all 10 fingers and toes.

One Room Challenge Guest Participant

This past week we started demo on the guest bathroom and completed about 90% off it. We still have to take down the shower walls and drop down ceiling. But hey, everything else is done. Not bad for first timers over here when it comes to demo.

One Room Challenge - Week 2 Guest Bathroom Renovation

Don’t worry if you missed week 1. Catch up here:
Week 1 (before images and our 6 week plan)

Before we dive into all the fun demo pictures, here’s our design board for our bathroom. I’ve been so antsy to share this with you and even more excited to see our vision come to life! Just look at that tile.

One Room Challenge - Week 2 Guest Bathroom Renovation

Alright, back to the demo. I’m pretty sure I was the excited one heading into demo while Ryan was a tad nervous. He’s the planner and I’m the let’s just go for it person. Balance, right? We started with the mirror and vanity since it seemed like the easiest place to begin. From there it was just a domino effect until everything was out.

One Room Challenge - Week 2 Guest Bathroom Renovation

You can check out the beginning of our demo in this video:

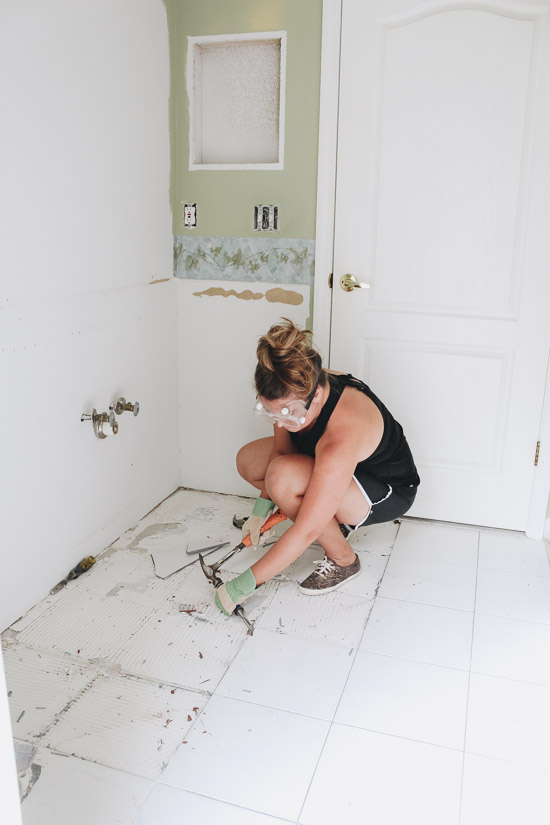
Next up was all the tile. I’ve heard amazing stories with how easy tile can be and horror stories with how difficult it can be to remove. I’d like to believe we received a little bit of both. The floor tile was a breeze to pop up and honestly made me a little too confident.

One Room Challenge - Week 2 Guest Bathroom Renovation

We obviously saved the best for last: the mortar and shower tile. The mortar took a whole other day to get off. We started off by chipping away at it with a hammer and a paint chisel. Mainly because it worked and allowed us not to damage the cement floor. We finally caved and used the power hammer to remove the remaining mortar hours after we started. It worked but we do have some work ahead of us with leveling and fixing the cement.

One Room Challenge - Week 2 Guest Bathroom Renovation

Gravity isn’t your friend when it comes to shower tile. In other words, I thought it would be easier to remove the shower tiles since gravity would help pull them down as we tried to pop them out. Negative. I’m not sure what the builder used back in 1994, but it’s the strongest adhesive I’ve ever seen.

One Room Challenge - Week 2 Guest Bathroom Renovation

With our heads held high, we started chipping away at the tile like it was going to be easy and that we could possibly save the shower walls. Nope, nope, and nope. One again, first time demo for us! We destroyed the walls like I had some stress to get out and we had to take turns getting the tile down.

One Room Challenge - Week 2 Guest Bathroom Renovation

5 Things We Quickly Learned About Demo

When it was time to call it a day, we quickly realized there are a couple things we learned about demo.

1. Accept Help and Don’t be Afraid to Ask for it.

Of course extra hands in a demo and/or remodel is always helpful. But I’m referring to those of you with kids where demo might be a little more difficult to complete. Having a 2 year old running around, my mom offered to watch our little one for the day. I didn’t hesitate to say okay just like I didn’t hesitate to ask her to come back the next day. You’ll also want to have a fully stocked fridge and activities on hand to make it easy for the kind person willing to give you a helping hand.

One Room Challenge - Week 2 Guest Bathroom Renovation

2. Tile Removal Isn’t Hard. The Removal of Mortar Is.

Tile removal moves quickly. The mortar, not so much and be prepared to walk away from it a few times. We tried several things before using a power hammer. We poured boiling water over the mortar which didn’t crack or soften it at all. We also used a heavy duty floor scrapper but that’s best for removing the last little bit once the main mortar is stripped away.

2. Old drywall stinks, my friends. This little tidbit doesn't really help you with anything except preparing your nose. It's a musty, old smell that will completely catch you off guard. Once it's out, the smell is gone.

A paint chisel and hammer did wonders but isn’t efficient with time. The power hammer did the job in the quarter of the time but left damage behind. So it all comes down to personal preference. Either way, you’ll finish with a blister or two, sore hands/wrists, and a new appreciation for those that do this daily.

2. Old drywall stinks, my friends. This little tidbit doesn't really help you with anything except preparing your nose. It's a musty, old smell that will completely catch you off guard. Once it's out, the smell is gone.

3. Clean Up As You Go

I can’t stress this one enough. We placed a small bucket in the bathroom as we removed the tile/mortar. Once the bucket was full of the tile remnants, it was dumped into a bigger trash can. This was a little easier for us since we have a bathroom door that leads to the patio.

If you’re bathroom doesn’t have this option or it’s on a second floor, this is still the best option for you. Look at it like you’re getting extra steps in. You’ll be thankful for a clean work space and not having a huge mess to clean up when you’re done.

2. Old drywall stinks, my friends. This little tidbit doesn't really help you with anything except preparing your nose. It's a musty, old smell that will completely catch you off guard. Once it's out, the smell is gone.

4. Old drywall stinks, my friends.

This little tidbit doesn’t really help you with anything except preparing your nose. It’s a musty, old smell that will completely catch you off guard. Once all the old drywall is out, the smell is gone.

2. Old drywall stinks, my friends. This little tidbit doesn't really help you with anything except preparing your nose. It's a musty, old smell that will completely catch you off guard. Once it's out, the smell is gone.

5. Get Rid of the Trash Right Away

Some may opt to have a dumpster placed in their driveway to throw all of the demo trash in. A great option but a way to cut cost and get rid of the trash faster, use your own truck and take it to the dump. You may even have to borrow your friend or family member’s truck for the day.

One Room Challenge - Week 2 Guest Bathroom Renovation

As tired as we were, we made a trip to the dump in the same day. It felt so good knowing it was out of our bathroom and not sitting in a pile for us to stare at.

One Room Challenge - Week 2 Guest Bathroom Renovation

That’s a wrap for this week. Wish us luck as we head into another week in hopes of showing a lot of progress. We’re hoping to have the rest of the demo completed and all the walls and ceiling repaired. Make sure to follow along on IG Stories as I show you what’s going on behind the scenes.

Want to see more of the One Room Challenge spaces? Head over here to see the full list of participants.

Share this:

  • Click to share on Twitter (Opens in new window)
  • Click to share on Facebook (Opens in new window)

Related

Filed Under: Home Inspiration, Home of the Rishels, Home Project, Our Home Improvements

« One Room Challenge Week 1: Guest Bathroom Plans
Creating Fall Flower Pots »

Comments

  1. Nicole Q-Schmitz says

    October 12, 2018 at 1:15 pm

    Popping in from the ORC linkup – love seeing this progress and hearing your tips! I like the one about having a small bin and cleaning as you go – I’ve made the mistake (a few times) of using one big garbage bin and then not being able to move it because it was SO heavy! Excited to see how it turns out 🙂

    Reply
  2. Pat says

    October 12, 2018 at 11:01 am

    So exciting! Love your design board!

    Reply

Leave a Reply Cancel reply

Your email address will not be published. Required fields are marked *

This site uses Akismet to reduce spam. Learn how your comment data is processed.

Looking for something?

withinthegrove

This time of year is full of organizing and purgin This time of year is full of organizing and purging to bring spaces back to life. But sometimes all a space needs to feel refreshed is, well, a refresh and a little attention. Your number one requested space was the living room. So I gave mine a refresh with some unique and gorgeous finds from @homesense_us . I found a few fun pots for my houseplants, a gorgeous magnifying glass, and a few other items for our coffee table and couch.

I never know what I’m going to find when I walk into Homesense since it’s always rotating with amazing finds. But I do know I’ll walk out with a few new favorites for my home at affordable prices. If you haven’t yet, I urge you to check and see if you have a Homesense near you! #DiscoverHomesense #HomesensePartner
2022, you were awesome. But I’m determined to ma 2022, you were awesome. But I’m determined to make 2023 even better! And I hope you join me! We can be one of our biggest cheerleaders, but together we’re going to do big things. Go ahead and write down a big, small and a few in-between projects you want to get done this year in your home. Kicking it off with intention and that reminder that we can do this. Ready to get started?! Let me know in the comments the first project you want to tackle!
We finally got the Christmas/winter edition of the We finally got the Christmas/winter edition of the window projection up and running! It was a hit for Halloween and just as fun for this time of year as well. I built frames wrapped with a plastic drop cloth but you can also secure the drop cloth over the windows using command strips. The videos are from @atmosfx and we use a mini projector to play them on the screen. Place a Bluetooth speaker outside and you’re in business! Such a fun addition this time of year for the exterior of your home.
It’s the last little bit of the demo we needed t It’s the last little bit of the demo we needed to do in order to give the green light for the pool to start. And 2,456 pavers later, it’s done! This was exhausting but worth the money we saved doing it ourselves. And why remove them? We’re using a different stone around the pool and we want it to be cohesive up to the house. Don’t worry, someone got one heck of a deal on these pavers, we made a little money, and someone else got them out of our driveway. I’d say that’s a win-win. Stayed tuned for the entire pool process as we enter 2023. It’s going to be pretty exciting to watch!
Our patio space has served us so well over the yea Our patio space has served us so well over the years and now it’s time for a change because we’re getting a POOL!! Sharing this with you makes it even more real because just a year ago I would have told you it isn’t in the cards for us. We’ll be breaking ground soon but first we have to remove the screen enclosure. Spoiler: we won’t be putting one back up around the pool. It has already made the biggest difference visually and SO much natural light pours into our home now with it gone. It’s going to be so exciting seeing this all unfold so stay tuned! Up next: removing the pavers.
This holiday season we were able to travel to my h This holiday season we were able to travel to my hometown for the first time in awhile. We were greeted by the most beautiful sunset on the beach. Fast forward to this week as I headed to @homesense_us for some holiday shopping, and I ended up finding a few pieces for our home that remind me of that core memory on the beach. The beautiful wicker bench caught my eye first followed by the comforter and toss pillows. Everything at amazing price points while not sacrificing style and quality. #HomesensePartner

Mixing a thrill of a find with a core memory, I guarantee you'll fall in love with your home even more as you go to decorate. Decorating your home isn't grasping on to the newest trend or what you think others would do. It's what YOU want to do. And sometimes that's based on an emotional connection. Oh, the stories your spaces will be able to tell as you decorate each one. Start with seeing if there’s a @homesense_us near you! #DiscoverHomesense #HomesenseSarasota
DIY Parchment Paper Village! I wanted to place an DIY Parchment Paper Village! I wanted to place an all white Christmas village in the transom window above our door and knew there could be an affordable way to do it. That’s when parchment paper came to mind. I can can create my own houses that can easily be seen from the inside and outside of our home, the “frostiness” of the parchment paper gives them the perfect amount of glow from the twinkle lights, and I only spent $3 on the paper! Perfect for any window in your home. Love figuring out new ways to decorate this transom window for the holidays. Will you be trying this? Great for a last minute decor idea as well!
Need a last minute gift idea? Give yourself an hou Need a last minute gift idea? Give yourself an hour and you can have a DIY custom doormat to gift someone or to keep for yourself. You can even switch out “merry” for a last name or another word of choice. I tried to make this as easy as possible and without using a Cricut machine to create the stencil.
The nutcrackers are finally in place right at our The nutcrackers are finally in place right at our front door! From the parchment paper Christmas village in the window to the island pines, did you spot something you want to try in your own home? And fun fact: Did you know nutcrackers originated in Germany as a folklore to bring luck to a family and protect their home?
Load More... Follow on Instagram

Sign up here to have our fresh posts delivered to your inbox!

Enter your email address:

Delivered by FeedBurner

Copyright © 2023 Within The Grove • Customized by Brave Creative Design · Log in

  • Privacy Policy
  • Terms and Conditions
  • Disclosures + Photo Usage
 

Loading Comments...