• Home
  • ABOUT
  • WORK WITH ME
  • Paint Colors
  • Shop Our House
    • Guest Bedroom
    • Front Living Room
    • Living Room with Fireplace
    • Previous Second Living Room
    • Current Playroom
    • Prior Playroom
    • Dining Room
    • Laundry Room
    • Oliver’s Bedroom
    • Guest Bathroom
    • Covered Lanai
    • Patio
    • Master Bedroom
  • CONTACT
    • Facebook
    • Instagram
    • Pinterest

Within the Grove

Join the list to receive occasional news and special updates!

Our Pool Plans and Design Inspiration

December 22, 2022

Now that we’ve shared the news that we’re getting a cement pool installed, it’s time for us to share the pool plans and design! As we went into the design process with our pool company, we kept the overall decking layout (for the most part) that Yardzen created which you can see here. We ended up changing the size, shape, and layout of the pool along with removing the rest of the screens along the right side. Here’s what we designed! This only shows the overall design of the pool and pool area. What you don’t see is the tile, decking and the interior pool finishing/color details. I’ll get to that in a second!

Pool Plans

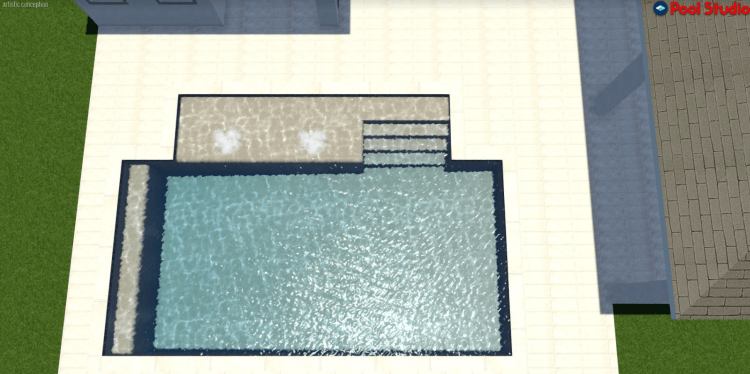
The number one thing I knew I wanted was a Baja shelf. It’s an area of a pool that is shallow for lounging and play. We’ll be placing ledge loungers in ours so we can relax and it will be an awesome area for Oliver as well.

We also placed a “pool bench” on the furthest end. A bench is mandatory somewhere in the deep end as a way for someone to easily climb out of the pool if they need to. We decided to make it the width of the pool. As far as size, the the main area of the pool will be 15′ x 30′. The shallow end will be 3 1/2 feet and it will go to 5 1/2 feet. The Baja shelf and stair area is 6′ x 20′.

Inspiration for Our Design

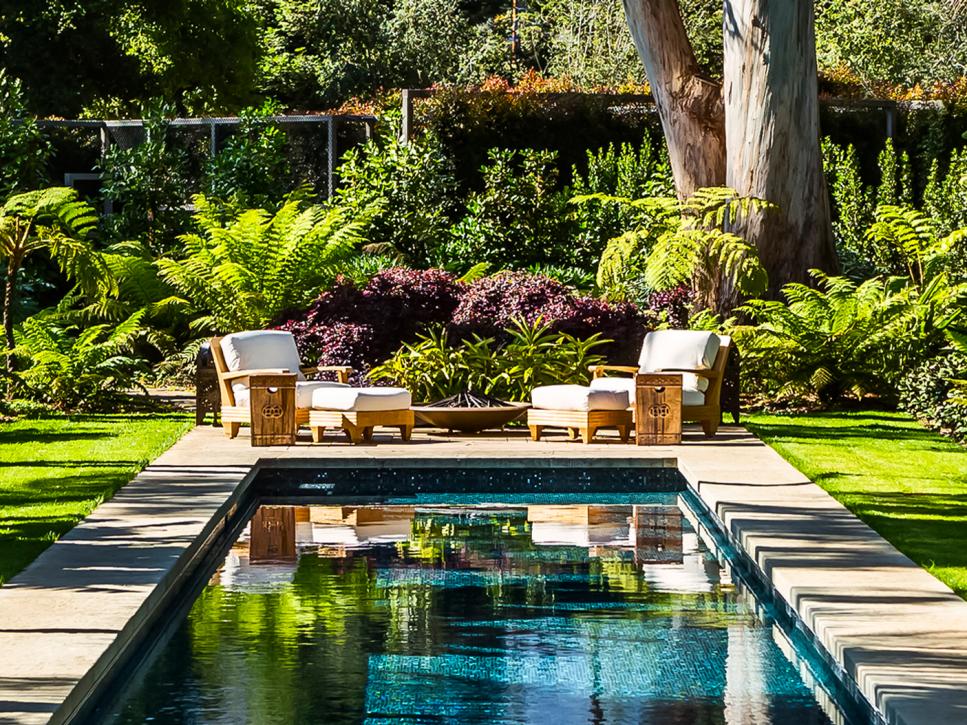
Now let’s chat about the design details of the pool! It’s something that isn’t shown in the renderings except for the color of the decking. We went into the design studio knowing exactly the look we wanted. Here are a few of the pools we referenced when designing our own. We’re wanting a modern, tropical oasis.

This pool by Root Design Company hits all the marks! Darker pool, green oasis behind it, and the decking.

Darker pool with greenery behind it found HGTV with photography by Ciro Coelho Photography.

Found this on Pinterest that perfectly balances a darker pool with birds of paradise for that tropical vibe.

Colors + Finishing Details

For the decking we went with limestone in Myra White. This will run around the pool and up to our home. Not only do we love the look of the limestone but it’s also one of the best stones you can place around a pool with it being mold and bacteria resistant. And when sealed properly, it will be resistant to stains and easily maintained. And the biggest thing, it isn’t slippery when wet.

For the tile around the pool, there were a lot blue tiles, stone, and beige to choose from. But there was one that immediately caught our eye which was a bronze tile that reads more of a slate black. We didn’t even hesitate to go with this choice and will be using a dark grout with it.

For the pool interior finish, we went with a darker color called plum. This is going to give our pool more of a lagoon look versus a bright, light blue. We want the overall aesthetic and look of the pool to flow with the rest of our yard. We want it to all work together as one space especially with the garden area behind it. This is the look that we’re going for with the pool but with our tile slightly lighter.

Image: Apartment Therapy

Screen or No Screen Enclosure?

With wanting everything to flow seamlessly in our backyard this is also why we aren’t installing a screen enclosure. Plus the sheer size of it in order to cover the entire pool area while connecting to our home would be insane. Our backyard would become a screen enclosure.

If you aren’t familiar with screen enclosures, they’re very common here in Florida. The main goal of them is to keep insects and bugs out and creates less maintenance with cleaning a pool. All things we’re willing to work around with the view we’re gaining, the overall aesthetic, and the amount of daylight we’re gaining in our home without. But also, for the simple fact we do not want a screen enclosure because we do not like them.

Type of Pool

As far as chlorine vs salt pool, it will be a chlorine pool but with a salt twist! Instead of pouring chlorine into our pool, we’ll be using a chlorine generator where chlorine is generated through the use of salt.

Pool Company

We interviewed a few different pool companies and ultimately went with Dreamscapes Pools and Spas for several reasons. We’ve had friends use them who had an amazing experience, their reviews online are great, the amazing quality with the pools they’ve completed, their level of professionalism, and their response time to our phone calls/emails. So far the experience with them as been amazing! They subcontract out the work and the crews that have shown up so far have been great! I’ll keep you posted.

Stay Tuned!

Total time from ground breaking to completing the pool + decking is 16 weeks. We broke ground about a week ago so we’re already one week in. I can’t wait to share this entire process with you! I’ll update you here on the blog. And for a behind the scenes look, head on over to Instagram! Stay tuned!

Share this:

  • Click to share on Twitter (Opens in new window)
  • Click to share on Facebook (Opens in new window)

Related

Filed Under: Our Home Improvements, Outdoor, Uncategorized

« We’re Getting a Pool!
The Ultimate List of Recommended Swimsuit Brands »

Comments

  1. Cemre says

    January 12, 2023 at 2:38 am

    beautiful environment nests i love the stones and the pool the house is amazing views

    Reply
  2. Cemre says

    December 26, 2022 at 4:19 am

    beautiful landscaping, the pool image looks great, a sweet home and garden environment

    Reply

Leave a Reply Cancel reply

Your email address will not be published. Required fields are marked *

This site uses Akismet to reduce spam. Learn how your comment data is processed.

Looking for something?

withinthegrove

The waterline tile and decking are both done! With The waterline tile and decking are both done! With the limestone making the biggest difference with this pool update. It’s stunning!! Very exciting to see our entire pool area installed. We’re almost there!! Just the interior finish to go and then it’s time to fill the pool. 

•Pavers are limestone in Myra White 
• If you’re local to Central Florida, @caapavers installed ours! 
• Waterline tile is by NPT in the color Carbon.
DIY TILE REVEAL! The front door is styled and now DIY TILE REVEAL! The front door is styled and now taking the time to soak these tiles in! I kept it simple with the decor and took away the rug. If you've been here for a little bit, you know I love to place a rug underneath my wooden doormat. But letting these tiles SHINE is a must. Still can’t believe I made these! Head to the last image. I installed an imperfectly perfect tile as a little nod to these being handmade. DIY tile blog post coming your way soon! Grabbing packages from my front door just became even more exciting. 

Front door color: Black Magic by Sherwin-Williams
House Color: Cloud White by Benjamin Moore
Decor: You can find it on my LTK through my profile!
Right when we thought the pool excavation day was Right when we thought the pool excavation day was exciting, the gunite was installed! We’re about halfway through the pool build and we officially have the shell of the pool done. This all happened so fast. I’m talking about two weeks. The waterline tile and decking up next!
This will forever be a project where I will say: “ I MADE THESE TILES!” What would have cost me close to $2,000 to buy, I was able to make them for $350. I started experimenting with how to make them and nailing down the perfect black color 8 weeks ago. Let that sink in! This has been such a labor of love. 20 hours went into making the tiles. Two weeks worth of demo + installation. And a lot of learning curves in between. This project is so much more than saving money. It’s the process I went through and what I pushed myself to learn and do to get to this moment. We can do hard things!! Cheers to this project being done. How about we make a front door next? JUST KIDDING!! But a new front will be happening!

Thank you @vintagerevivals for showing that making cement tiles is a project one can tackle and @abby_roadhome doing the same with this amazing pattern!
The tiles are in place! 🎉 I’m not done yet bu The tiles are in place! 🎉 I’m not done yet but this is certainly a part of the project that needs to be celebrated. Grout is up next to call this project a wrap. It has been a process but one of the most rewarding ones when it comes to projects I’ve tackled in our home.
IT IS TIME! I have been waiting for this moment to IT IS TIME! I have been waiting for this moment to smash these front door tiles ever since we moved in. And it felt so dang good! Here’s what I’m doing to prep the concrete slab for the tile install: 

1. Remove old tile
2. Use an angle grinder with a diamond grinding blade to remove the thin set and paint. 
3. Wash the slab
4. Apply two coats of Hydro Ban to create waterproofing barrier from the moisture in the concrete slab and to help with crack isolation.
Another exciting step for the pool: Excavation day Another exciting step for the pool: Excavation day! We officially broke ground. It was the coolest thing to watch. Rebar and gunite up next.
250 cement tiles made!! 20+ hours went into making 250 cement tiles made!! 20+ hours went into making these tiles and we’re going to celebrate making it to this point! I questioned myself during the last push when molds started failing, tiles weren’t turning out, and I was just flat out tired. If there’s a project to test patience, this is the one. But want to know the craziest part? I’d do it all over again. What an awesome process being able to make my own tiles. And the part we’ve all been waiting for is coming up next: INSTALL!! Tiles, don’t fail me now.
This pretty much sums up the progress of making 25 This pretty much sums up the progress of making 250 cement tiles. But I’m halfway through! The moment I finish the last tile is the moment I knock out the old tile. Let’s do this!
Load More... Follow on Instagram

Sign up here to have our fresh posts delivered to your inbox!

Enter your email address:

Delivered by FeedBurner

Copyright © 2023 Within The Grove • Customized by Brave Creative Design · Log in

  • Privacy Policy
  • Terms and Conditions
  • Disclosures + Photo Usage
 

Loading Comments...