• Home
  • ABOUT
  • WORK WITH ME
  • Paint Colors
  • Shop Our House
    • Guest Bedroom
    • Front Living Room
    • Living Room with Fireplace
    • Previous Second Living Room
    • Current Playroom
    • Prior Playroom
    • Dining Room
    • Laundry Room
    • Oliver’s Bedroom
    • Guest Bathroom
    • Covered Lanai
    • Patio
    • Master Bedroom
  • CONTACT
    • Facebook
    • Instagram
    • Pinterest

Within the Grove

Join the list to receive occasional news and special updates!

WTG Explores // Board and Brush

September 27, 2017

A few weeks ago I grabbed one of my best gals and we had our monthly ladies night out. This particular night consisted of creating a custom wooden sign to display in our home at a local Board and Brush DIY Workshop at their Sanford location in Central Florida. I’m even more thrilled to chat about this wood sign workshop with all of you because it’s offered throughout the United States. Finally, a workshop that so many of you can experience and it involves home decor!

Wood Sign Workshop

So what is Board and Brush exactly?  It’s a studio in your area where you build, stain, and paint your very own wooden sign. You have from over 100 designs to choose from and all the materials are provided.  All you have to do is pick your design, show up, and let the wonderful people of Board and Brush guide you. In just a matter of 3 hours, you leave with a professional made sign to proudly display in your home.

Board and Brush in Sanford, Florida

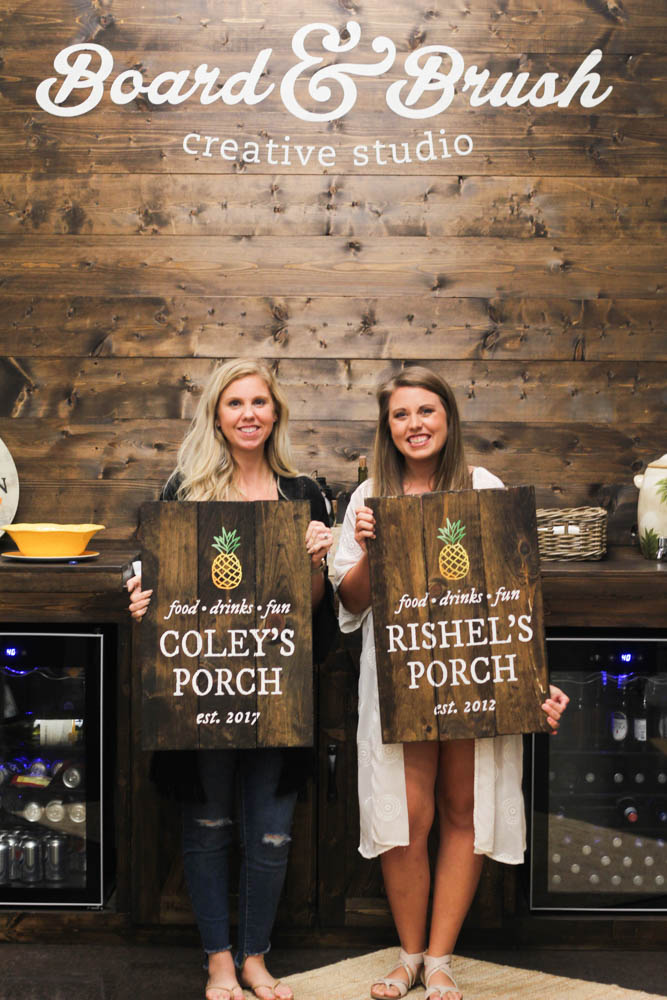
Alicia and I arrived not knowing what to expect but we quickly made new friends, enjoyed a glass of wine, and got ready to build our sign from raw materials. What does this mean exactly? Well, you’re handed strips of wood that you’ll need to use a hammer on to give it a distressed look, sand the edges, and apply your stain. You’re literally building and assembling your sign.

Board and Brush Workshop

Building a sign at Board and Brush

From there you’re given a drill to attach all of your wooden pieces together. At this point you’re feeling pretty good about what you’ve accomplished so far and the fun isn’t even over.

Creating a wooden sign

When you purchase your ticket online, you pick your sign design which usually includes custom wording. For example, your family name, dates, or picking a general design. A stencil is printed and given to you to place on your stained sign that sticks to the wood so it doesn’t move once you start painting.

Board and Brush WOrkshop

And speaking of paint! They have an abundance of colors available for you to choose from. Go all white for a farmhouse look or add color throughout to make your sign pop.

Board and Brush

Board and Brush Sign Making

Once you’ve applied the paint over your stencil, you’ll carefully peel it off. Get ready to be truly amazed at the results. The signs created during this workshop were stunning and looked professionally made. I was nervous my paint leaked under the stencil but it turned out great! I’ll be sealing mine and keeping it on my back patio.

DIY Workshop

If you’re looking for something different for a ladies night out, you need to consider Board and Brush. The venue was amazing with examples of signs hung everywhere, music playing throughout the event, and an amazing staff there to guide and support. You also leave feeling confident in your sign making skills.To sweeten the workshop even more, they’re currently offering holiday themed signs that are a must see!

Board and Brush Sanford

Image Source

This was truly a fun night out experiencing something new. Seriously, how great is it that all you have to do is show up, everything is provided for you, and you don’t have a mess to clean up in your own home? It’s time to find out if you have a Board and Brush near you, pick your date, choose your design, and then simply show up and have fun! We attended the location in Downtown Sanford, FL if you’re local to this area. Let me know if you decide to check it out. So. Much. Fun!

Here’s where you can find Board and Brush nationally and in Central Florida:

Where to find Board and Brush

Sanford in Central Florida:

Reserve your seat on BoardandBrush.com/Sanford 
Facebook: Board and Brush Sanford
Instagram: Board and Brush Sanford

Nationally:

Search for your location
Instagram: Broad and Brush
Pinterest:Broad and Brush
Facebook:Board and Brush

Twitter:Broad and Brush

Let’s keep in touch!

We have a brand new community over on Facebook, House & Home, where we’ll be chatting, sharing, and helping one another when it comes to home decor and projects. Come join us! Check it out here. 

Like on Facebook || Follow on Instagram || Follow on Pinterest

Share this:

  • Click to share on Twitter (Opens in new window)
  • Click to share on Facebook (Opens in new window)

Related

Filed Under: WTG Explores, WTG Explores Orlando

« DIY // New Fall Wreath
Free Printable // We Rise by Lifting Others »

Leave a Reply Cancel reply

Your email address will not be published. Required fields are marked *

This site uses Akismet to reduce spam. Learn how your comment data is processed.

Looking for something?

withinthegrove

Round 2 (and final!) for the grass install in our Round 2 (and final!) for the grass install in our backyard. Dang, does it feel GOOD to finally say that! It has been a long time coming and a little sweat equity saved us so much by doing it ourselves. Next on the backyard to do list is turning it into a tropical oasis by planting the flower beds. Think huge birds of paradise! Time to start planning.
It has been 6 years since we moved into our home a It has been 6 years since we moved into our home and visualized the potential our backyard would one day have. The first few years were spent clearing out and claiming our property back . Two years ago we built our dream garden, last year we built the play area that feels more like a magical treehouse, and this year we added a pool (still pinching myself every day). We’re seeing our hard work over the years starting to come together as we approach the finish line of installing grass and landscaping that’s going to bring it all together. As I always say, stay tuned because you know I’m going to share it all with you! And a little reminder for you to keep going because home takes time.
The garden is cleaned up, prepped, and ready for t The garden is cleaned up, prepped, and ready for the summer crop. What started as a single garden box has transformed to this garden space over the past few years. Favorite thing about it: being tucked away in this cozy corner with the winding paths throughout it. One thing I would do differently: using pea gravel instead of the granite rocks we went with. These rocks hurt! Pea gravel is smooth enough to comfortably walk barefoot on.
The grass is in! Saying BUH BYE to the dirt around The grass is in! Saying BUH BYE to the dirt around the pool for the first time since December when we broke ground. We spent the past few weeks installing irrigation throughout our backyard and around the pool. Yesterday we finally had the sod delivered and within a few hours it got us one step closer to finishing our backyard oasis. We still have a long ways to go, but my goodness does it feel good to see this part done! And we can finally check off the final inspection for the pool build.
What does it cost to fill a 16,000 gallon pool wit What does it cost to fill a 16,000 gallon pool with a garden hose? Our total came to $229! Does this total surprise you? This of course can greatly vary depending on where you live and your situation. For us, we live in Florida and on county water. We only pay water fees and not sewage. The water company did not give us a discount. We filled the pool right at the start of our billing month so this is it! Have you filled up a pool before? I’d love for you to share your cost, pool size, and location if you feel comfortable doing so!
We have a 16,000 gallon pool and filled it up with We have a 16,000 gallon pool and filled it up with a single water hose. And we for sure had some questions! Answering them here:

• Why not use a water truck? We weren’t in a rush, it was the best way to end this project watching it fill up, and it would have been more expensive. 

• Why not use our local fire station? Our local fire department doesn’t do this and it isn’t very common that most do. We wouldn’t ask if they did. 

• Did our water company give us a discount? Nope. Most water companies will take off the sewage fee but we only pay for water and not sewage where we live. We did notify them so they wouldn’t turn our water off thinking it was a leak. 

• What is that on the end of your hose? We added a filter on the hose to help reduce iron, scale, any other heavy metals and containments to help give our pool a fresh start. 

• How long did it take? 51 hours 

I’ll be sharing the cost soon so make sure to add your guess in the comments!
Pizza nights are back! And one thing we’re addin Pizza nights are back! And one thing we’re adding since our screen enclosure is gone, are these Bitefighter LED String Lights by @tikibrandproducts . You’ve seen us use them in our playset area and now for our patio area. They give us the ambiance we need at night while helping to fight off the mosquitoes as a 2 in 1 solution. There’s no odor, no mess, and they will last all season long. Cheers to the summer nights ahead! #ad #TIKIbrand
Protecting outdoor furniture for the summer!

It’s time to give your outdoor furniture the best start for summer and to help it last long term. Here are some things you can do to protect your outdoor furniture as we enter the summer season:

1. If you have wood furniture, it’s time to seal it! I use Thompson’s Waterseal on all my outdoor wood furniture except for teak. This protects it from moisture, sunshine, and mold/mildew.

2. Easiest way to help keep cushions clean is by spot cleaning throughout the season. I use 30 Seconds Outdoor Cleaner for quick, fresh looking cushions. 

3. To really protect cushions, Shield H2O provides a water repellent treatment that repels moisture and spills, which in return helps prevent mold and mildew. 

4. Have teak furniture? Use a teak SEALER and not an oil. Teak oil is a short term solution and easily washes out with rain. Time to seal it to last long term! 

I have everything I used in my Amazon storefront under outdoor.
We were told 16 weeks for our pool install but it We were told 16 weeks for our pool install but it ended up taking exactly 12 weeks. Broke ground on December 16th and started filling it with water on March 16th. I’m sharing all the pool details over on my blog. Including the answer to the number one question: How much did this cost? Covering how we picked a pool builder, the construction process, the materials we went with and why, what we splurged on and where we saved, and so much more. Save it for future reference! It’s a good one!
Load More... Follow on Instagram

Sign up here to have our fresh posts delivered to your inbox!

Enter your email address:

Delivered by FeedBurner

Copyright © 2023 Within The Grove • Customized by Brave Creative Design · Log in

  • Privacy Policy
  • Terms and Conditions
  • Disclosures + Photo Usage
 

Loading Comments...