• Home
  • ABOUT
  • WORK WITH ME
  • Paint Colors
  • Shop Our House
    • Guest Bedroom
    • Front Living Room
    • Living Room with Fireplace
    • Previous Second Living Room
    • Current Playroom
    • Prior Playroom
    • Dining Room
    • Laundry Room
    • Oliver’s Bedroom
    • Guest Bathroom
    • Covered Lanai
    • Patio
    • Master Bedroom
  • CONTACT
    • Facebook
    • Instagram
    • Pinterest

Within the Grove

Join the list to receive occasional news and special updates!

Adding a Roman Shade to the Playroom

July 2, 2019

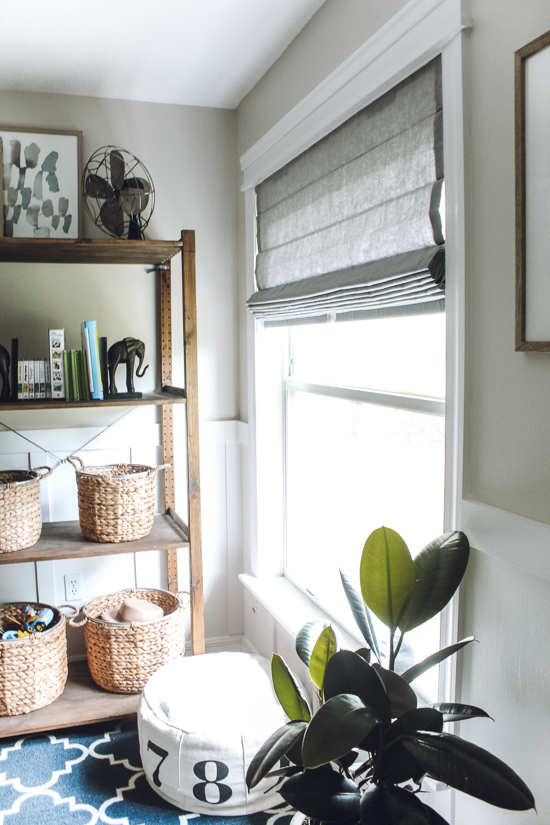
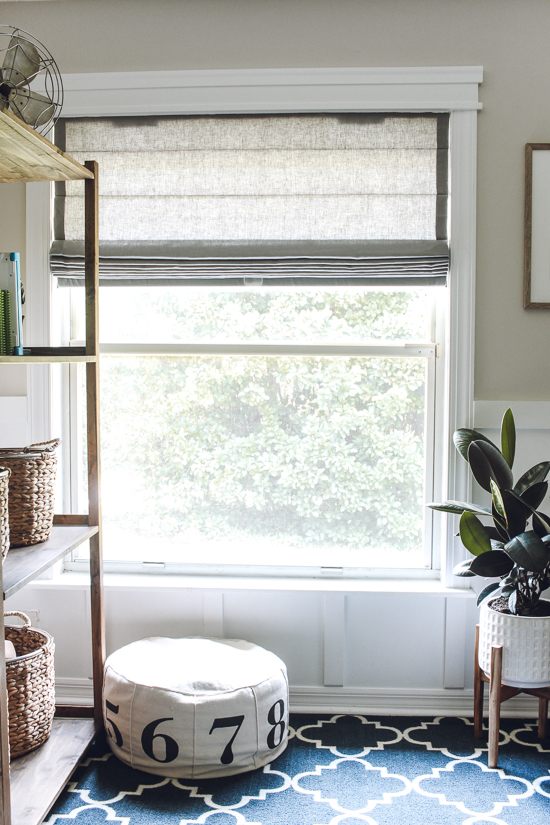
The playroom has to be one of my favorite spaces in our home and it isn’t even because of the decor. It’s because of all the amazing natural light that pours into the room throughout the day. And it only makes sense with it having the largest window in our home. So, you can probably understand why we didn’t want to hang blinds or cover this window in any way.

But, of course, being able to block the direct sunlight in the late afternoons and having privacy is a must. I had one thing in mind to have the best of both worlds: a linen roman shade. This will give us the privacy we need and allow for the abundance of sunlight to shine in. And, oh my, did I find one that does exactly this and more. Just take a look at this before and after:

This is a sponsored post written by me on behalf of Alva. All opinions are 100% mine. Thank you for supporting the brands that help make this blog possible!

I couldn’t keep this amazing company to myself, so I partnered up with Alva to share how you can order and install custom window treatments for a few reasons: everything is done online with an easy ordering process, the install is a DIY project that anyone can do, and you can order custom window treatments to fit any window in your home.

If you’ve ever been intimidated with ordering custom window treatments, you don’t know where to start or you’re afraid you won’t know how to install them, you’ll want to stick around. I’m spilling all my tips and tricks so that you can be looking at a new roman shade in your home in no time.

Alva has plenty of window treatments to choose from but I immediately knew I wanted to go with the Cascade Roman Shade in the Belgian Linen. The design of this roman shade creates a clean look when pulled up versus having a relaxed look.

Before I took a single measurement, I ordered my free swatches to see first hand the fabric colors I had to choose from. This is another way Alva stands out from the rest! Seeing the color choices in person is so important when ordering custom window treatments.

I thought it would be easy to decide when I saw them in person but it became ten times harder because all the colors are gorgeous. I turned to my followers on Instagram and they helped me narrow it down to two: Oatmeal and Mist. I observed both colors throughout various parts of the day, what it looked like with the sunlight shining through it and how it goes with the design of the space. Both are great neutral options but I ultimately went with Mist to bring a pop of color into the space.

So the hardest part of this whole process, which isn’t hard at all, is measuring for your window treatments. You’ll first want to determine if you want an inside or outside mount. We went with in inside mount for a seamless look.

You’ll then measure your window by taking three measurements for the width (top, middle, bottom of window) and three measurements from top to bottom (left, center, right of window). Alva’s great with guiding you on how to get the best fit. The hardest part is officially done!

Now you just have to decide if you want your shade with a regular cord, cordless or even motorized. We didn’t hesitate to go cordless with having a two year old running around and this roman shade being located in the playroom. After hanging the roman shade, I also discovered that it has a clear clip on the midpoint of the shade so you don’t dirty the fabric as you pull it up and down. It’s these little details that will have me going back to Alva time and time again.

Our custom roman shade arrived within 12 days after ordering it. Which is amazing since each roman shade is handcrafted.

It took just a few simple steps to get it installed as well. And by installed, I mean you doing it! Here’s how, at least for an inside mount:

1. Using the screws that came with the roman shade, insert them into the four holes on the top mounting bracket. You want them just slightly sticking out.

2. Align the roman shade in the window to where it’s centered and the shade is flush with the window casing. Apply pressure and push up so that the screws leave a small indention.

3. Pre-drill a hole where each indention is using a drill bit. Your directions will tell you the size that you need to use.

4. Place the roman shade back into place where the screws line up with the holes. Secure it in place by drilling in the screws. And that’s it!

One extra step that I took was using my steamer on the roman shade once it was installed. From it being packaged for shipping, there were a few creases I wanted to smooth out. This also made the roman shade pull up and fold even nicer along the folds.

My hope is that you won’t feel intimidated about installing custom roman shades in your home. You don’t have to go to a store to order or have someone to come in your home to install these! This ordering and installation process with my Alva Cascade Roman Shade truly impressed me with the ease of it.

Overall, we are truly so pleased with the roman shade in Oliver’s playroom. From the color and quality of the fabric to how easily it functions. I’m also equally as impressed with how neat and straight they look when pulled up. Not bulky at all!

And I forgot to mention something earlier that’s equally as important. Our roman shades have a privacy backing so that some light will filter in but nobody can see in from the outside when it’s closed. You also have the option to have full blackout shades. But, like I said earlier, we love our natural light too much to block it all out. Here’s a look at what it looks like with the roman shade closed.

We race every morning to lift the roman shade up and every evening to pull it down. That’s when you know something truly brings you joy in your home. It’s amazing how this one roman shade has made the biggest difference in our playroom. It finally feels completed! Please don’t hesitate to reach out if you have any questions about our Alva Cascade Roman Shade. I’ll even help you figure out the best window treatment for your space.

Let’s keep in touch!
We have a brand new community over on Facebook, House & Home, where we’ll be chatting, sharing, and helping one another when it comes to home decor and projects. Come join us! Check it out here.
Like on Facebook || Follow on Instagram || Follow on Pinterest

Share this:

  • Click to share on Twitter (Opens in new window)
  • Click to share on Facebook (Opens in new window)

Related

Filed Under: DIY, Our Home Improvements

« How to Get Clean Paint Lines Every Time
Three Ways to Easily Transform a Bedroom »

Trackbacks

  1. Playroom Makeover with a Fresh Set of Paint Colors - Within the Grove says:
    May 28, 2020 at 7:35 am

    […] for more playroom inspiration? See how we organized toys, installed board and batten, and installed a roman shade in […]

    Reply

Leave a Reply Cancel reply

Your email address will not be published. Required fields are marked *

This site uses Akismet to reduce spam. Learn how your comment data is processed.

Looking for something?

withinthegrove

This time of year is full of organizing and purgin This time of year is full of organizing and purging to bring spaces back to life. But sometimes all a space needs to feel refreshed is, well, a refresh and a little attention. Your number one requested space was the living room. So I gave mine a refresh with some unique and gorgeous finds from @homesense_us . I found a few fun pots for my houseplants, a gorgeous magnifying glass, and a few other items for our coffee table and couch.

I never know what I’m going to find when I walk into Homesense since it’s always rotating with amazing finds. But I do know I’ll walk out with a few new favorites for my home at affordable prices. If you haven’t yet, I urge you to check and see if you have a Homesense near you! #DiscoverHomesense #HomesensePartner
2022, you were awesome. But I’m determined to ma 2022, you were awesome. But I’m determined to make 2023 even better! And I hope you join me! We can be one of our biggest cheerleaders, but together we’re going to do big things. Go ahead and write down a big, small and a few in-between projects you want to get done this year in your home. Kicking it off with intention and that reminder that we can do this. Ready to get started?! Let me know in the comments the first project you want to tackle!
We finally got the Christmas/winter edition of the We finally got the Christmas/winter edition of the window projection up and running! It was a hit for Halloween and just as fun for this time of year as well. I built frames wrapped with a plastic drop cloth but you can also secure the drop cloth over the windows using command strips. The videos are from @atmosfx and we use a mini projector to play them on the screen. Place a Bluetooth speaker outside and you’re in business! Such a fun addition this time of year for the exterior of your home.
It’s the last little bit of the demo we needed t It’s the last little bit of the demo we needed to do in order to give the green light for the pool to start. And 2,456 pavers later, it’s done! This was exhausting but worth the money we saved doing it ourselves. And why remove them? We’re using a different stone around the pool and we want it to be cohesive up to the house. Don’t worry, someone got one heck of a deal on these pavers, we made a little money, and someone else got them out of our driveway. I’d say that’s a win-win. Stayed tuned for the entire pool process as we enter 2023. It’s going to be pretty exciting to watch!
Our patio space has served us so well over the yea Our patio space has served us so well over the years and now it’s time for a change because we’re getting a POOL!! Sharing this with you makes it even more real because just a year ago I would have told you it isn’t in the cards for us. We’ll be breaking ground soon but first we have to remove the screen enclosure. Spoiler: we won’t be putting one back up around the pool. It has already made the biggest difference visually and SO much natural light pours into our home now with it gone. It’s going to be so exciting seeing this all unfold so stay tuned! Up next: removing the pavers.
This holiday season we were able to travel to my h This holiday season we were able to travel to my hometown for the first time in awhile. We were greeted by the most beautiful sunset on the beach. Fast forward to this week as I headed to @homesense_us for some holiday shopping, and I ended up finding a few pieces for our home that remind me of that core memory on the beach. The beautiful wicker bench caught my eye first followed by the comforter and toss pillows. Everything at amazing price points while not sacrificing style and quality. #HomesensePartner

Mixing a thrill of a find with a core memory, I guarantee you'll fall in love with your home even more as you go to decorate. Decorating your home isn't grasping on to the newest trend or what you think others would do. It's what YOU want to do. And sometimes that's based on an emotional connection. Oh, the stories your spaces will be able to tell as you decorate each one. Start with seeing if there’s a @homesense_us near you! #DiscoverHomesense #HomesenseSarasota
DIY Parchment Paper Village! I wanted to place an DIY Parchment Paper Village! I wanted to place an all white Christmas village in the transom window above our door and knew there could be an affordable way to do it. That’s when parchment paper came to mind. I can can create my own houses that can easily be seen from the inside and outside of our home, the “frostiness” of the parchment paper gives them the perfect amount of glow from the twinkle lights, and I only spent $3 on the paper! Perfect for any window in your home. Love figuring out new ways to decorate this transom window for the holidays. Will you be trying this? Great for a last minute decor idea as well!
Need a last minute gift idea? Give yourself an hou Need a last minute gift idea? Give yourself an hour and you can have a DIY custom doormat to gift someone or to keep for yourself. You can even switch out “merry” for a last name or another word of choice. I tried to make this as easy as possible and without using a Cricut machine to create the stencil.
The nutcrackers are finally in place right at our The nutcrackers are finally in place right at our front door! From the parchment paper Christmas village in the window to the island pines, did you spot something you want to try in your own home? And fun fact: Did you know nutcrackers originated in Germany as a folklore to bring luck to a family and protect their home?
Load More... Follow on Instagram

Sign up here to have our fresh posts delivered to your inbox!

Enter your email address:

Delivered by FeedBurner

Copyright © 2023 Within The Grove • Customized by Brave Creative Design · Log in

  • Privacy Policy
  • Terms and Conditions
  • Disclosures + Photo Usage
 

Loading Comments...