


Learn how to get clean paint lines every time. This is a sponsored post written by me on behalf of FrogTape®. All opinions are 100% mine.

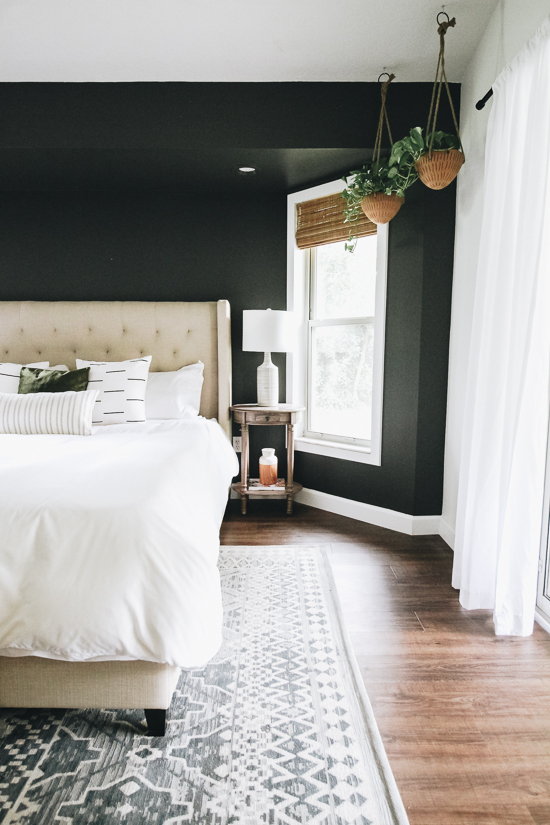
 A few months later, however, I was finally ready to put a splash of color on one of the walls in our bedroom. We decided on a bold paint color: black. I knew with all the natural sunlight that this room receives throughout the day, it could certainly handle a dark paint color like this.
 What I was nervous about was creating clean paint lines along the ceiling, where the black wall meets the adjacent walls staying white and of course along the trim and baseboards. Going with a dark paint color can easily make mistakes stick out that much more. Learning how to paint clean lines is not for the faint of heart – especially when painting dark accent walls!
Luckily I was beyond lucky to team up with FrogTape® on this project to achieve a professional look with ease. Who wouldn’t want crisp, clean paint lines the first time around? Keep reading to learn more about how to get crisp paint lines with FrogTape®.
What I was nervous about was creating clean paint lines along the ceiling, where the black wall meets the adjacent walls staying white and of course along the trim and baseboards. Going with a dark paint color can easily make mistakes stick out that much more. Learning how to paint clean lines is not for the faint of heart – especially when painting dark accent walls!
Luckily I was beyond lucky to team up with FrogTape® on this project to achieve a professional look with ease. Who wouldn’t want crisp, clean paint lines the first time around? Keep reading to learn more about how to get crisp paint lines with FrogTape®.

FrogTape® vs Blue Painter’s Tape
Anytime I talk about using FrogTape® for my painting projects, I get the same question: what’s the difference between FrogTape® vs blue painter’s tape? While they might seem like just two different brands of the same product, they’re actually very different. Here’s a fun fact for you. FrogTape® is the only painting tape treated with PaintBlock® Technology. It contains a super-absorbent polymer that reacts with the water in latex paint and instantly gels to form a barrier against paint bleed. This gives you the sharpest paint lines possible.

How to Get Clean Paint Lines on Baseboards and Trim
Like any paint project in a space, I start Like any paint project in a space, I start off by giving the baseboards a fresh coat of white paint. I used the FrogTape® Multi-Surface Painting Tape to tape off the baseboards along the wall and the floor. You’ll notice the FrogTape® is wide enough to easily protect the flooring while painting.Tip #1: Clean the surfaces you plan to tape.
Make sure you clean the wall and flooring before applying the FrogTape® to ensure it adheres properly. If it doesn’t properly stick to your surfaces you won’t get the same level of protection from paint leaks.
Tip #2: Remove the painter’s tape before the paint is dry.
This is a little-known tip that is so important for getting clean paint lines! As soon as the baseboards start to dry after painting them, you’ll want to peel off the FrogTape® while the paint is still wet. This will help create that clean paint line and prevent the paint from peeling off compared to letting it dry on the tape. If you have to do more than one coat on the baseboards and trim, you’ll still want to peel off the painter’s tape before letting the first coat fully dry.
How to Get Clean Paint Lines on Walls
After the baseboards were fully dry, I started taping off the adjacent walls and ceiling once again using the FrogTape® Multi-Surface Painting Tape. This took no time at all!
Tip #3: Use different tape on fresh paint.
To protect the freshly painted baseboards as I painted the wall, I switched out my tape. I used the FrogTape® Delicate Surface Painting Tape since I was dealing with fresh paint. The delicate surface tape is best for use on finished wood, fresh paint (dry to the touch), wallpaper, veneer, laminate, vinyl and drywall (primed only) to prevent messing up the surface you’re applying the tape to. Pretty awesome, right?
Tip #4: Use a card to ensure the best adhesion.
FrogTape® offers a really strong adhesion on its own, but because I was painting a black accent wall in a white room I wanted to make sure I figured out how to get perfect paint lines on the walls. Before I started painting, I took the extra step of running a card over all of the FrogTape®. I wanted to make sure I truly pressed down on every inch of the tape I applied. Can you tell you I really wanted those crisp paint lines?Tip #5: Cut-in along the painter’s tape.
I got into a rhythm that worked best for me as I started painting. Instead of going immediately to a paint roller, I used a paint brush to paint along the tape to about 3-4 inches beside it. This ensured I got full coverage along the paint lines while also ensuring my roller didn’t bump against the ceiling or adjacent wall.Tip #6: Remove tape slowly.
As soon as I finished a section, I slowly pulled the FrogTape® off at a 45-degree angle before the paint even had a chance to start drying. Pulling slowly and at an angle ensures you remove the tape cleanly without pulling off any of the paint from the wall or damaging the wall under the tape. Now, if your walls require two coats of paint, you still want to remove the tape before the first coat dries. You’ll have to apply the FrogTape® again for the second coat. Those perfect paint lines are worth it!
 I was impressed with the results especially along the ceiling. I was dealing with a textured ceiling so I wasn’t sure how it would turn out. But no worries there as well!
Tip #7: Cut in and paint on the same day.
Once all the tape was removed from the walls and ceiling, I went back and rolled the rest of the wall. For the best results and the best clean paint lines make sure to cut in along the tape and roll the rest of the wall the same day so the paint hasn’t dried in between. This ensures all the paint blends together and looks cohesive. Now, right when I thought I was done with this project, I decided to add trim around the windows. Going from never using the FrogTape® Delicate Surface Painting Tape, here I was grabbing it for a second time in one day. I taped off the freshly painted walls and applied a coat of white paint to the trim around the windows. And just like that our bedroom refresh was completed!
 I can’t tell you how great it feels to see the difference paint made in this space. Even better, how clean it looks when I take a step back to admire it. FrogTape® allowed for perfect paint lines while also protecting the areas I didn’t want the black paint to touch.

Common Questions About Painting Crisp Lines with FrogTape®
Can FrogTape be left on between coats?
While it may seem like a big time saver to leave FrogTape on between coats, it’s not recommended. You’ll get the cleanest paint lines when you remove tape before the paint has fully dried and then re-tape before your next coat.Can you tape the day before painting?
Painter’s tape is designed to become less adhesive over time for easier removal, so it’s not recommended to tape the day before painting. If you do, you won’t get the same protection against bleeding paint and it will be harder to paint crisp lines.Is it OK to cut in one day and paint the next?
For best results you should cut in along your edges and paint the rest of the walls on the same day. This will ensure the paint blends together properly and looks cohesive on the wall.When painting two coats do you cut in twice?
Yes! You need to approach your second coat of paint the same way you do your first coat. That means re-taping along the edges of your wall, trim and ceiling and then first cutting in along the tape before rolling.How do you stop paint from bleeding through FrogTape®?
There’s not much you have to do besides properly applying the FrogTape® – it’s that effective! However if you’re looking for the best protection possible you can use a card to run along the edges of the tape to ensure it’s very tight to the wall. You can also try running a damp cloth along the paint to activate the tape’s Paint Block technology. If you haven’t already, it’s time to add FrogTape® to your home improvement tool belt. I usually have 2-3 rolls on hand because you truly can’t have enough of it. Tag me in your upcoming paint projects so I can celebrate your clean paint lines along with you.


[…] get very expensive but it doesn’t have to be that way. I recently shared with you how to get clean paint lines every time especially with a dark paint color. But that wasn’t the only thing I did in our master […]