• Home
  • ABOUT
  • WORK WITH ME
  • Paint Colors
  • Shop Our House
    • Guest Bedroom
    • Front Living Room
    • Living Room with Fireplace
    • Previous Second Living Room
    • Current Playroom
    • Prior Playroom
    • Dining Room
    • Laundry Room
    • Oliver’s Bedroom
    • Guest Bathroom
    • Covered Lanai
    • Patio
    • Master Bedroom
  • CONTACT
    • Facebook
    • Instagram
    • Pinterest

Within the Grove

Join the list to receive occasional news and special updates!

Create Your Own Wooden Poster Frame

January 30, 2019

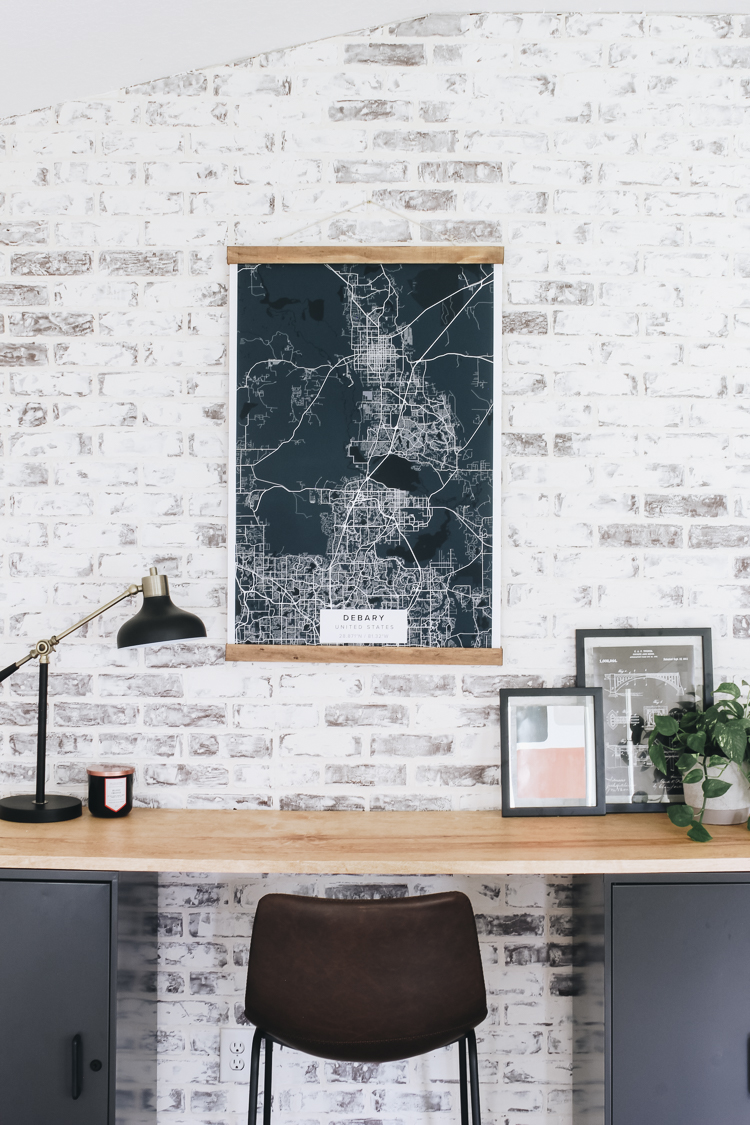
When designing Ryan’s office, I knew I wanted to display a large map in the center of the brick wall. I wanted something simple but also made a bold statement. The map arrived and it was exactly what I was looking for. The problem? I wanted the map to stand out and I was afraid a bulky frame would take away from it. I had to think of another way to display it.

I immediately thought of a wooden poster frame. They’re modern, simple and a great way to display large pieces of artwork. Due to a time crunch, I decided to try and make my own. It ended up being very simple to make and only took an hour of my time. Here’s how you can make one for your home.

The How-to

Materials:

  • 3/8″ x 1.5″ x 3′ Pine Board
  • Hand saw, jig saw, table saw, etc. Your tool of choice to cut the pine boards.
  • Sandpaper
  • Gel Gorilla Glue
  • Stain color of choice
  • Magnets
  • Screw in hooks or small eye screws
  • String
  • Scissors

Step 1: Determine the length you want your boards to be. For mine, I made them a quarter of a inch longer than my poster.

Step 2: Measure and mark your desired length on each board. Using a hand saw, cut your boards where you placed the mark. You can also use a jig saw or a table saw for this step. If you don’t have any of these tools, know your length before you go to Lowe’s or Home Depot and ask them to cut the boards for you.

Step 3: Once all the boards are cut, you’ll want to sand the edge you cut to create a smooth edge. You’ll also need to sand the entire surface area of each board for a smooth finish and to prep for the stain. You can start with a 160 grit sandpaper and finish it off with a 220 grit sandpaper.

Step 4: Stain the pine boards and allow them to fully dry. I used Provincial by Minwax on our pine boards.

Step 5: Once the stain is dry, it’s time to attach the magnets. This part can be tricky because you want to make sure you attach them to each piece of wood so that they line up correctly when the boards are put together. Also, make sure you glue them so that the unlike poles attract and not repel.

Start by gluing four magnets (evenly spaced) on one board using the super glue gel.

Place the corresponding magnet on top of each magnet.

You’ll apply the super glue gel on top of the second magnet.

Next, pick up the second piece of pine board and place on top of the magnets and firmly press down. Make sure you’re lining the board up evenly.

Here’s a quick video also showing you this step:

Step 6: On the top piece of the back hanger, attach a hook on both ends by screwing it in. You want to make sure you’re at least 1 1/2″ away from the end. From there, attach your choice of string to both hooks.

You’re finally ready to hang your artwork or poster using your new poster frame. It’s that simple! You’ll place your poster between the two pieces of boards and the magnets will hold the poster in place while also keeping the two pieces of board together.

The great thing about using magnets for this project? You’ll be able to easily switch out your artwork whenever you’d like! So, tell me, how many will you be making this weekend for your home?

Need other ideas on how to display artwork and photos in your home? Make sure to check out our gallery wall tutorial and hanging art work using hangers.

Let’s keep in touch! 
We have a brand new community over on Facebook, House & Home, where we’ll be chatting, sharing, and helping one another when it comes to home decor and projects. Come join us! Check it out here.  
Like on Facebook || Follow on Instagram || Follow on Pinterest

Share this:

  • Click to share on Twitter (Opens in new window)
  • Click to share on Facebook (Opens in new window)

Related

Filed Under: DIY

« How to Hide Your TV Cords
Organizing Playroom Toys »

Trackbacks

  1. DIY Plywood Desk - Within the Grove says:
    February 8, 2019 at 12:16 am

    […] You can check out the full reveal of this space here and the tutorial for the poster frame here. […]

    Reply

Leave a Reply Cancel reply

Your email address will not be published. Required fields are marked *

This site uses Akismet to reduce spam. Learn how your comment data is processed.

Looking for something?

withinthegrove

A little garden magic just by adding some solar li A little garden magic just by adding some solar lights. Notice the starburst pattern they give off? My favorite part! These would also work great along a deck railing, the top of a wooden fence, or on the side of stairs. I added both solar lights you see here to my Amazon shop!
Round 2 (and final!) for the grass install in our Round 2 (and final!) for the grass install in our backyard. Dang, does it feel GOOD to finally say that! It has been a long time coming and a little sweat equity saved us so much by doing it ourselves. Next on the backyard to do list is turning it into a tropical oasis by planting the flower beds. Think huge birds of paradise! Time to start planning.
It has been 6 years since we moved into our home a It has been 6 years since we moved into our home and visualized the potential our backyard would one day have. The first few years were spent clearing out and claiming our property back . Two years ago we built our dream garden, last year we built the play area that feels more like a magical treehouse, and this year we added a pool (still pinching myself every day). We’re seeing our hard work over the years starting to come together as we approach the finish line of installing grass and landscaping that’s going to bring it all together. As I always say, stay tuned because you know I’m going to share it all with you! And a little reminder for you to keep going because home takes time.
The garden is cleaned up, prepped, and ready for t The garden is cleaned up, prepped, and ready for the summer crop. What started as a single garden box has transformed to this garden space over the past few years. Favorite thing about it: being tucked away in this cozy corner with the winding paths throughout it. One thing I would do differently: using pea gravel instead of the granite rocks we went with. These rocks hurt! Pea gravel is smooth enough to comfortably walk barefoot on.
The grass is in! Saying BUH BYE to the dirt around The grass is in! Saying BUH BYE to the dirt around the pool for the first time since December when we broke ground. We spent the past few weeks installing irrigation throughout our backyard and around the pool. Yesterday we finally had the sod delivered and within a few hours it got us one step closer to finishing our backyard oasis. We still have a long ways to go, but my goodness does it feel good to see this part done! And we can finally check off the final inspection for the pool build.
What does it cost to fill a 16,000 gallon pool wit What does it cost to fill a 16,000 gallon pool with a garden hose? Our total came to $229! Does this total surprise you? This of course can greatly vary depending on where you live and your situation. For us, we live in Florida and on county water. We only pay water fees and not sewage. The water company did not give us a discount. We filled the pool right at the start of our billing month so this is it! Have you filled up a pool before? I’d love for you to share your cost, pool size, and location if you feel comfortable doing so!
We have a 16,000 gallon pool and filled it up with We have a 16,000 gallon pool and filled it up with a single water hose. And we for sure had some questions! Answering them here:

• Why not use a water truck? We weren’t in a rush, it was the best way to end this project watching it fill up, and it would have been more expensive. 

• Why not use our local fire station? Our local fire department doesn’t do this and it isn’t very common that most do. We wouldn’t ask if they did. 

• Did our water company give us a discount? Nope. Most water companies will take off the sewage fee but we only pay for water and not sewage where we live. We did notify them so they wouldn’t turn our water off thinking it was a leak. 

• What is that on the end of your hose? We added a filter on the hose to help reduce iron, scale, any other heavy metals and containments to help give our pool a fresh start. 

• How long did it take? 51 hours 

I’ll be sharing the cost soon so make sure to add your guess in the comments!
Pizza nights are back! And one thing we’re addin Pizza nights are back! And one thing we’re adding since our screen enclosure is gone, are these Bitefighter LED String Lights by @tikibrandproducts . You’ve seen us use them in our playset area and now for our patio area. They give us the ambiance we need at night while helping to fight off the mosquitoes as a 2 in 1 solution. There’s no odor, no mess, and they will last all season long. Cheers to the summer nights ahead! #ad #TIKIbrand
Protecting outdoor furniture for the summer!

It’s time to give your outdoor furniture the best start for summer and to help it last long term. Here are some things you can do to protect your outdoor furniture as we enter the summer season:

1. If you have wood furniture, it’s time to seal it! I use Thompson’s Waterseal on all my outdoor wood furniture except for teak. This protects it from moisture, sunshine, and mold/mildew.

2. Easiest way to help keep cushions clean is by spot cleaning throughout the season. I use 30 Seconds Outdoor Cleaner for quick, fresh looking cushions. 

3. To really protect cushions, Shield H2O provides a water repellent treatment that repels moisture and spills, which in return helps prevent mold and mildew. 

4. Have teak furniture? Use a teak SEALER and not an oil. Teak oil is a short term solution and easily washes out with rain. Time to seal it to last long term! 

I have everything I used in my Amazon storefront under outdoor.
Load More... Follow on Instagram

Sign up here to have our fresh posts delivered to your inbox!

Enter your email address:

Delivered by FeedBurner

Copyright © 2023 Within The Grove • Customized by Brave Creative Design · Log in

  • Privacy Policy
  • Terms and Conditions
  • Disclosures + Photo Usage
 

Loading Comments...