• Home
  • ABOUT
  • WORK WITH ME
  • Paint Colors
  • Shop Our House
    • Guest Bedroom
    • Front Living Room
    • Living Room with Fireplace
    • Previous Second Living Room
    • Current Playroom
    • Prior Playroom
    • Dining Room
    • Laundry Room
    • Oliver’s Bedroom
    • Guest Bathroom
    • Covered Lanai
    • Patio
    • Master Bedroom
  • CONTACT
    • Facebook
    • Instagram
    • Pinterest

Within the Grove

Join the list to receive occasional news and special updates!

DIY // Glitter Picture Hangers

November 30, 2016

This shop has been compensated by Collective Bias, Inc. and its advertiser. All opinions are mine alone. #RollAwayLint #CollectiveBias

DIY Glitter Picture Hangers

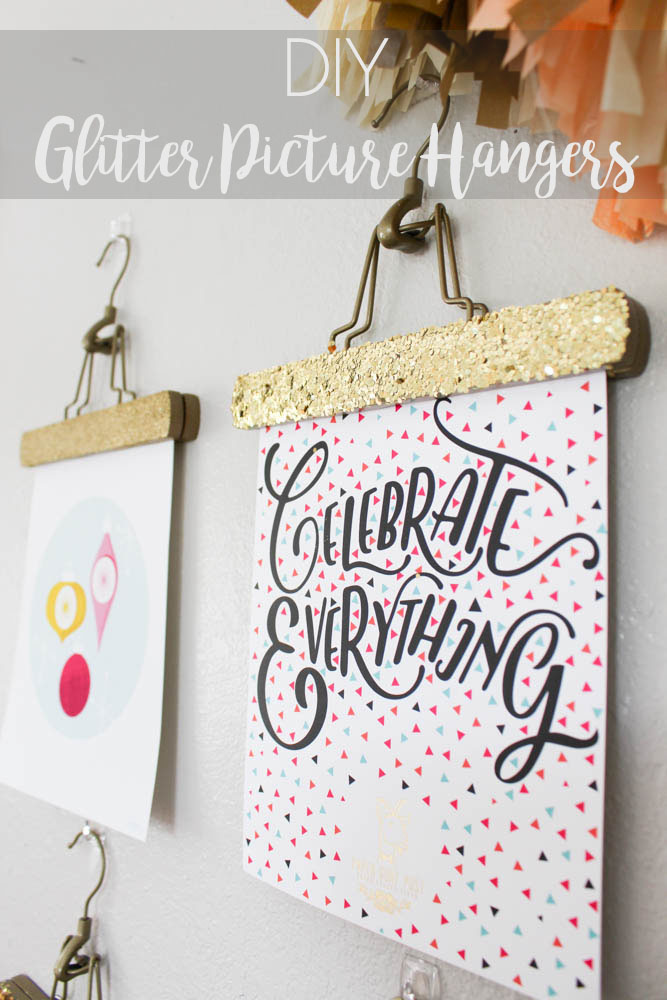
When my guest bedroom also became my office, I didn’t do much except move my desk and supplies into the room. The walls already had a few decor pieces but not what I wanted for an office. I finally decided to do something about it this week! I wanted to display motivational quotes and images on the wall that will keep me going on those hard days where a little push is needed. But I also wanted to be able to rotate the quotes and pictures without having to put a ton of holes in my office wall.

Glitter picture hangers for your office - Within the Grove

Picture frames seemed too bulky for my space. That’s when I thought of creating glitter picture hangers. I transformed wooden pant hangers I found at Target into picture hangers with a little spray paint and glitter. This was a quick project with amazing results! When gold glitter is involved, it’s bound to be magical. Plus, I can continuously rotate my prints to match my mood or the season.

Office decor using glitter hangers - Within the Grove

These sparkly glitter picture hangers are the perfect addition to my office. The neutral color will allow me to place unlimited types of prints in the hangers and also match flawlessly. In just a few easy steps, you can make a set of your own. For an added bonus, I’m showing you how you can quickly and successfully clean up the glitter mess that’s left behind. What are we waiting for? It’s time to start creating!

Supplies:

|| Wooden Hangers || Gold Spray Paint || Gold Glitter || Glue || Paintbrush || Scotch-Brite™ 50% Stickier Lint Roller || Poster Board

Supplies to create glitter picture hangers - Within the Grove

The How-To:

Step 1: After gathering your supplies, spray paint each hanger gold. Make sure to get all of the sides. Allow them to fully dry before moving on to the next step.

Spray painting hangers gold - Within the Grove

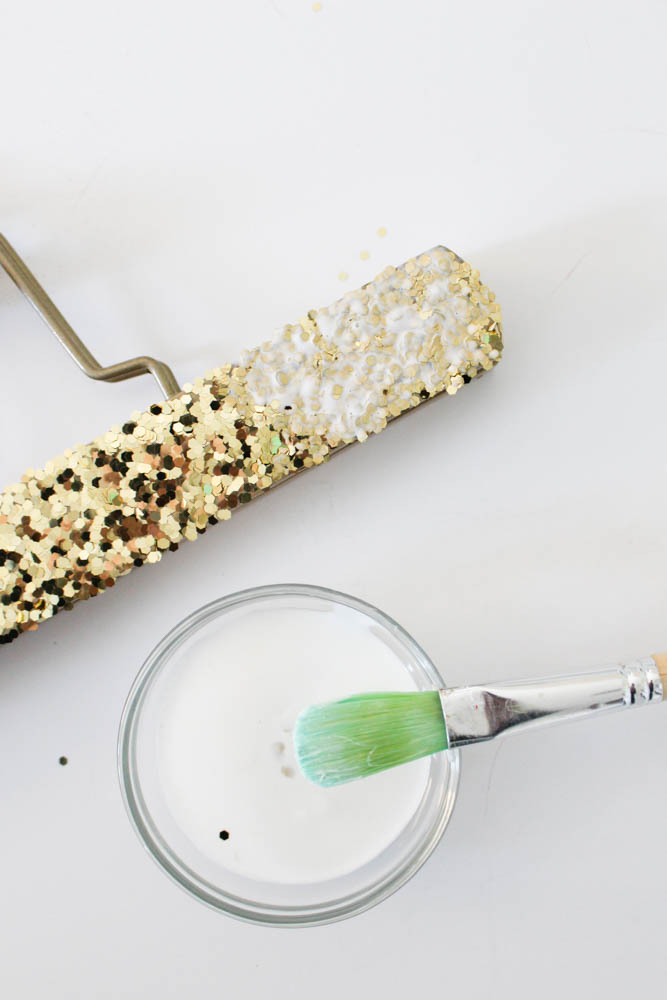
Step 2: Place your hanger on a poster board and apply the glue using a paintbrush to the front of each wooden hanger. Apply enough glue to allow the glitter to stick.

Applying glitter to hangers using glue - Within the Grove

Step 3: Sprinkle the gold glitter on top of the glue covering the entire area.

Using glitter on hangers - Within the Grove

Sprinkling glitter onto a hanger - Within the Grove

Step 4: Shake off the excess glitter and allow the hangers to dry.

Gold glitter on hangers - Within the Grove

Step 5: Once the hangers are dry, apply a coat of glue on top of the glitter. This will seal the glitter and prevent it from continuously sprinkling off once they are hung. Don’t worry, the glue will dry clear.

Sealing glitter with a layer of glue - Within the Grove

Step 6: Once the glue has dried, place your favorite prints in the hangers and display them on your wall!

Glitter picture hangers - Within the Grove

Now, you’re probably wondering why you even started this project after seeing all the glitter that’s left behind. Don’t worry, I have a solution for you! Scotch-Brite™ Brand solves all of our glitter problems when using it in the home.

You know how walking through Target to grab just one item turns into grabbing several? After picking up my wooden hangers, I noticed the 8″ Scotch-Brite Lint Roller as I started browsing even more. It’s huge and has the best handle. I knew this would be perfect to pick up the glitter because let’s face it, the vacuum is a pain to get out sometimes. I even picked up the 4.8″ lint roller as a back up. Here’s exactly where you can find this product in Target:

Find Scotch-Brite in Target

For a reason to buy more, use this Target Cartwheel Offer for an extra 15% off from November 17th through December 3rd.

I’m so glad that I bought these two lint rollers! I’m telling you, as much as I love glitter, sometimes it’s my enemy. That gorgeous container you saw earlier in the post, well it ended up on the floor, face down! I told myself not to panic. Using the 8″ lint roller, I was able to get the glitter up and out of my carpet within minutes.

Getting glitter out of the carpet with Scotch-Brite lint roller.

Why this one? It’s perfect when cleaning up this much glitter in a large area. Glitter on the carpet? Lint roll it. Glitter all over your workspace? Lint roll it. Glitter somehow flew onto the curtain? Lint roll it! See how amazing this product is!? The Scotch-Brite 50% Sticker Lint Roller goes beyond your typical use of picking up lint and hair. For anyone trying a DIY project, it’s perfect for picking up fine and thick glitter within your home. With it being 50% stickier, it has no problem picking up the glittery mess. Forget the vacuum! Plus, this method is quicker and easier.

Getting glitter out of carpet.

After my cleaning spree, I noticed one more area the glitter attacked. Remember how I told you this is for my home office that’s also my guest bedroom? Well, this also happens to be where I complete most of my DIY projects including this one. After knocking and blowing off the extra glitter from the hangers, I guess I did my job a little too well. Glitter ended up on the bedspread out of all places.  Hello smaller lint roller! I was back in business after one quick swipe.

Using lint rollers on bedding.

Need more inspiration on how you can use your Scotch-Brite 50% Stickier Lint Rollers in your home? Come see how other bloggers are using their lint roller by clicking here.

Switching out prints in your home office - Within the Grove

I would love to see the hangers your create after following this DIY tutorial. There are so many color options and now you don’t have an excuse to not get the glitter out with such an easy clean up. What colors are you picking for your hangers? I would also love to know how you use a lint roller in your home. Head on down to the comments below to tell me all about it! Meanwhile, here’s a little more inspiration for you:

Scotch-Brite on Facebook

on Twitter

on Pinterest

on Instagram 

Thank you for supporting the brands that make Within the Grove possible!

Let’s keep in touch!

We have a brand new community over on Facebook, House & Home, where we’ll be chatting, sharing, and helping one another when it comes to home decor and projects. Come join us! Check it out here.

Like on Facebook || Follow on Instagram || Follow on Pinterest

Share this:

  • Click to share on Twitter (Opens in new window)
  • Click to share on Facebook (Opens in new window)

Related

Filed Under: DIY Tutorial

« A Mama’s Winter Survival Toolkit
Holiday Table Blog Hop 2016 // Within The Grove »

Comments

  1. kristi@ishouldbemoppingthefloor says

    December 1, 2016 at 2:27 pm

    These hangers are SO FUN! Loving this awesomesauce BIG lint rollers, too! #client

    Reply
    • ElizabethRishel says

      December 13, 2016 at 1:41 pm

      Thank you Kristi! Both are so much fun!

      Reply

Trackbacks

  1. Create Your Own Wooden Poster Frame - Within the Grove says:
    January 30, 2019 at 1:29 am

    […] Need other ideas on how to display artwork and photos in your home? Make sure to check out our gallery wall tutorial and hanging art work using hangers. […]

    Reply

Leave a Reply Cancel reply

Your email address will not be published. Required fields are marked *

This site uses Akismet to reduce spam. Learn how your comment data is processed.

Looking for something?

withinthegrove

Round 2 (and final!) for the grass install in our Round 2 (and final!) for the grass install in our backyard. Dang, does it feel GOOD to finally say that! It has been a long time coming and a little sweat equity saved us so much by doing it ourselves. Next on the backyard to do list is turning it into a tropical oasis by planting the flower beds. Think huge birds of paradise! Time to start planning.
It has been 6 years since we moved into our home a It has been 6 years since we moved into our home and visualized the potential our backyard would one day have. The first few years were spent clearing out and claiming our property back . Two years ago we built our dream garden, last year we built the play area that feels more like a magical treehouse, and this year we added a pool (still pinching myself every day). We’re seeing our hard work over the years starting to come together as we approach the finish line of installing grass and landscaping that’s going to bring it all together. As I always say, stay tuned because you know I’m going to share it all with you! And a little reminder for you to keep going because home takes time.
The garden is cleaned up, prepped, and ready for t The garden is cleaned up, prepped, and ready for the summer crop. What started as a single garden box has transformed to this garden space over the past few years. Favorite thing about it: being tucked away in this cozy corner with the winding paths throughout it. One thing I would do differently: using pea gravel instead of the granite rocks we went with. These rocks hurt! Pea gravel is smooth enough to comfortably walk barefoot on.
The grass is in! Saying BUH BYE to the dirt around The grass is in! Saying BUH BYE to the dirt around the pool for the first time since December when we broke ground. We spent the past few weeks installing irrigation throughout our backyard and around the pool. Yesterday we finally had the sod delivered and within a few hours it got us one step closer to finishing our backyard oasis. We still have a long ways to go, but my goodness does it feel good to see this part done! And we can finally check off the final inspection for the pool build.
What does it cost to fill a 16,000 gallon pool wit What does it cost to fill a 16,000 gallon pool with a garden hose? Our total came to $229! Does this total surprise you? This of course can greatly vary depending on where you live and your situation. For us, we live in Florida and on county water. We only pay water fees and not sewage. The water company did not give us a discount. We filled the pool right at the start of our billing month so this is it! Have you filled up a pool before? I’d love for you to share your cost, pool size, and location if you feel comfortable doing so!
We have a 16,000 gallon pool and filled it up with We have a 16,000 gallon pool and filled it up with a single water hose. And we for sure had some questions! Answering them here:

• Why not use a water truck? We weren’t in a rush, it was the best way to end this project watching it fill up, and it would have been more expensive. 

• Why not use our local fire station? Our local fire department doesn’t do this and it isn’t very common that most do. We wouldn’t ask if they did. 

• Did our water company give us a discount? Nope. Most water companies will take off the sewage fee but we only pay for water and not sewage where we live. We did notify them so they wouldn’t turn our water off thinking it was a leak. 

• What is that on the end of your hose? We added a filter on the hose to help reduce iron, scale, any other heavy metals and containments to help give our pool a fresh start. 

• How long did it take? 51 hours 

I’ll be sharing the cost soon so make sure to add your guess in the comments!
Pizza nights are back! And one thing we’re addin Pizza nights are back! And one thing we’re adding since our screen enclosure is gone, are these Bitefighter LED String Lights by @tikibrandproducts . You’ve seen us use them in our playset area and now for our patio area. They give us the ambiance we need at night while helping to fight off the mosquitoes as a 2 in 1 solution. There’s no odor, no mess, and they will last all season long. Cheers to the summer nights ahead! #ad #TIKIbrand
Protecting outdoor furniture for the summer!

It’s time to give your outdoor furniture the best start for summer and to help it last long term. Here are some things you can do to protect your outdoor furniture as we enter the summer season:

1. If you have wood furniture, it’s time to seal it! I use Thompson’s Waterseal on all my outdoor wood furniture except for teak. This protects it from moisture, sunshine, and mold/mildew.

2. Easiest way to help keep cushions clean is by spot cleaning throughout the season. I use 30 Seconds Outdoor Cleaner for quick, fresh looking cushions. 

3. To really protect cushions, Shield H2O provides a water repellent treatment that repels moisture and spills, which in return helps prevent mold and mildew. 

4. Have teak furniture? Use a teak SEALER and not an oil. Teak oil is a short term solution and easily washes out with rain. Time to seal it to last long term! 

I have everything I used in my Amazon storefront under outdoor.
We were told 16 weeks for our pool install but it We were told 16 weeks for our pool install but it ended up taking exactly 12 weeks. Broke ground on December 16th and started filling it with water on March 16th. I’m sharing all the pool details over on my blog. Including the answer to the number one question: How much did this cost? Covering how we picked a pool builder, the construction process, the materials we went with and why, what we splurged on and where we saved, and so much more. Save it for future reference! It’s a good one!
Load More... Follow on Instagram

Sign up here to have our fresh posts delivered to your inbox!

Enter your email address:

Delivered by FeedBurner

Copyright © 2023 Within The Grove • Customized by Brave Creative Design · Log in

  • Privacy Policy
  • Terms and Conditions
  • Disclosures + Photo Usage
 

Loading Comments...