• Home
  • ABOUT
  • WORK WITH ME
  • Paint Colors
  • Shop Our House
    • Guest Bedroom
    • Front Living Room
    • Living Room with Fireplace
    • Previous Second Living Room
    • Current Playroom
    • Prior Playroom
    • Dining Room
    • Laundry Room
    • Oliver’s Bedroom
    • Guest Bathroom
    • Covered Lanai
    • Patio
    • Master Bedroom
  • CONTACT
    • Facebook
    • Instagram
    • Pinterest

Within the Grove

Join the list to receive occasional news and special updates!

Organizing Playroom Toys

January 31, 2019

Hey, friends! It’s finally reveal day for the playroom. Well, at least how we organized the toys. A few months ago we had really good intentions of doing this when we purchased these shelves from Ikea. We even stained them and then it stopped there. So, what exactly happened to create this hot mess of a toy situation? We didn’t stop and think how we could store and organize the toys on the shelves. Which resulted in this:

Although we picked the toys up every evening before bed, it still felt chaotic in this space. So much, I realized that Oliver wasn’t playing in here as much as he used to. I knew something had to change which meant giving these shelves a complete overhaul.

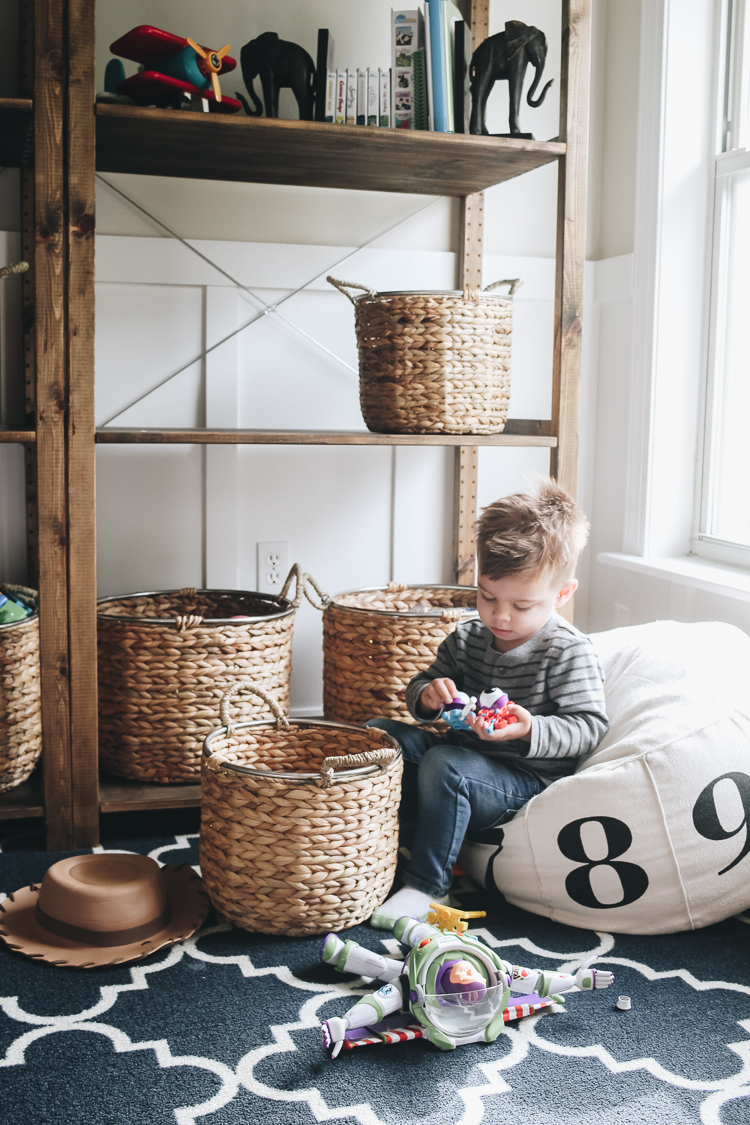
How to Organize Toys on a Shelving Unit

1.Determine how you’re going to organize them.

This was the easy part for me to decide because I knew I wanted baskets on the shelves to organize the toys. The difficult part? Finding enough baskets that not only worked for the space but also didn’t blow the budget. I finally found these on Wayfair that came in a 2 pack (1 small, 1 large) and they’re perfect for the space.

The smaller baskets allow Oliver to safely remove them from the shelf without being too heavy. The larger baskets allow for ample storage for those bigger toys or toys like legos where they are a lot of pieces. And overall, the baskets provide decor while also concealing the toys.

2. Use Home Decor to Display Electronics and Educational Activities 

As a former Kindergarten teacher, I have a love for interactive educational games and activities. Which means I also needed a place to store these items while being able to quickly and easily grab them as I work with Oliver during the day. For his electronics, I found these adorable book ends where I can easily display and grab his digital books, LeapFrog pad, and tablet. Plus, it helps us keep track of them.

For the hands-on educational games, I displayed them in a metal basket. There are a few reasons why I love this type of basket for these activities: I can easily see what’s in the basket, I can quickly grab an activity and it adds a little design to the space.

3. Use Toys as part of the Decor

Not all toys need to be hidden (like the 20 stuffed animals we have). There are some that are very cute to display on the shelf. They add a sense of playfulness to the shelves and the whole reason why the shelves are even there: to provide interactive play for kids. I placed a few of Oliver’s wooden play sets and his airplane on the shelf and love the whimsical touch they add.


4. Add Decor

Who said every shelf has to be designated for toys? I love to design a space that is functional and one that we will love to spend time in. Since the top shelf isn’t practical to place toys on (Oliver nor I can reach), I decided to have a little fun by decorating it. A few pieces of framed artwork, a robot clock and an industrial fan was all that it took to complete the space.

So, there you have it! We took Oliver’s playroom toys from a chaotic mess to organized bliss. And the best part? He’s spending more time in here than he ever has since getting it organized.

Since every toy has a place to go or a basket to be tossed in, clean up is a breeze! It has also been easier to guide and teach Oliver where his toys go. So much, he’s starting to do it on his own. This type of organization in a playroom is a win for both kids and parents! I’d love to know how you organize the toys in your home, especially books.

Shop the Space

Shelving Unit

Let’s keep in touch! 
We have a brand new community over on Facebook, House & Home, where we’ll be chatting, sharing, and helping one another when it comes to home decor and projects. Come join us! Check it out here.  
Like on Facebook || Follow on Instagram || Follow on Pinterest

Share this:

  • Click to share on Twitter (Opens in new window)
  • Click to share on Facebook (Opens in new window)

Related

Filed Under: Home Inspiration, Home of the Rishels, Our Home Improvements

« Create Your Own Wooden Poster Frame
DIY Plywood Desk »

Comments

  1. Lea says

    October 9, 2020 at 8:31 pm

    Love these! What stain did you use?

    Reply
  2. Brittany Pearson says

    September 9, 2020 at 10:18 am

    Hi! I love this look so much! Which size of the shelves did you get? I am debating between the 35×19(https://www.ikea.com/us/en/p/ivar-shelving-unit-pine-s59248320/)
    and the 35X11 (https://www.ikea.com/us/en/p/ivar-shelving-unit-pine-s89248314/). Are they pretty sturdy?
    Last question: I cannot find similar baskets anywhere! Did they ever come back in stock?
    Thank you!

    Reply
  3. Hailry says

    May 15, 2020 at 10:32 pm

    This is a great space and given my lots of inspo for our playroom.

    What are the shelves called from ikea. Having a hard time finding them and hoping they are still in stock

    Reply
  4. Barbara says

    January 14, 2020 at 7:21 am

    I love the shelves! The link for the shelves just takes you to Ikea. What is the name of the shelves?? Thank you!

    Reply
  5. Lisa says

    October 31, 2019 at 3:30 pm

    Hi! Can you please list where you got the giant bean bag chair with the numbers on it? Super cute!!

    Reply
  6. Lisa says

    August 30, 2019 at 11:07 am

    Where are the shelving units from?

    Reply
  7. Kerrilee says

    May 10, 2019 at 9:51 am

    Love this all. I have found the shelving unit and wicker baskets, but where is the small black wire basket from?

    Reply
  8. Gigi says

    March 31, 2019 at 1:18 am

    Where oh where did you find those amazing shelves?! They are exactly what I have been looking for? This space looks great.

    Reply
  9. Laura Ballard says

    March 18, 2019 at 4:54 pm

    Am I missing the link somewhere? I feel stupid, but I can’t seem to find the link to the baskets… 🙂

    Thanks!

    Reply
    • ElizabethRishel says

      March 18, 2019 at 5:01 pm

      Hi! It’s at the bottom of the post under “Shop the Space”. You’ll see the image of the baskets and click on that. I’ll also attach the link here: http://bit.ly/2FihFgW . . . Looks like they’re currently 55% off!

      Reply
      • Jennifer says

        June 22, 2019 at 5:02 pm

        Hi! Love these baskets! The link just takes me to Wayfair’s website. Does that mean they are out of stock??

        Reply
        • Kate D says

          July 17, 2019 at 11:27 am

          Having the same problem! I love this idea sm the baskets. I think we are going to do this in our space.

          Reply
        • Cat Snelson says

          August 30, 2019 at 7:51 pm

          I had the same problem. I searched for them and found out they’re out of stock but plan to have them back December 2019.

          Reply
          • Jennifer says

            August 30, 2019 at 8:27 pm

            Awesome! Thanks for letting us know!

      • April says

        August 26, 2019 at 10:12 am

        Mind to share what stain you used?

        Reply
  10. Meg says

    February 21, 2019 at 10:04 pm

    LOVE this space! The baskets are on sale so I’m going to jump on it. Can you tell me if you sanded and stained the IKEA shelves? If so, which stain?

    Thanks in advance, can’t wait to try the faux cabinet for my utility sink also 🙂

    Reply
    • ElizabethRishel says

      February 21, 2019 at 10:26 pm

      Hi Meg!! So excited they’re on sale! I didn’t sand them before staining. They were already good to go! The stain I used was Ash by Varathane. It may be discontinued but double check!

      I’d love to see your shelves and faux cabinet turn out too! Thank you SO much for checking out this post!!

      Reply
  11. Pat says

    January 31, 2019 at 10:07 pm

    Looks great! My daughter keeps the books on IKEA cubes and smaller toys go in bins. It’s easy to guide my granddaughter in cleaning up her playroom.

    Reply

Trackbacks

  1. 10 Decorating Essentials For A Rental Home on a Budget – BetterBabyDeals.com says:
    July 1, 2020 at 4:07 am

    […] potterybarn.com via withinthegrove.com via […]

    Reply
  2. Organizing Playroom Toys - Within the Grove - Kids Activities says:
    June 20, 2020 at 6:00 am

    […] Organizing Playroom Toys || Within the Grove. Read more at withinthegrove.com […]

    Reply
  3. Playroom Makeover with a Fresh Set of Paint Colors - Within the Grove says:
    May 28, 2020 at 7:34 am

    […] for more playroom inspiration? See how we organized toys, installed board and batten, and installed a roman shade in […]

    Reply
  4. 10 Decorating Essentials For A Rental Home on a Budget • Wustoo says:
    May 19, 2020 at 2:32 am

    […] via withinthegrove.com […]

    Reply
  5. 6 clever toy storage ideas - Daily Dream Decor says:
    April 23, 2020 at 3:48 pm

    […] Photocredit […]

    Reply
  6. Lets Do This | Tackling Spring Cleaning Without Giving Up Your Whole Weekend - BANDD DESIGN says:
    February 28, 2020 at 3:55 pm

    […] Within The Grove […]

    Reply
  7. Most Popular Projects of 2019 - Within the Grove says:
    January 2, 2020 at 8:50 am

    […] playroom organization project is worth to go look at just because of the before picture. If you have kids you know how hard it […]

    Reply
  8. 15 Minimalist Playroom Organization Ideas » LADY DECLUTTERED says:
    August 19, 2019 at 7:00 pm

    […] WITHIN THE GROVE .COM […]

    Reply
  9. 20 Extremely Organised Toy Closets To Loathe ⋆ says:
    August 15, 2019 at 5:42 pm

    […] withinthegrove.com […]

    Reply
  10. 10 Decorating Essentials For A Rental Home on a Budget ⋆ says:
    June 28, 2019 at 6:38 am

    […] potterybarn.com via withinthegrove.com via […]

    Reply

Leave a Reply Cancel reply

Your email address will not be published. Required fields are marked *

This site uses Akismet to reduce spam. Learn how your comment data is processed.

Looking for something?

withinthegrove

The waterline tile and decking are both done! With The waterline tile and decking are both done! With the limestone making the biggest difference with this pool update. It’s stunning!! Very exciting to see our entire pool area installed. We’re almost there!! Just the interior finish to go and then it’s time to fill the pool. 

•Pavers are limestone in Myra White 
• If you’re local to Central Florida, @caapavers installed ours! 
• Waterline tile is by NPT in the color Carbon.
DIY TILE REVEAL! The front door is styled and now DIY TILE REVEAL! The front door is styled and now taking the time to soak these tiles in! I kept it simple with the decor and took away the rug. If you've been here for a little bit, you know I love to place a rug underneath my wooden doormat. But letting these tiles SHINE is a must. Still can’t believe I made these! Head to the last image. I installed an imperfectly perfect tile as a little nod to these being handmade. DIY tile blog post coming your way soon! Grabbing packages from my front door just became even more exciting. 

Front door color: Black Magic by Sherwin-Williams
House Color: Cloud White by Benjamin Moore
Decor: You can find it on my LTK through my profile!
Right when we thought the pool excavation day was Right when we thought the pool excavation day was exciting, the gunite was installed! We’re about halfway through the pool build and we officially have the shell of the pool done. This all happened so fast. I’m talking about two weeks. The waterline tile and decking up next!
This will forever be a project where I will say: “ I MADE THESE TILES!” What would have cost me close to $2,000 to buy, I was able to make them for $350. I started experimenting with how to make them and nailing down the perfect black color 8 weeks ago. Let that sink in! This has been such a labor of love. 20 hours went into making the tiles. Two weeks worth of demo + installation. And a lot of learning curves in between. This project is so much more than saving money. It’s the process I went through and what I pushed myself to learn and do to get to this moment. We can do hard things!! Cheers to this project being done. How about we make a front door next? JUST KIDDING!! But a new front will be happening!

Thank you @vintagerevivals for showing that making cement tiles is a project one can tackle and @abby_roadhome doing the same with this amazing pattern!
The tiles are in place! 🎉 I’m not done yet bu The tiles are in place! 🎉 I’m not done yet but this is certainly a part of the project that needs to be celebrated. Grout is up next to call this project a wrap. It has been a process but one of the most rewarding ones when it comes to projects I’ve tackled in our home.
IT IS TIME! I have been waiting for this moment to IT IS TIME! I have been waiting for this moment to smash these front door tiles ever since we moved in. And it felt so dang good! Here’s what I’m doing to prep the concrete slab for the tile install: 

1. Remove old tile
2. Use an angle grinder with a diamond grinding blade to remove the thin set and paint. 
3. Wash the slab
4. Apply two coats of Hydro Ban to create waterproofing barrier from the moisture in the concrete slab and to help with crack isolation.
Another exciting step for the pool: Excavation day Another exciting step for the pool: Excavation day! We officially broke ground. It was the coolest thing to watch. Rebar and gunite up next.
250 cement tiles made!! 20+ hours went into making 250 cement tiles made!! 20+ hours went into making these tiles and we’re going to celebrate making it to this point! I questioned myself during the last push when molds started failing, tiles weren’t turning out, and I was just flat out tired. If there’s a project to test patience, this is the one. But want to know the craziest part? I’d do it all over again. What an awesome process being able to make my own tiles. And the part we’ve all been waiting for is coming up next: INSTALL!! Tiles, don’t fail me now.
This pretty much sums up the progress of making 25 This pretty much sums up the progress of making 250 cement tiles. But I’m halfway through! The moment I finish the last tile is the moment I knock out the old tile. Let’s do this!
Load More... Follow on Instagram

Sign up here to have our fresh posts delivered to your inbox!

Enter your email address:

Delivered by FeedBurner

Copyright © 2023 Within The Grove • Customized by Brave Creative Design · Log in

  • Privacy Policy
  • Terms and Conditions
  • Disclosures + Photo Usage
 

Loading Comments...