• Home
  • ABOUT
  • WORK WITH ME
  • Paint Colors
  • Shop Our House
    • Guest Bedroom
    • Front Living Room
    • Living Room with Fireplace
    • Previous Second Living Room
    • Current Playroom
    • Prior Playroom
    • Dining Room
    • Laundry Room
    • Oliver’s Bedroom
    • Guest Bathroom
    • Covered Lanai
    • Patio
    • Master Bedroom
  • CONTACT
    • Facebook
    • Instagram
    • Pinterest

Within the Grove

Join the list to receive occasional news and special updates!

Creating a Patio That’s an Extension of Your Home

June 25, 2018

Outdoor patio space to enjoy with friends and family.

We truly thought our patio was going to be the last space completed and one that we wouldn’t get to for a little while when we first moved in. Even though it was one of the main reasons we fell in love with this home. But, wouldn’t you know, our outdoor patio has become one of the first spaces in our home that we can officially say is done. Well, for now because you know we’ll never truly be done with any space. It all started with this corner of the patio that gave us our first seating area. You can see the cute little changes we made to it when we moved in here.

Design your own outdoor patio space on a budget,

We spend every morning out here. Me with a cup of coffee and Oliver pushing his toy cars around in his pajamas. Then morning turns into eating lunch out on the patio, playing with water toys when it’s too hot to be in the direct sunlight, and ending our days reading books out here. And of course Ryan and I enjoy a little quiet time out here once Oliver is in bed. It only made sense to continue to furnish and complete our patio area since it has truly become an extension of our living space.

Design your own outdoor patio space on a budget,

Here’s a look at our patio the day we moved in without any furniture or decor. The space intimidated me at first because I’ve never had a patio area this spacious (there’s an additional screened in area and smaller patio on the other side).

Our patio before the makeover.

Our patio before the makeover.

I knew I would have to be patient to decorate this patio space because it wasn’t a priority. And let’s be honest, outdoor anything isn’t necessarily budget friendly when it comes to decor and furniture.

Design your own outdoor patio space on a budget.

A few things happened to make this space possible while staying within our budget. We were able to furnish this space in a year due to a mixture of clearance finds, thrifting adventures, receiving a few items in exchange for sharing with all of you, and finding a few items that were priced within our budget. Our patio space certainly didn’t happen overnight and it took a lot of patience to wait for the right items at the right price.

Design your own outdoor patio space on a budget.

I’m going to show you each finished area of our patio but also spilling all the details about where we found everything. You’ll be shocked at the price that we paid for a few things. It shows that if you enter a space with a little patience and general idea of what you’d like, you can make things happen within budget.

Design your own outdoor patio space on a budget.

Sitting Area off of our Master Bedroom

Let’s start with the patio area off of our master bedroom. This was the first completed space within our patio because it was the easiest for me to visualize.  I tend to do better starting with smaller spaces and working my way out to the larger areas. My favorite part about this space? The thrifted coffee table I found. Several people were eyeing it but I knew it would be perfect for my space. I became the lucky new owner because I wrote sold on a sticky note and placed it on the table as I ran to the front to pay. Keep that little trick in mind when you’re thrifting!

Creating a comfortable outdoor living space.

Blue and White Polywood Bench – Received from Target in exchange for review.
Outdoor Pillow – Target clearance
Side Tables – We already owned these. They’re from Lowe’s and have been spray painted a few times over the years.
Table – $20 thrift find
Rug – Target Clearance
Floor Poufs – I splurged on these. $29 from Ikea and can also be stacked.
Hanging Boston Ferns– Home Depot purchased in the hanging pots to save money.

Main Sitting Area

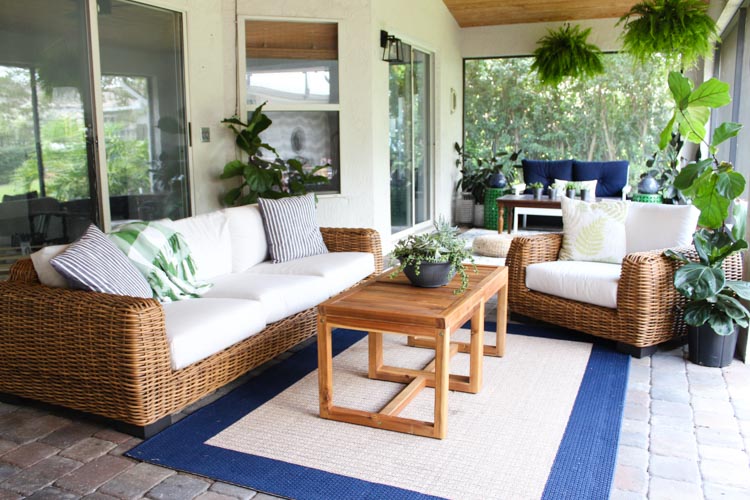
Then we have another seating area as you walk out onto the patio from the dining room and main living area of our home. Originally we wanted to place a long outdoor dining room table here but it didn’t make sense with it being right next to the sliding glass doors of the dining room. Turning this into another area for friends and family to relax was such a great choice.

Creating an outdoor living space with plenty of seating.

Outdoor Couch and Club Chair – Received from Target in exchange for review.
Rug – Target summer sale
Outdoor Pillows – Target summer sale
Outdoor Blanket – Target summer sale
Tables – Walmart (2 side tables placed together to create a larger table.)
Fiddle Leaf Fig Trees – Walmart (A steal at $13 each)

Corner Patio

The corner patio has become such a dreamy space. It connects to my office which is great because I can see Ryan and Oliver having an amazing time on the patio as I get work done from inside.  I use the patio area during nap time and in the evenings to get work done with how relaxing it is. You’ll be shocked to see what this area cost us after stalking Target for a good week.

Small outdoor patio space.

Club Chairs – Scored these for 95% off at Target bringing them to $90 for both!
Rug – Target (1 of 2 items I paid full price for)
Side Table – $5 thrift store find
Ferns – $2 clearance at Lowe’s
Olive Tree – $5 clearance at Lowe’s

Screened in Area

There’s also the open, screened in area of our patio. This has been the catch all with the outdoor furniture from our previous home. Although it’s functional this is the last area that will get a makeover. For now, it serves it’s purpose but I can’t wait to get my hands on it! Here’s where we found a few of the items in this space.

Outdoor Table – Found by the side of the road
Chairs– Target clearance
Hibiscus Trees – Estate Sale
Bench– Target
Pillows– Hand sewn

Lighting and Outdoor Fans

Lastly, we couldn’t forget about the outdoor lighting and ceiling fans. The condition of the ceiling fans when we moved in made it to where they couldn’t even be turned on. Let alone, with the wilting blades, they weren’t that great to look at either. So I de-cluttered, sold a few items on Facebook Marketplace and paid for new fans. We found these at Lowe’s for $99 each and couldn’t believe the price! We were also beyond thrilled to partner with Lamps Plus for our outdoor lighting. It seriously took a good three days to finalize what we wanted because their selection is so amazing! We ended up going with the Arrington Wall Light for a modern look.

Extending your living area to your outdoor patio.

Who wants to come hang out for a fun evening on our patio?! Now that we have it 90% completed, I want to have a few friends and family over to enjoy this gorgeous summer season as we grill out. I have plenty of seating and it just might motivate me to try and figure something out with the middle part of our patio. Maybe a decorative way to store outdoor toys, a potting area for my gardening needs, or an outdoor bar. If you have any suggestions, send them my way! I’d love to hear.

Let’s keep in touch!

We have a brand new community over on Facebook, House & Home, where we’ll be chatting, sharing, and helping one another when it comes to home decor and projects. Come join us! Check it out here.

Like on Facebook || Follow on Instagram || Follow on Pinterest


Share this:

  • Click to share on Twitter (Opens in new window)
  • Click to share on Facebook (Opens in new window)

Related

Filed Under: Our Home Improvements

« Our Design Plans for the Navy Wall in our Foyer
Easily Update Your Brass Fireplace »

Comments

  1. Cream Furniture says

    July 26, 2018 at 4:13 am

    Stunning!! love the ideas, brilliant read. Thanks for this informative post.

    Reply

Trackbacks

  1. Clone of 21 Patio Extension Ideas - Your House Needs This says:
    November 30, 2020 at 8:39 pm

    […] a sunroom, porch, or another patio is making sure that it feels like an extension of that space. Consider getting outdoor furniture to make it feel like a comfortable indoor room while still benefiting from fresh air and sun. Check […]

    Reply
  2. 21 Patio Extension Ideas - Your House Needs This says:
    November 30, 2020 at 8:25 pm

    […] a sunroom, porch, or another patio is making sure that it feels like an extension of that space. Consider getting outdoor furniture to make it feel like a comfortable indoor room while still benefiting from fresh air and sun. Check […]

    Reply

Leave a Reply Cancel reply

Your email address will not be published. Required fields are marked *

This site uses Akismet to reduce spam. Learn how your comment data is processed.

Looking for something?

withinthegrove

Round 2 (and final!) for the grass install in our Round 2 (and final!) for the grass install in our backyard. Dang, does it feel GOOD to finally say that! It has been a long time coming and a little sweat equity saved us so much by doing it ourselves. Next on the backyard to do list is turning it into a tropical oasis by planting the flower beds. Think huge birds of paradise! Time to start planning.
It has been 6 years since we moved into our home a It has been 6 years since we moved into our home and visualized the potential our backyard would one day have. The first few years were spent clearing out and claiming our property back . Two years ago we built our dream garden, last year we built the play area that feels more like a magical treehouse, and this year we added a pool (still pinching myself every day). We’re seeing our hard work over the years starting to come together as we approach the finish line of installing grass and landscaping that’s going to bring it all together. As I always say, stay tuned because you know I’m going to share it all with you! And a little reminder for you to keep going because home takes time.
The garden is cleaned up, prepped, and ready for t The garden is cleaned up, prepped, and ready for the summer crop. What started as a single garden box has transformed to this garden space over the past few years. Favorite thing about it: being tucked away in this cozy corner with the winding paths throughout it. One thing I would do differently: using pea gravel instead of the granite rocks we went with. These rocks hurt! Pea gravel is smooth enough to comfortably walk barefoot on.
The grass is in! Saying BUH BYE to the dirt around The grass is in! Saying BUH BYE to the dirt around the pool for the first time since December when we broke ground. We spent the past few weeks installing irrigation throughout our backyard and around the pool. Yesterday we finally had the sod delivered and within a few hours it got us one step closer to finishing our backyard oasis. We still have a long ways to go, but my goodness does it feel good to see this part done! And we can finally check off the final inspection for the pool build.
What does it cost to fill a 16,000 gallon pool wit What does it cost to fill a 16,000 gallon pool with a garden hose? Our total came to $229! Does this total surprise you? This of course can greatly vary depending on where you live and your situation. For us, we live in Florida and on county water. We only pay water fees and not sewage. The water company did not give us a discount. We filled the pool right at the start of our billing month so this is it! Have you filled up a pool before? I’d love for you to share your cost, pool size, and location if you feel comfortable doing so!
We have a 16,000 gallon pool and filled it up with We have a 16,000 gallon pool and filled it up with a single water hose. And we for sure had some questions! Answering them here:

• Why not use a water truck? We weren’t in a rush, it was the best way to end this project watching it fill up, and it would have been more expensive. 

• Why not use our local fire station? Our local fire department doesn’t do this and it isn’t very common that most do. We wouldn’t ask if they did. 

• Did our water company give us a discount? Nope. Most water companies will take off the sewage fee but we only pay for water and not sewage where we live. We did notify them so they wouldn’t turn our water off thinking it was a leak. 

• What is that on the end of your hose? We added a filter on the hose to help reduce iron, scale, any other heavy metals and containments to help give our pool a fresh start. 

• How long did it take? 51 hours 

I’ll be sharing the cost soon so make sure to add your guess in the comments!
Pizza nights are back! And one thing we’re addin Pizza nights are back! And one thing we’re adding since our screen enclosure is gone, are these Bitefighter LED String Lights by @tikibrandproducts . You’ve seen us use them in our playset area and now for our patio area. They give us the ambiance we need at night while helping to fight off the mosquitoes as a 2 in 1 solution. There’s no odor, no mess, and they will last all season long. Cheers to the summer nights ahead! #ad #TIKIbrand
Protecting outdoor furniture for the summer!

It’s time to give your outdoor furniture the best start for summer and to help it last long term. Here are some things you can do to protect your outdoor furniture as we enter the summer season:

1. If you have wood furniture, it’s time to seal it! I use Thompson’s Waterseal on all my outdoor wood furniture except for teak. This protects it from moisture, sunshine, and mold/mildew.

2. Easiest way to help keep cushions clean is by spot cleaning throughout the season. I use 30 Seconds Outdoor Cleaner for quick, fresh looking cushions. 

3. To really protect cushions, Shield H2O provides a water repellent treatment that repels moisture and spills, which in return helps prevent mold and mildew. 

4. Have teak furniture? Use a teak SEALER and not an oil. Teak oil is a short term solution and easily washes out with rain. Time to seal it to last long term! 

I have everything I used in my Amazon storefront under outdoor.
We were told 16 weeks for our pool install but it We were told 16 weeks for our pool install but it ended up taking exactly 12 weeks. Broke ground on December 16th and started filling it with water on March 16th. I’m sharing all the pool details over on my blog. Including the answer to the number one question: How much did this cost? Covering how we picked a pool builder, the construction process, the materials we went with and why, what we splurged on and where we saved, and so much more. Save it for future reference! It’s a good one!
Load More... Follow on Instagram

Sign up here to have our fresh posts delivered to your inbox!

Enter your email address:

Delivered by FeedBurner

Copyright © 2023 Within The Grove • Customized by Brave Creative Design · Log in

  • Privacy Policy
  • Terms and Conditions
  • Disclosures + Photo Usage
 

Loading Comments...