• Home
  • ABOUT
  • WORK WITH ME
  • Paint Colors
  • Shop Our House
    • Guest Bedroom
    • Front Living Room
    • Living Room with Fireplace
    • Previous Second Living Room
    • Current Playroom
    • Prior Playroom
    • Dining Room
    • Laundry Room
    • Oliver’s Bedroom
    • Guest Bathroom
    • Covered Lanai
    • Patio
    • Master Bedroom
  • CONTACT
    • Facebook
    • Instagram
    • Pinterest

Within the Grove

Join the list to receive occasional news and special updates!

Creating a Functional and Organized Cleaning Command Center

March 23, 2018

This post has been sponsored by Bounty Select-A-Size paper towels. All thoughts and opinions are my own.

Cleaning Command Center in Your Garage

The space for our cleaning supplies went from a dumping ground to a beautiful and functional space that our whole family can now enjoy. And did I just use the words enjoy and cleaning in the same sentence? Why yes, I did! This spring I finally decided to do something about this space and it proved to be the perfect home project and helps get the whole family involved. Let me show you what I mean!

Creating a cleaning command center in your garage.

Today I’m showing you how I created a functional and organized cleaning command center. It’s full of our favorite products (one that is my must have), our weekly cleaning schedule, a chalkboard sign to help hold each other accountable, and it’s visually designed to become an extension of our home. And let me tell you, it’s a completely different space from the dumping ground it used to be. Just take a look!

Before and after cleaning command center

I couldn’t be happier as a working mom from home as life just got a little easier when it comes to cleaning. So, how did we flip this space in an afternoon into the ultimate cleaning command center? Let’s take a closer look.

Using a chalkboard in your cleaning command center.

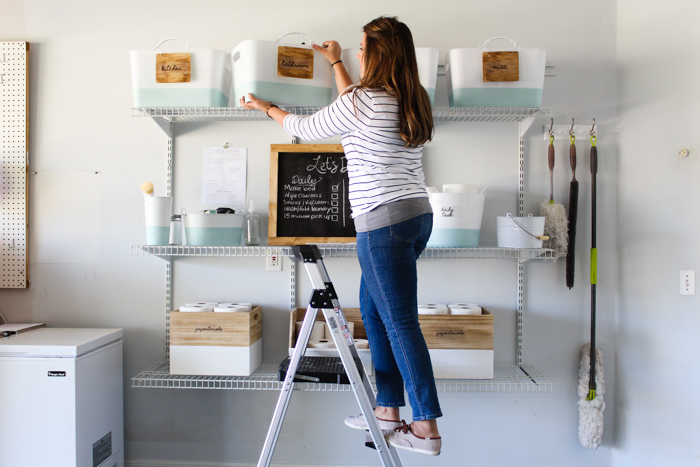
We used the shelves in our garage to help free up storage space inside our home. Plus, I love knowing that all our cleaning supplies are out of reach from our little one as we placed them on the top shelf. The shelves provided more than enough space to store everything and allowed me to add a few organizational items.  

Organizing a space for your cleaning materials.

The first thing I did was decide on a color scheme and created labels. This helps create an organized and cohesive look that will hopefully inspire us to clean more often. I purchased all white containers and added a pop of mint along the bottom. These were used to organize our cleaning supplies. For example, I have a bucket designated for the kitchen, bathrooms, general use, and miscellaneous items and placed them all on the top shelf to help keep out of reach from the little ones.

Using buckets to organize your cleaning materials.

Buckets are a great way to organize cleaning materials.

I also have paper towels on hand no matter what.  More importantly, Bounty Select-A-Size paper towels. They’re always my go-to when it comes to wiping off counters daily, cleaning up spills, and handing them to my toddler to use with his afternoon snack. Basically, my go to quicker picker upper whenever life gets messy because they’re so durable and absorbent. So, I knew I had to have plenty of storage for this product. Which is why I designated two bins just for Bounty. Grab a few Bounty paper towels for your cleaning command center by clicking the button below. 

Bounty is a must within your cleaning command center.

There are actually two places you’ll always find The Quicker Picker Upper: in the designated bins and in the daily task bucket. That’s right, we organized this space so much that we have a daily task bucket, our weekly cleaning schedule on display, and a chalkboard to check off what we’ve completed so far.

Cleaning Command Center with Bounty

By displaying our weekly cleaning schedule, it not only keeps us on track, but it keeps us motivated. No more of the crazy marathon of cleaning everything in one day. Now we can clean in as little as 20 minutes a day and have our weekends completely free to have fun as a family.

Creating a cleaning schedule to place in your cleaning command center.

We even added a chalkboard to our cleaning command center so we know what we’ve done for the day and what we have left to do according to the check marks. With chalk and paper towels on hand, it only takes seconds to change daily.  Plus, how fun is it to have a daily task bucket ready to go so you don’t have to go digging for the cleaning products.

Checking off your cleaning tasks using a chalkboard.

Checking off your cleaning tasks using a chalkboard.

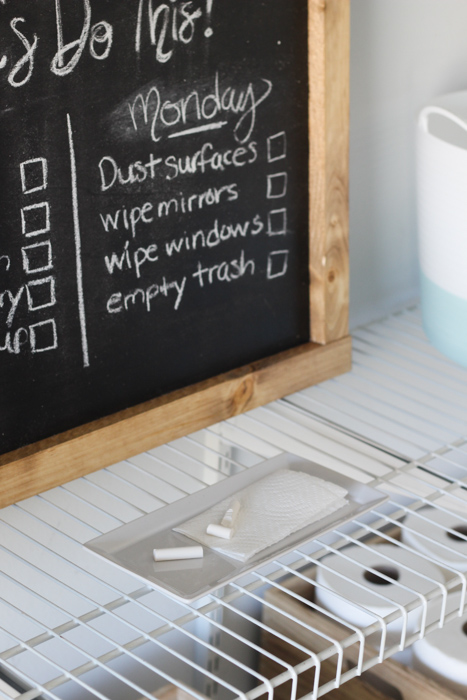
For example, when Monday comes around we have our all-purpose cleaning spray, Bounty Select-A-Size paper towels, and our duster ready to go in our daily task bucket to complete the cleaning tasks listed.

Use a daily cleaning bucket to help get tasks completed.

Of course, we didn’t forget some of the larger cleaning tools you may need last minute. Using decorative hooks, we were able to hang these items where they’re easily accessible versus piling on a shelf.

Organizing your cleaning materials.

We tried to keep our storage and cleaning schedule as simple as possible, especially since we don’t have a lot of time due to work, events, and everyday home responsibilities. By setting a timer for 20 minutes, you’d be amazed at how much we get done when we’re focused strictly on the cleaning tasks at hand.

Use bins for cleaning paper products.

Need a little motivation to get your own cleaning command center organized? Click the image below to download and print the weekly cleaning schedule and bookmark this post as your guide.

I’m amazed at how a few bins and using a color scheme can create a space that inspires us to have fun with cleaning. Hopefully this inspires you to create your own cleaning command center in your home to give you a jump start on all your spring cleaning. What are your favorite ways that you use Bounty Select-A-Size paper towels within your home? I’m all about new tips and tricks! I’d love to leave you with our video of us transforming our garage space into our cleaning command center. Enjoy!

Let’s keep in touch!

We have a brand new community over on Facebook, House & Home, where we’ll be chatting, sharing, and helping one another when it comes to home decor and projects. Come join us! Check it out here. 

Like on Facebook || Follow on Instagram || Follow on Pinterest 

Share this:

  • Click to share on Twitter (Opens in new window)
  • Click to share on Facebook (Opens in new window)

Related

Filed Under: DIY, Home Decor, Home of the Rishels, Our Home Improvements

« Nine Gray Paint Colors We Put to the Test for Your Home
Budget Friendly Coffee Table Flip »

Comments

  1. Pat says

    December 31, 2018 at 1:41 pm

    Love your cleaning command center!

    Reply
  2. Ann says

    September 15, 2018 at 3:45 pm

    Any chance you have a link or item number for the bins for the top shelf? I love them and cannot find them at Hobby Lobby.

    Reply
    • ElizabethRishel says

      September 16, 2018 at 1:01 pm

      Hi Ann! It looks like they are no longer available on their website. They were part of their spring shop line. Here’s a link to Target with their selection of white containers. Maybe one of these will catch your eye! https://www.target.com/s?searchTerm=white+container

      Reply
  3. Michele says

    April 16, 2018 at 9:09 pm

    I love this idea!!! Love the colors. I will have to try this. What are the names of the colors?

    Reply
  4. Adris says

    April 15, 2018 at 9:44 am

    I’m loving the personal touch to the storage containers. Can you please include the brand and name of the color spray paint that you used?
    Thanks

    Reply
    • ElizabethRishel says

      April 29, 2018 at 12:36 am

      Of course! It’s Ocean Mist by Rustoleum.

      Reply
  5. Cassi says

    April 12, 2018 at 10:27 am

    I have been looking for baskets or bins with this color sceme for such a long time how did you go about painting them your self?

    Reply
    • ElizabethRishel says

      April 12, 2018 at 4:54 pm

      It was a little tricky since I used spray paint! I started off my evenly wrapping painters tape around the each bin. Then used a piece of cardboard to shield the top half as I sprayed the bottom. I sat mine on a cardboard box as I did this. I hope this helps!

      Reply
  6. Debbie says

    March 23, 2018 at 3:58 pm

    I love those buckets. Where did you find them? I am also a huge Bounty fan. Your space looks amazing. Thanks for the inspiration.

    Reply
    • ElizabethRishel says

      April 6, 2018 at 12:57 pm

      Hi Debbie! The white buckets are from Hobby Lobby and the wooden ones are from Target. Thank you SO much for joining me here on the blog. Let me know if you grab a few buckets!

      Reply
  7. Jess says

    March 23, 2018 at 2:10 pm

    I love it Liz! It turned out great! I love the color scheme you went with and I’m inspired to come up with something…and maybe even get back into a regular cleaning regimen! *gasp*

    Reply
    • ElizabethRishel says

      April 6, 2018 at 7:11 am

      Hi Jess!! Thanks, girl! The color scheme is my favorite part. Very refreshing. I can’t wait to see your space you makeover.

      Reply

Trackbacks

  1. How to Organize A Garage - Within the Grove says:
    October 4, 2019 at 4:28 pm

    […] random items stored under the shelves. This was a fun project I completed last year which you can find here. Our goal is to keep it clear of items being stored in this […]

    Reply

Leave a Reply Cancel reply

Your email address will not be published. Required fields are marked *

This site uses Akismet to reduce spam. Learn how your comment data is processed.

Looking for something?

withinthegrove

The waterline tile and decking are both done! With The waterline tile and decking are both done! With the limestone making the biggest difference with this pool update. It’s stunning!! Very exciting to see our entire pool area installed. We’re almost there!! Just the interior finish to go and then it’s time to fill the pool. 

•Pavers are limestone in Myra White 
• If you’re local to Central Florida, @caapavers installed ours! 
• Waterline tile is by NPT in the color Carbon.
DIY TILE REVEAL! The front door is styled and now DIY TILE REVEAL! The front door is styled and now taking the time to soak these tiles in! I kept it simple with the decor and took away the rug. If you've been here for a little bit, you know I love to place a rug underneath my wooden doormat. But letting these tiles SHINE is a must. Still can’t believe I made these! Head to the last image. I installed an imperfectly perfect tile as a little nod to these being handmade. DIY tile blog post coming your way soon! Grabbing packages from my front door just became even more exciting. 

Front door color: Black Magic by Sherwin-Williams
House Color: Cloud White by Benjamin Moore
Decor: You can find it on my LTK through my profile!
Right when we thought the pool excavation day was Right when we thought the pool excavation day was exciting, the gunite was installed! We’re about halfway through the pool build and we officially have the shell of the pool done. This all happened so fast. I’m talking about two weeks. The waterline tile and decking up next!
This will forever be a project where I will say: “ I MADE THESE TILES!” What would have cost me close to $2,000 to buy, I was able to make them for $350. I started experimenting with how to make them and nailing down the perfect black color 8 weeks ago. Let that sink in! This has been such a labor of love. 20 hours went into making the tiles. Two weeks worth of demo + installation. And a lot of learning curves in between. This project is so much more than saving money. It’s the process I went through and what I pushed myself to learn and do to get to this moment. We can do hard things!! Cheers to this project being done. How about we make a front door next? JUST KIDDING!! But a new front will be happening!

Thank you @vintagerevivals for showing that making cement tiles is a project one can tackle and @abby_roadhome doing the same with this amazing pattern!
The tiles are in place! 🎉 I’m not done yet bu The tiles are in place! 🎉 I’m not done yet but this is certainly a part of the project that needs to be celebrated. Grout is up next to call this project a wrap. It has been a process but one of the most rewarding ones when it comes to projects I’ve tackled in our home.
IT IS TIME! I have been waiting for this moment to IT IS TIME! I have been waiting for this moment to smash these front door tiles ever since we moved in. And it felt so dang good! Here’s what I’m doing to prep the concrete slab for the tile install: 

1. Remove old tile
2. Use an angle grinder with a diamond grinding blade to remove the thin set and paint. 
3. Wash the slab
4. Apply two coats of Hydro Ban to create waterproofing barrier from the moisture in the concrete slab and to help with crack isolation.
Another exciting step for the pool: Excavation day Another exciting step for the pool: Excavation day! We officially broke ground. It was the coolest thing to watch. Rebar and gunite up next.
250 cement tiles made!! 20+ hours went into making 250 cement tiles made!! 20+ hours went into making these tiles and we’re going to celebrate making it to this point! I questioned myself during the last push when molds started failing, tiles weren’t turning out, and I was just flat out tired. If there’s a project to test patience, this is the one. But want to know the craziest part? I’d do it all over again. What an awesome process being able to make my own tiles. And the part we’ve all been waiting for is coming up next: INSTALL!! Tiles, don’t fail me now.
This pretty much sums up the progress of making 25 This pretty much sums up the progress of making 250 cement tiles. But I’m halfway through! The moment I finish the last tile is the moment I knock out the old tile. Let’s do this!
Load More... Follow on Instagram

Sign up here to have our fresh posts delivered to your inbox!

Enter your email address:

Delivered by FeedBurner

Copyright © 2023 Within The Grove • Customized by Brave Creative Design · Log in

  • Privacy Policy
  • Terms and Conditions
  • Disclosures + Photo Usage
 

Loading Comments...