


How to Organize A Garage

Have a garage that’s leaving you more stressed out rather than being able to enjoy it? That was us, my friends. When we moved into our home the garage was the perfect place to put our boxes and items that we weren’t sure what to do with quite yet. As we moved everything that needed to go inside, the remaining items got pushed to the walls of the garage. We attempted to organize with open shelving where we organized our outdoor items and our tools were thrown into two metal cabinets.

Over time these items were just shoved onto shelves, stacked on top of one another. When you needed one item, 5 other things would fall on top of you. Our yard tools and Oliver’s toys ended up making their home on our garage floor which took up half the floor. Things were shoved in corners, under our workbench, and honestly where they could fit.


And since we immediately threw everything into our garage from day 1, we never had a chance to address the 4 different paint colors found on the walls and a damaged floor that had paint chipping left and right. We finally decided it was time to focus on our garage. With all of the home projects that we do, we need a space that’s functional, organized, and a place that feels like an extension of our home.


Let me tell you, friends, we jumped all in. Three things went down: painted all the walls, used epoxy paint on the garage floor, and organized everything which included a lot of selling and donating. Let’s start with the walls, shall we?
Freshly Painted Walls
We ended up painting the walls of the garage twice. The first color we went with was Greek Villa by Sherwin-Williams. We used it in our laundry room and I thought it would be the perfect color. The paint color ended up looking like a creamy yellow against the cabinets we were going to use. So, in true Liz fashion, I repainted them in White Dove by Benjamin Moore 11:00 the night before we brought everything back into the garage. SO glad that I did!

One of the biggest eyesores in the garage also got a refresh with the paint. Our AC handler/area had seen better days. With it being right in the middle of the back wall, my eye immediately went to it every single time. Look at how paint cleaned up this area with this before and after!


Painting the Garage Floor
Between the repainting of the garage, we cleaned, prepped and painted the garage floor. You can check out the full tutorial here if you’re wanting to do the same! The floor alone was a game-changer and one I wished I had done sooner. Even my neighbors got fully invested in this process and seeing the before and after first hand!


Now the most visual change of all: organizing the MESS. When we emptied the garage, we placed everything on our patio. We knew this would take us a few days so we didn’t want all of our items hanging out in our driveway. This also gave us visual clarity as to what we wanted to do with this space. With having shelving previously, we knew our next step would be installing cabinets in our garage.

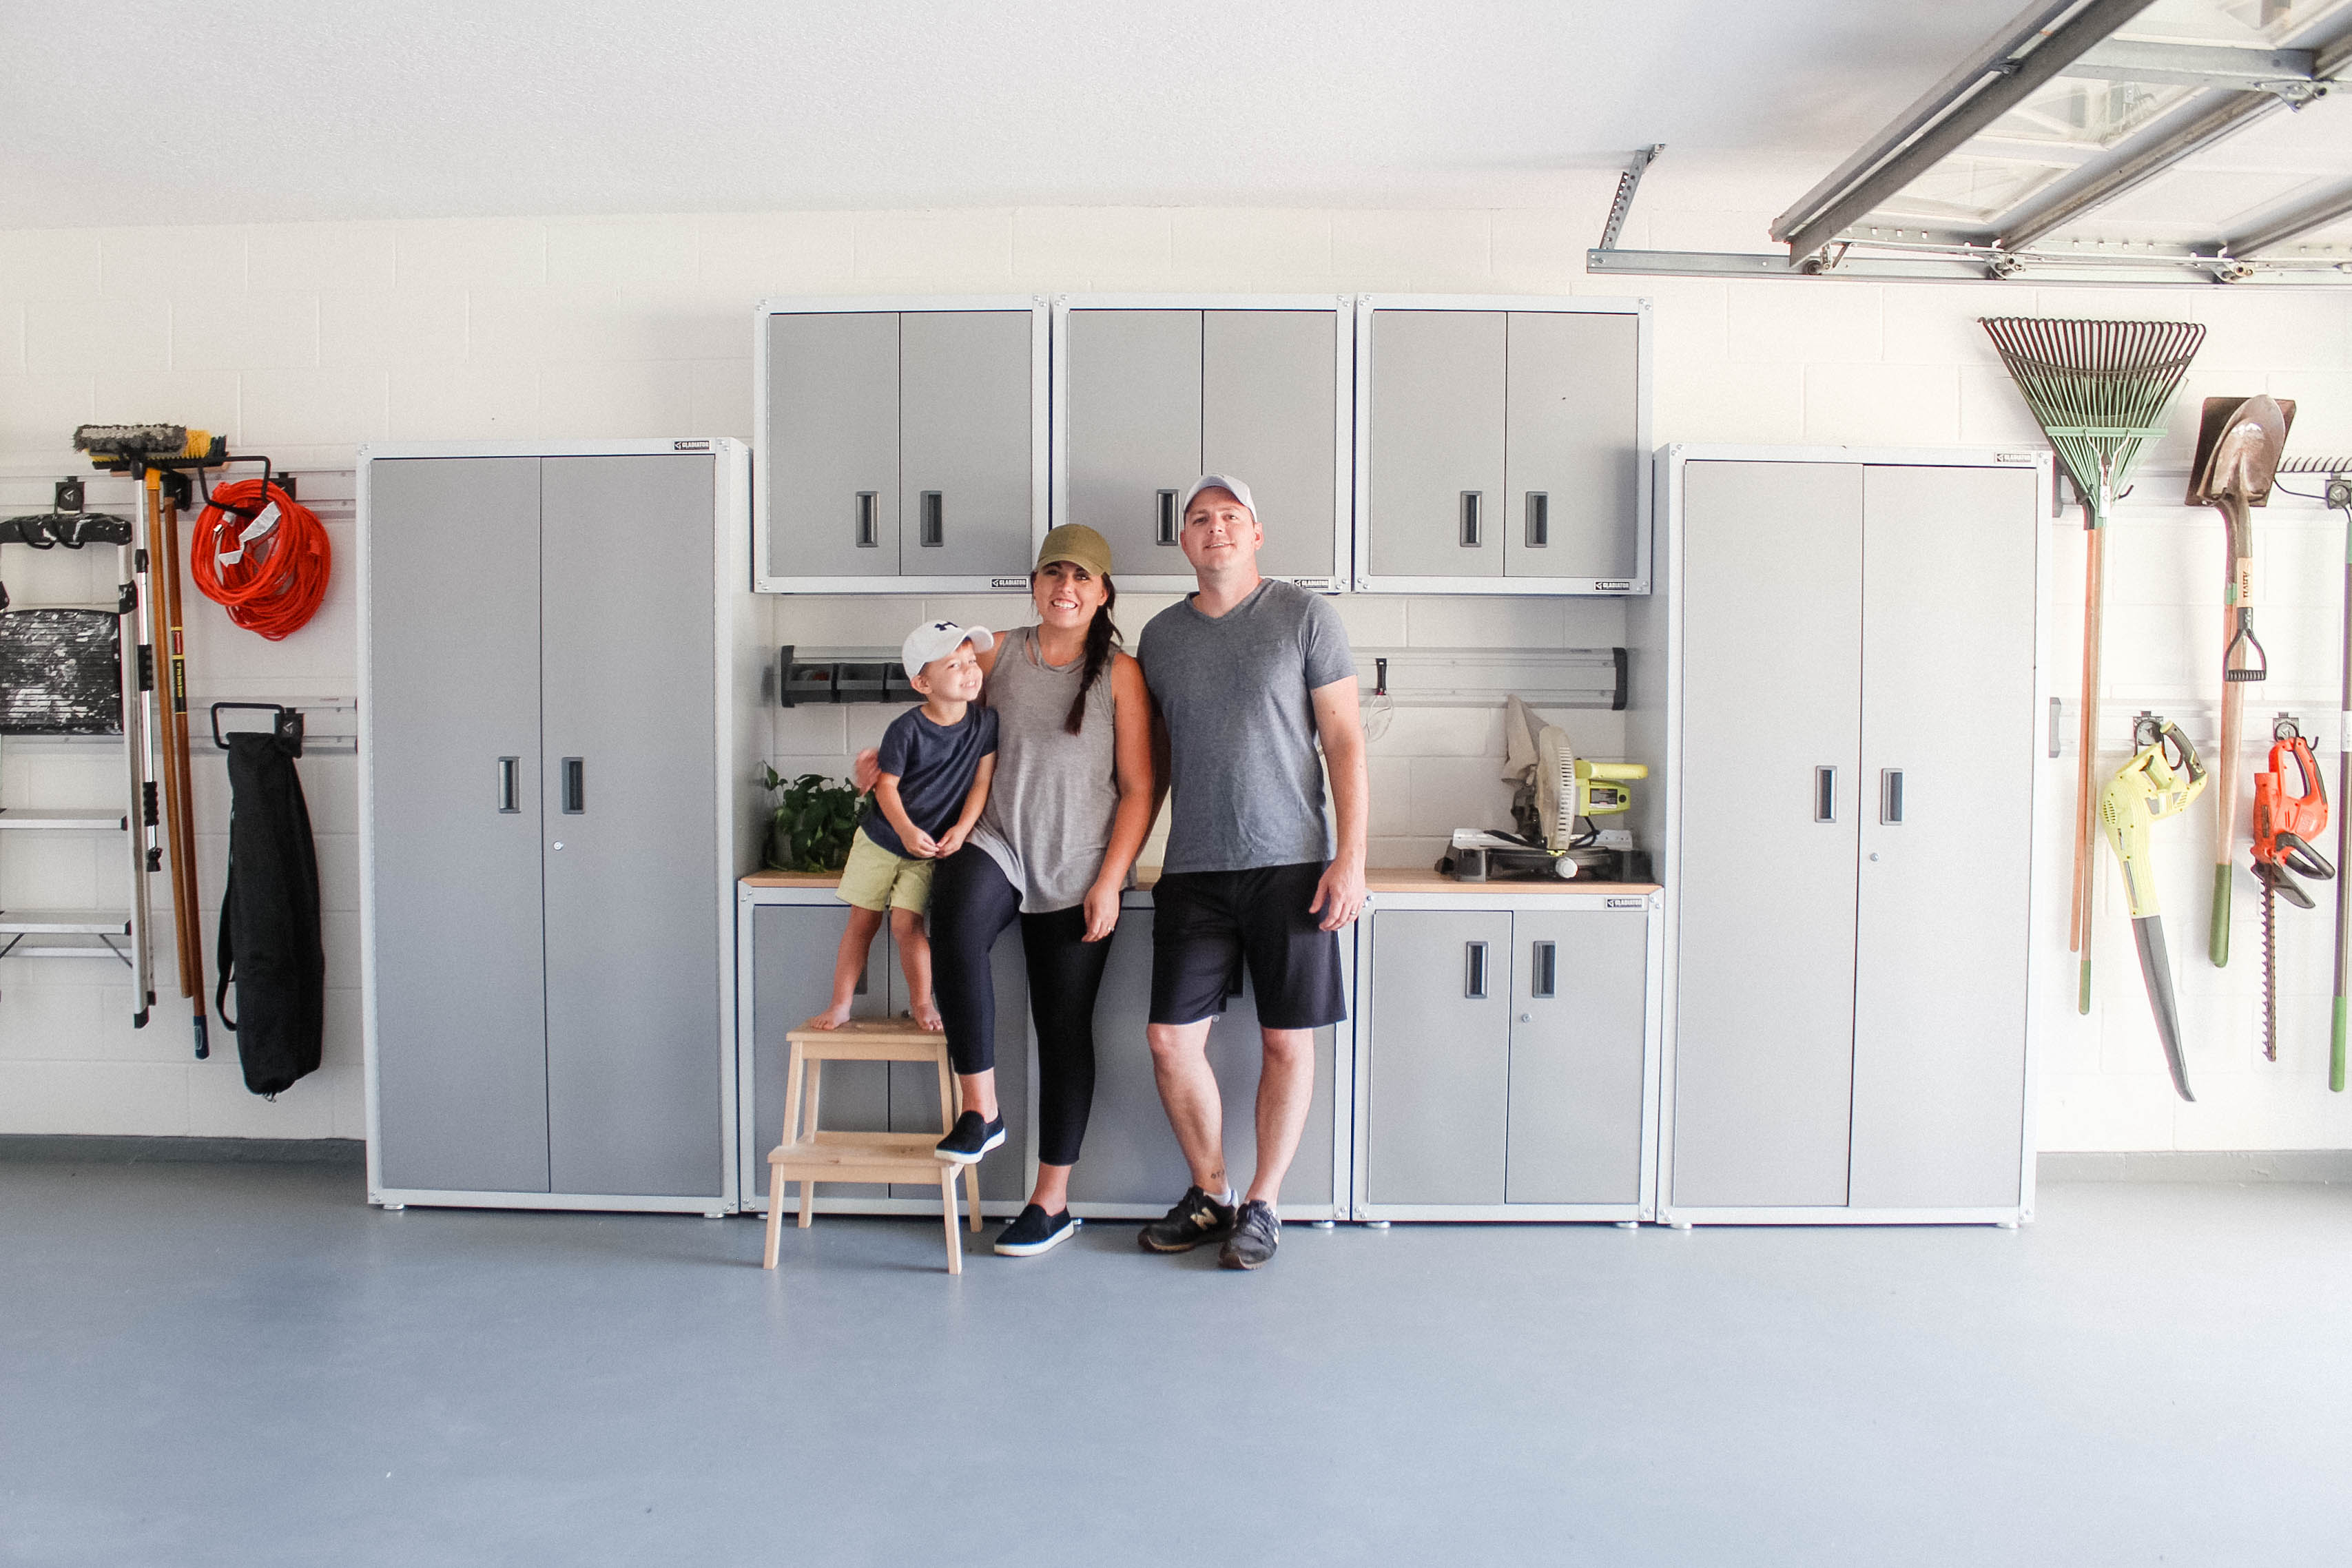
We partnered with Gladiator to help our vision and organization goals come to life! As we started designing our space, we took into consideration how much storage we would need, how to create a functional workspace, and how to make it visually appealing. Here’s what we came up with and how it turned out.


We went with the white design (which is more of a light gray on the sides) and couldn’t be happier with this color choice. Who knew that steel cabinets could be so pretty? It truly allowed our garage to become an extension of our home versus a man cave. Because at the end of the day, both Ryan and I use this space! Here’s what we used in our design:
Full-Door Wall GearBox x 3
Extra Large GearBox x 2
Full-Door Modular GearBox x 3
28″ Hardwood Top x 3
4′ Wide GearTrack Channels (2 pack) x 3
Channel End Caps x 2
Accessory Starter Kit
Lawn Care GearTrack Pack

We grouped the items together like we for a few reasons. One, it created a dedicated workspace for us with the hardwood tops on the lower cabinets. Secondly, it allowed us to use additional wall space on the left and right side of the unit which I’ll get into in a second. And lastly, it was that visual, clean look we were looking for.

Organization of the Cabinets
I mentioned before everything was out on our patio that used to be in our garage. As we started to bring it back in to organize into the new cabinets, we started 4 different piles: keep, donate, sell, attic. One of the things that we love doing is selling items that we no longer use or have a need for. This will often fund a large portion of our home projects and it allows for things we truly love and frees up space.
As we placed items in our cabinets, we used smaller containers to organize even more. We wanted to avoid just throwing things on shelves and create the same mess we were in before. By labeling the containers, it’s very efficient to find what we need, easily get it out, and keep the cabinets organized. When it’s this easy to get what you need, it’s even easier to keep it organized.

Each cabinet has it’s own purpose. For example, the tall cabinet on the right is designated for materials and smaller tools. One of the upper cabinets is just for sanding materials and tools. And I claimed two of the bottom cabinets for paint materials.

Speaking of paint, I dramatically increased space for our cabinets by one simple organizational hack. I had over 20 different gallons of paint just sitting on the previous shelves and on the floor. I kept all these paints on hand for touch-ups in our home. My solution? Pour each paint into an 8-ounce mason jar. This freed up so much space and made it visually appealing.

I can simply grab a mason jar, use it on my touch-ups, and store it on a single shelf. I placed a label on the lid of each jar that states the paint color, brand, sheen, where I used it, and the date. Of course, there were a few gallons of paint I kept that were nearly full. Wanting to do the same for your paints? Using these 2 1/2″ labels, download the free printable below for your own paints.

Free Download

Next up: yard tools. Before the yard tools were either on the garage floor or all shoved into a heaping pile in a corner of the garage. We installed four GearTracks on the left and right side of the cabinets. Using accessory hooks, we were able to hang all of our yard tools on one side.

And on the other side a few other tools but also our extension cords, ladder, and a few other items. I never knew I would be calling yard tools pretty but oh my, do they look pretty organized on our garage wall! Even if you don’t have the budget or space yet for cabinets, I highly suggest grabbing some of these GearTracks just to get things off the floor and organized. This was something we easily could have done we first moved in.

Other Areas of our Garage
Now that we had the main area under control and organized in our garage, we could focus on the other areas. We still stored our larget items (wheelbarrow, pressure washer, generator) at the back of the garage. But with the tools off the floor and Oliver’s toys store somewhere else, overall it visually looks cleaner.

Our cleaning command center stayed the same except now we don’t have a lot of random items stored under the shelves. This was a fun project I completed last year which you can find here. Our goal is to keep it clear of items being stored in this space.

We decided to keep our larger workbench. Our new cabinets provided a smaller working area but we need something that we can pull out to the driveway for when we need to cut wood. We need the room to make the cuts and it keeps the sawdust out of the garage.

On this side of the garage, you’ll see that we kept one of the larger shelving units. At the end of the day, we have items where it would be really silly to store in a cabinet. I’m talking about our large inflatable pools, coolers, turkey fryer, etc. We have it organized as best as it can be and it’s functional. Which is all that I can ask for!

That, my friends, is how we gave our garage a complete overhaul! It has truly become a happy space and not one that gives us anxiety every time we walk in there to find something. And the funny thing is, we find ourselves hanging out in there more with the garage door wide open. We’re 100% that family that will open up some beach chairs, sit in the garage, and watch Oliver ride his bike in the driveway. It has also motivated us, even more, to get started on some projects. It’s amazing what an organized space will do!


Let’s keep in touch!
We have a brand new community over on Facebook, House & Home, where we’ll be chatting, sharing, and helping one another when it comes to home decor and projects. Come join us! Check it out here.
Like on Facebook || Follow on Instagram || Follow on Pinterest

It might be much more surprising to learn that
many in the ancient pipes that define the U. Floors are only as critical as other pursuits such
as carpets, laminated items, covers, curtains, etc. It is very important to find
the exact measurements, particularly when your situation is
the selection part.
OHH love the end results! Where did you find your dark see-through organizing bins? I need them in my life, lol!
And how did you make the printable labels for them?
Hello, we’re the black opaque containers mentioned? Thanks!
We found those at Target!