• Home
  • ABOUT
  • WORK WITH ME
  • Paint Colors
  • Shop Our House
    • Guest Bedroom
    • Front Living Room
    • Living Room with Fireplace
    • Previous Second Living Room
    • Current Playroom
    • Prior Playroom
    • Dining Room
    • Laundry Room
    • Oliver’s Bedroom
    • Guest Bathroom
    • Covered Lanai
    • Patio
    • Master Bedroom
  • CONTACT
    • Facebook
    • Instagram
    • Pinterest

Within the Grove

Join the list to receive occasional news and special updates!

Hiring Out For Our Flooring Install

October 23, 2019

Hey, friends! If you’re new here, I’d love to catch you up with why today’s post is so exciting and something new for us. We’re a DIY family through and through and have never hired out help. Well, except for electrical and plumbing (two things we don’t mess with if we’re already second-guessing). Until now. And here’s why!

This past July I attended the Haven Conference where I ended up winning flooring from Stainmaster. How crazy and amazing is that!? When we started the process of picking out the flooring I found out it included install. But we decided to tackle this project with a little twist. We asked for two bedrooms to be installed and leave the third one to us to DIY. We wanted to experience both sides and be able to tell you all about it! So, here we are with phase 1: install day that’s been hired out.

Here’s where we’re starting with our bedrooms. We had a very orange laminate flooring in all three bedrooms. They were in okay condition but honestly looking for something more us.

Ordering Process

Back in August, we decided to go with Stainmaster’s PetProtect Luxury Vinyl for the bedrooms. There are a couple of reasons why we went with this type of flooring and I can’t wait to share those reasons with you soon! We headed to Knight Flooring where they carry a large variety of Stainmaster luxury vinyl to start the process of picking out our flooring. And I say start because it took four trips total, trying multiple samples, and canceling an order before it was processed before we picked out the perfect color flooring for our home. No matter the type of flooring you’re installing, it’s a big decision!

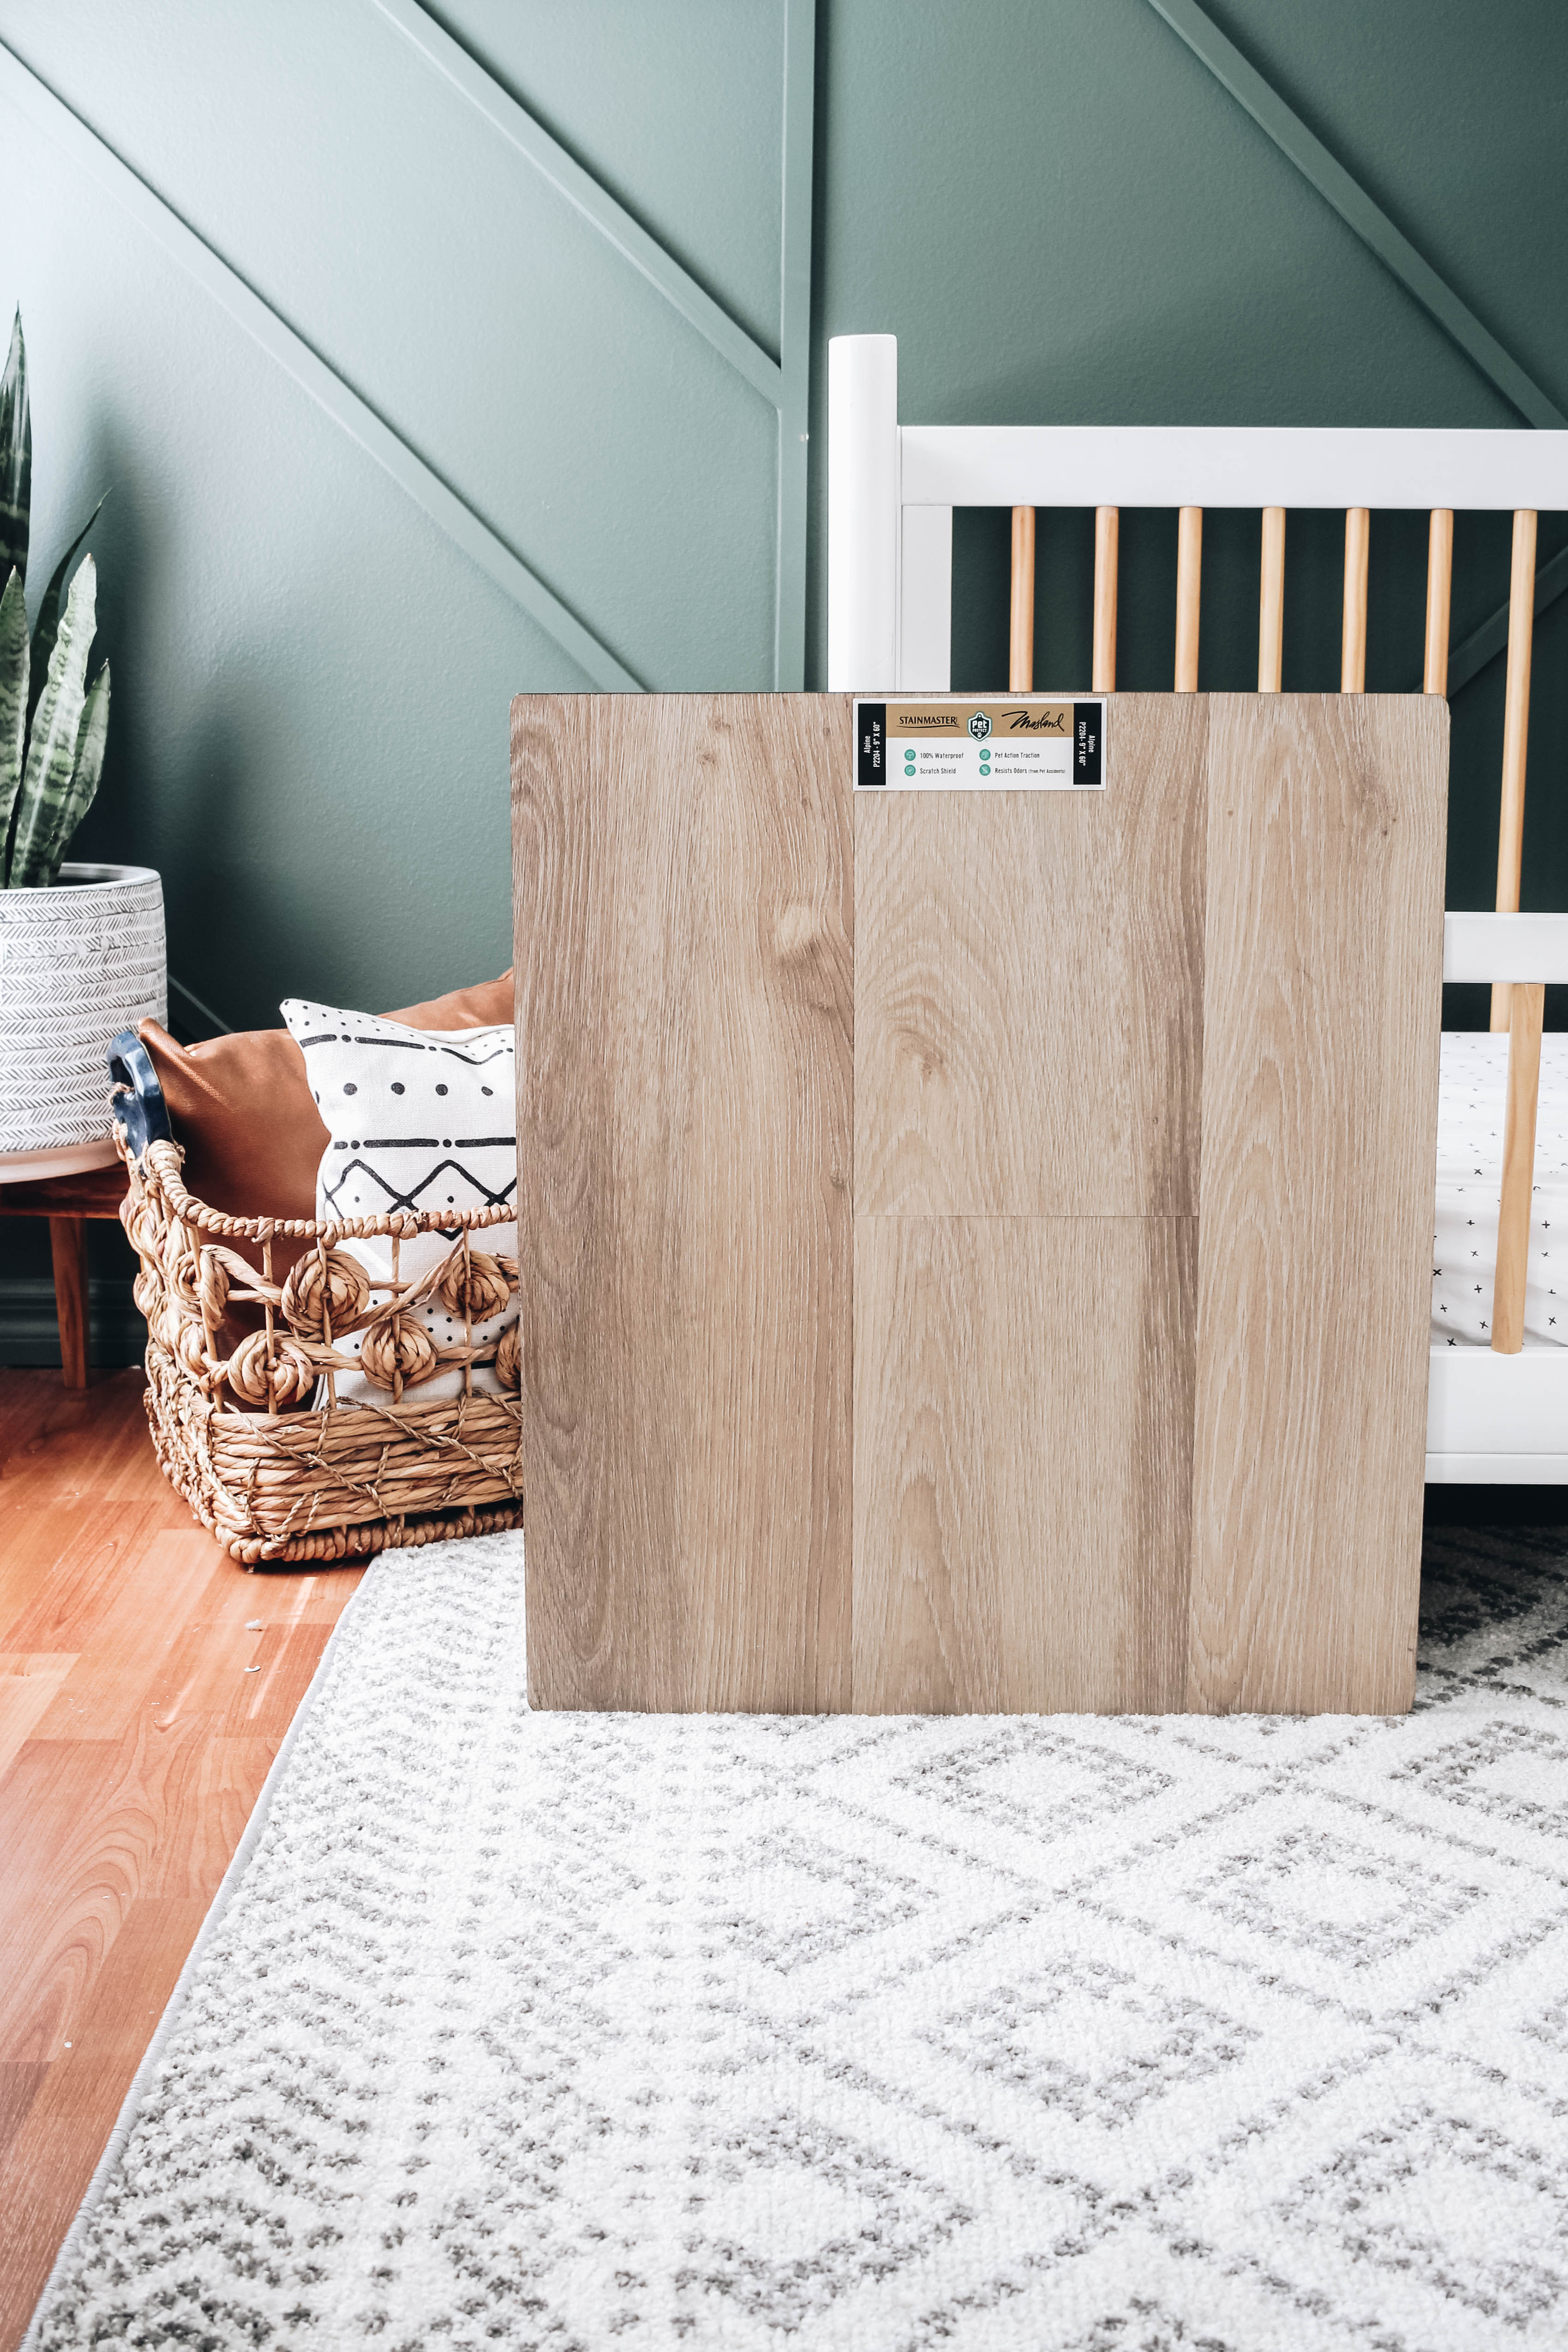
Knowing we wanted a lighter color, we decided on Alpine by Masland which reminds us of white oak. The most we could see of it though was the sample board we brought home. We had to trust it was going to be exactly what were looking for. Since it’s Stainmaster’s PetProtect Luxury Vinyl, we’re going to have flooring that looks like wood but it’s waterproof, scratch-resistant, won’t stain and will repel odors. From there Knight Flooring processed the order and got in touch the next week with the install date.

Preparing for Install Day

The night before the big day of install, we were instructed to clear the rooms except for the beds (installers would move them) and get everything off the floor in the closets. We did end up moving them beds the morning of to make it quicker and easier once the installers arrived. That was it!

Install Day

The crew of three men arrived by 9:00 a.m. and immediately took a look at the rooms they would be working in. Like clockwork, they set up their work station in the driveway and got all their ducks in a row. It was pretty fun to see this side of how others work and stay organized throughout projects.

With all the tools ready to go, the baseboards were taken off the wall and the doors off their hinges. Taking the baseboards off is optional. If you keep them on, they’ll add a shoe molding after install. We opted to have them taken off because we installed new baseboards once they left. It was surprising that they took all the doors off the hinges. I just assumed they would work around them. Within 30 minutes the old flooring was out and the floor was prepped for the new flooring and it was on to the second bedroom.

They were very, very clean as they worked. They used a trash can for the old laminate to go in. Once it was full, they took it out to the truck and then kept going. The old padding was neatly rolled up and taped. It was very motivating to see how quickly and cleanly they worked.

Our new flooring was dropped off around 10:00. By 1:00 both rooms were done! We’re talking a complete floor demo and install of two-bedroom within 4 hours. Two things that factored to this quick install: expertise of doing this daily and each installer had his own job. As one was installing the luxury vinyl (which is a click and lock flooring), another person would cut the necessary cuts, and the third person did the cleanup, transitions with the door frames, and re-attaching the doors.

We were 100% planning for Oliver to skip his nap that day thinking it would be an all day job. But he still got his nap because of how quickly it went! I’m seriously impressed with the process, the install, and the quality of work we received. And then there’s the fact that we have new flooring in Oliver’s room and our guest bedroom! I’m thrilled to see our new Stainmaster flooring and walk past the bedrooms probably more than what I should just so I can look at them. Here’s how the two rooms turned out:

With this being our first experience with hiring work out, let me tell you, it was an amazing experience. If you’re on the fence with if you should DIY or hire, here are a few benefits with hiring out:

  1. It’s a huge time saver
  2. If you have children, a quick install like ours can make all the difference.
  3. You have a lot of square footage to demo and install.
  4. You simply don’t want to DIY this type of project
  5. Peace of mind

By going with the Stainmaster PetProtect Luxury Vinyl, we don’t have to worry about scratches, stains, it’s 100% waterproof, and basically the perfect flooring choice for us! Thank you so much to Stainmaster for this wonderful experience! As we share our experience with installing the luxury vinyl on our own, I’ll be sharing all the details about this flooring choice. I truly can’t wait to share everything we learned from the installers and teach you how to install flooring. Stay tuned, my friends!

Let’s keep in touch!
We have a brand new community over on Facebook, House & Home, where we’ll be chatting, sharing, and helping one another when it comes to home decor and projects. Come join us! Check it out here.
Like on Facebook || Follow on Instagram || Follow on Pinterest

Share this:

  • Click to share on Twitter (Opens in new window)
  • Click to share on Facebook (Opens in new window)

Related

Filed Under: Home Inspiration, Home of the Rishels, Home Project, Our Home Improvements

« How to Organize A Garage
DIY Modern Doormat for Under $10 »

Comments

  1. Laura says

    February 26, 2021 at 7:54 pm

    Hi, I’m trying to find a post showing how this flooring was done over the tiled areas. I’ve read at least 3 posts now and I’m not sure if I’m missing it or if there are not any posts on it. I love the look and am seriously considering having the same thing put in my home but I’m not sure how it’ll go since my house is mostly tile.

    Reply
    • WithintheGrove says

      March 29, 2021 at 10:15 am

      Hi Laura! We actually had our tile removed before placing the luxury viynl. You can certainly install over tile, you just have to make sure that all of the tile is level.

      Reply
  2. Stephanie says

    October 24, 2019 at 12:26 pm

    The floors look great!!

    Also, it looks like you’ve already made the correction to the typo, but when I was reading your post, it read “click and lick flooring”, and I can’t get that visual out of my head xD Just sittin’ here chuckling to myself.. don’t mind me. Hehehe

    Reply

Trackbacks

  1. How to Install STAINMASTER® Luxury Vinyl Flooring - Within the Grove says:
    October 29, 2020 at 12:27 am

    […] by someone else and installing the flooring on our own. You can see how it went with the pros here (spoiler: it was amazing). As for this post, we’re sharing how you can install your own […]

    Reply
  2. Why We Went with STAINMASTER® PetProtect™ Luxury Vinyl + Q & A - Within the Grove says:
    June 29, 2020 at 8:20 am

    […] more luxury vinyl flooring information? You can check out our experience with hiring out the bedroom installs here and the entire before and after of our home here with the flooring […]

    Reply

Leave a Reply Cancel reply

Your email address will not be published. Required fields are marked *

This site uses Akismet to reduce spam. Learn how your comment data is processed.

Looking for something?

withinthegrove

A little garden magic just by adding some solar li A little garden magic just by adding some solar lights. Notice the starburst pattern they give off? My favorite part! These would also work great along a deck railing, the top of a wooden fence, or on the side of stairs. I added both solar lights you see here to my Amazon shop!
Round 2 (and final!) for the grass install in our Round 2 (and final!) for the grass install in our backyard. Dang, does it feel GOOD to finally say that! It has been a long time coming and a little sweat equity saved us so much by doing it ourselves. Next on the backyard to do list is turning it into a tropical oasis by planting the flower beds. Think huge birds of paradise! Time to start planning.
It has been 6 years since we moved into our home a It has been 6 years since we moved into our home and visualized the potential our backyard would one day have. The first few years were spent clearing out and claiming our property back . Two years ago we built our dream garden, last year we built the play area that feels more like a magical treehouse, and this year we added a pool (still pinching myself every day). We’re seeing our hard work over the years starting to come together as we approach the finish line of installing grass and landscaping that’s going to bring it all together. As I always say, stay tuned because you know I’m going to share it all with you! And a little reminder for you to keep going because home takes time.
The garden is cleaned up, prepped, and ready for t The garden is cleaned up, prepped, and ready for the summer crop. What started as a single garden box has transformed to this garden space over the past few years. Favorite thing about it: being tucked away in this cozy corner with the winding paths throughout it. One thing I would do differently: using pea gravel instead of the granite rocks we went with. These rocks hurt! Pea gravel is smooth enough to comfortably walk barefoot on.
The grass is in! Saying BUH BYE to the dirt around The grass is in! Saying BUH BYE to the dirt around the pool for the first time since December when we broke ground. We spent the past few weeks installing irrigation throughout our backyard and around the pool. Yesterday we finally had the sod delivered and within a few hours it got us one step closer to finishing our backyard oasis. We still have a long ways to go, but my goodness does it feel good to see this part done! And we can finally check off the final inspection for the pool build.
What does it cost to fill a 16,000 gallon pool wit What does it cost to fill a 16,000 gallon pool with a garden hose? Our total came to $229! Does this total surprise you? This of course can greatly vary depending on where you live and your situation. For us, we live in Florida and on county water. We only pay water fees and not sewage. The water company did not give us a discount. We filled the pool right at the start of our billing month so this is it! Have you filled up a pool before? I’d love for you to share your cost, pool size, and location if you feel comfortable doing so!
We have a 16,000 gallon pool and filled it up with We have a 16,000 gallon pool and filled it up with a single water hose. And we for sure had some questions! Answering them here:

• Why not use a water truck? We weren’t in a rush, it was the best way to end this project watching it fill up, and it would have been more expensive. 

• Why not use our local fire station? Our local fire department doesn’t do this and it isn’t very common that most do. We wouldn’t ask if they did. 

• Did our water company give us a discount? Nope. Most water companies will take off the sewage fee but we only pay for water and not sewage where we live. We did notify them so they wouldn’t turn our water off thinking it was a leak. 

• What is that on the end of your hose? We added a filter on the hose to help reduce iron, scale, any other heavy metals and containments to help give our pool a fresh start. 

• How long did it take? 51 hours 

I’ll be sharing the cost soon so make sure to add your guess in the comments!
Pizza nights are back! And one thing we’re addin Pizza nights are back! And one thing we’re adding since our screen enclosure is gone, are these Bitefighter LED String Lights by @tikibrandproducts . You’ve seen us use them in our playset area and now for our patio area. They give us the ambiance we need at night while helping to fight off the mosquitoes as a 2 in 1 solution. There’s no odor, no mess, and they will last all season long. Cheers to the summer nights ahead! #ad #TIKIbrand
Protecting outdoor furniture for the summer!

It’s time to give your outdoor furniture the best start for summer and to help it last long term. Here are some things you can do to protect your outdoor furniture as we enter the summer season:

1. If you have wood furniture, it’s time to seal it! I use Thompson’s Waterseal on all my outdoor wood furniture except for teak. This protects it from moisture, sunshine, and mold/mildew.

2. Easiest way to help keep cushions clean is by spot cleaning throughout the season. I use 30 Seconds Outdoor Cleaner for quick, fresh looking cushions. 

3. To really protect cushions, Shield H2O provides a water repellent treatment that repels moisture and spills, which in return helps prevent mold and mildew. 

4. Have teak furniture? Use a teak SEALER and not an oil. Teak oil is a short term solution and easily washes out with rain. Time to seal it to last long term! 

I have everything I used in my Amazon storefront under outdoor.
Load More... Follow on Instagram

Sign up here to have our fresh posts delivered to your inbox!

Enter your email address:

Delivered by FeedBurner

Copyright © 2023 Within The Grove • Customized by Brave Creative Design · Log in

  • Privacy Policy
  • Terms and Conditions
  • Disclosures + Photo Usage
 

Loading Comments...