• Home
  • ABOUT
  • WORK WITH ME
  • Paint Colors
  • Shop Our House
    • Guest Bedroom
    • Front Living Room
    • Living Room with Fireplace
    • Previous Second Living Room
    • Current Playroom
    • Prior Playroom
    • Dining Room
    • Laundry Room
    • Oliver’s Bedroom
    • Guest Bathroom
    • Covered Lanai
    • Patio
    • Master Bedroom
  • CONTACT
    • Facebook
    • Instagram
    • Pinterest

Within the Grove

Join the list to receive occasional news and special updates!

Thrift Shop Challenge: DIY Book Bin

September 16, 2019

I’m so excited about today’s post because it feels like a throwback to when I flipped furniture all the time. Except for this time, it’s with a little twist. If you’ve been following along on Instagram, you’ll know that I’ve joined an amazing group of ladies for the Thrift Shop Challenge. When I was asked to join, I didn’t even hesitate.

What exactly is the Thrift Shop Challenge?

Every season a group of bloggers head to their local thrift stores to find the perfect piece to transform for their home. It can be home decor, a piece of furniture, items that are used in a whole new way, etc. We transform our pieces and share them on our blogs for all to see.

And then here’s the best part. We invite you to join in! We want to inspire you to head out to your local thrift shops to take on this challenge yourself. This is such an amazing and fun way to decorate your home on a budget. And if you do join in, share your picture with us over on Instagram, use #thriftshopchallenge, and you can even tag me. I seriously can’t wait to see what you find!

Today kicks off the fall Thrift Store Challenge. Make sure to scroll to the bottom of this post to see what the six other bloggers created for this challenge. Meanwhile, let’s jump into what I transformed for this challenge.

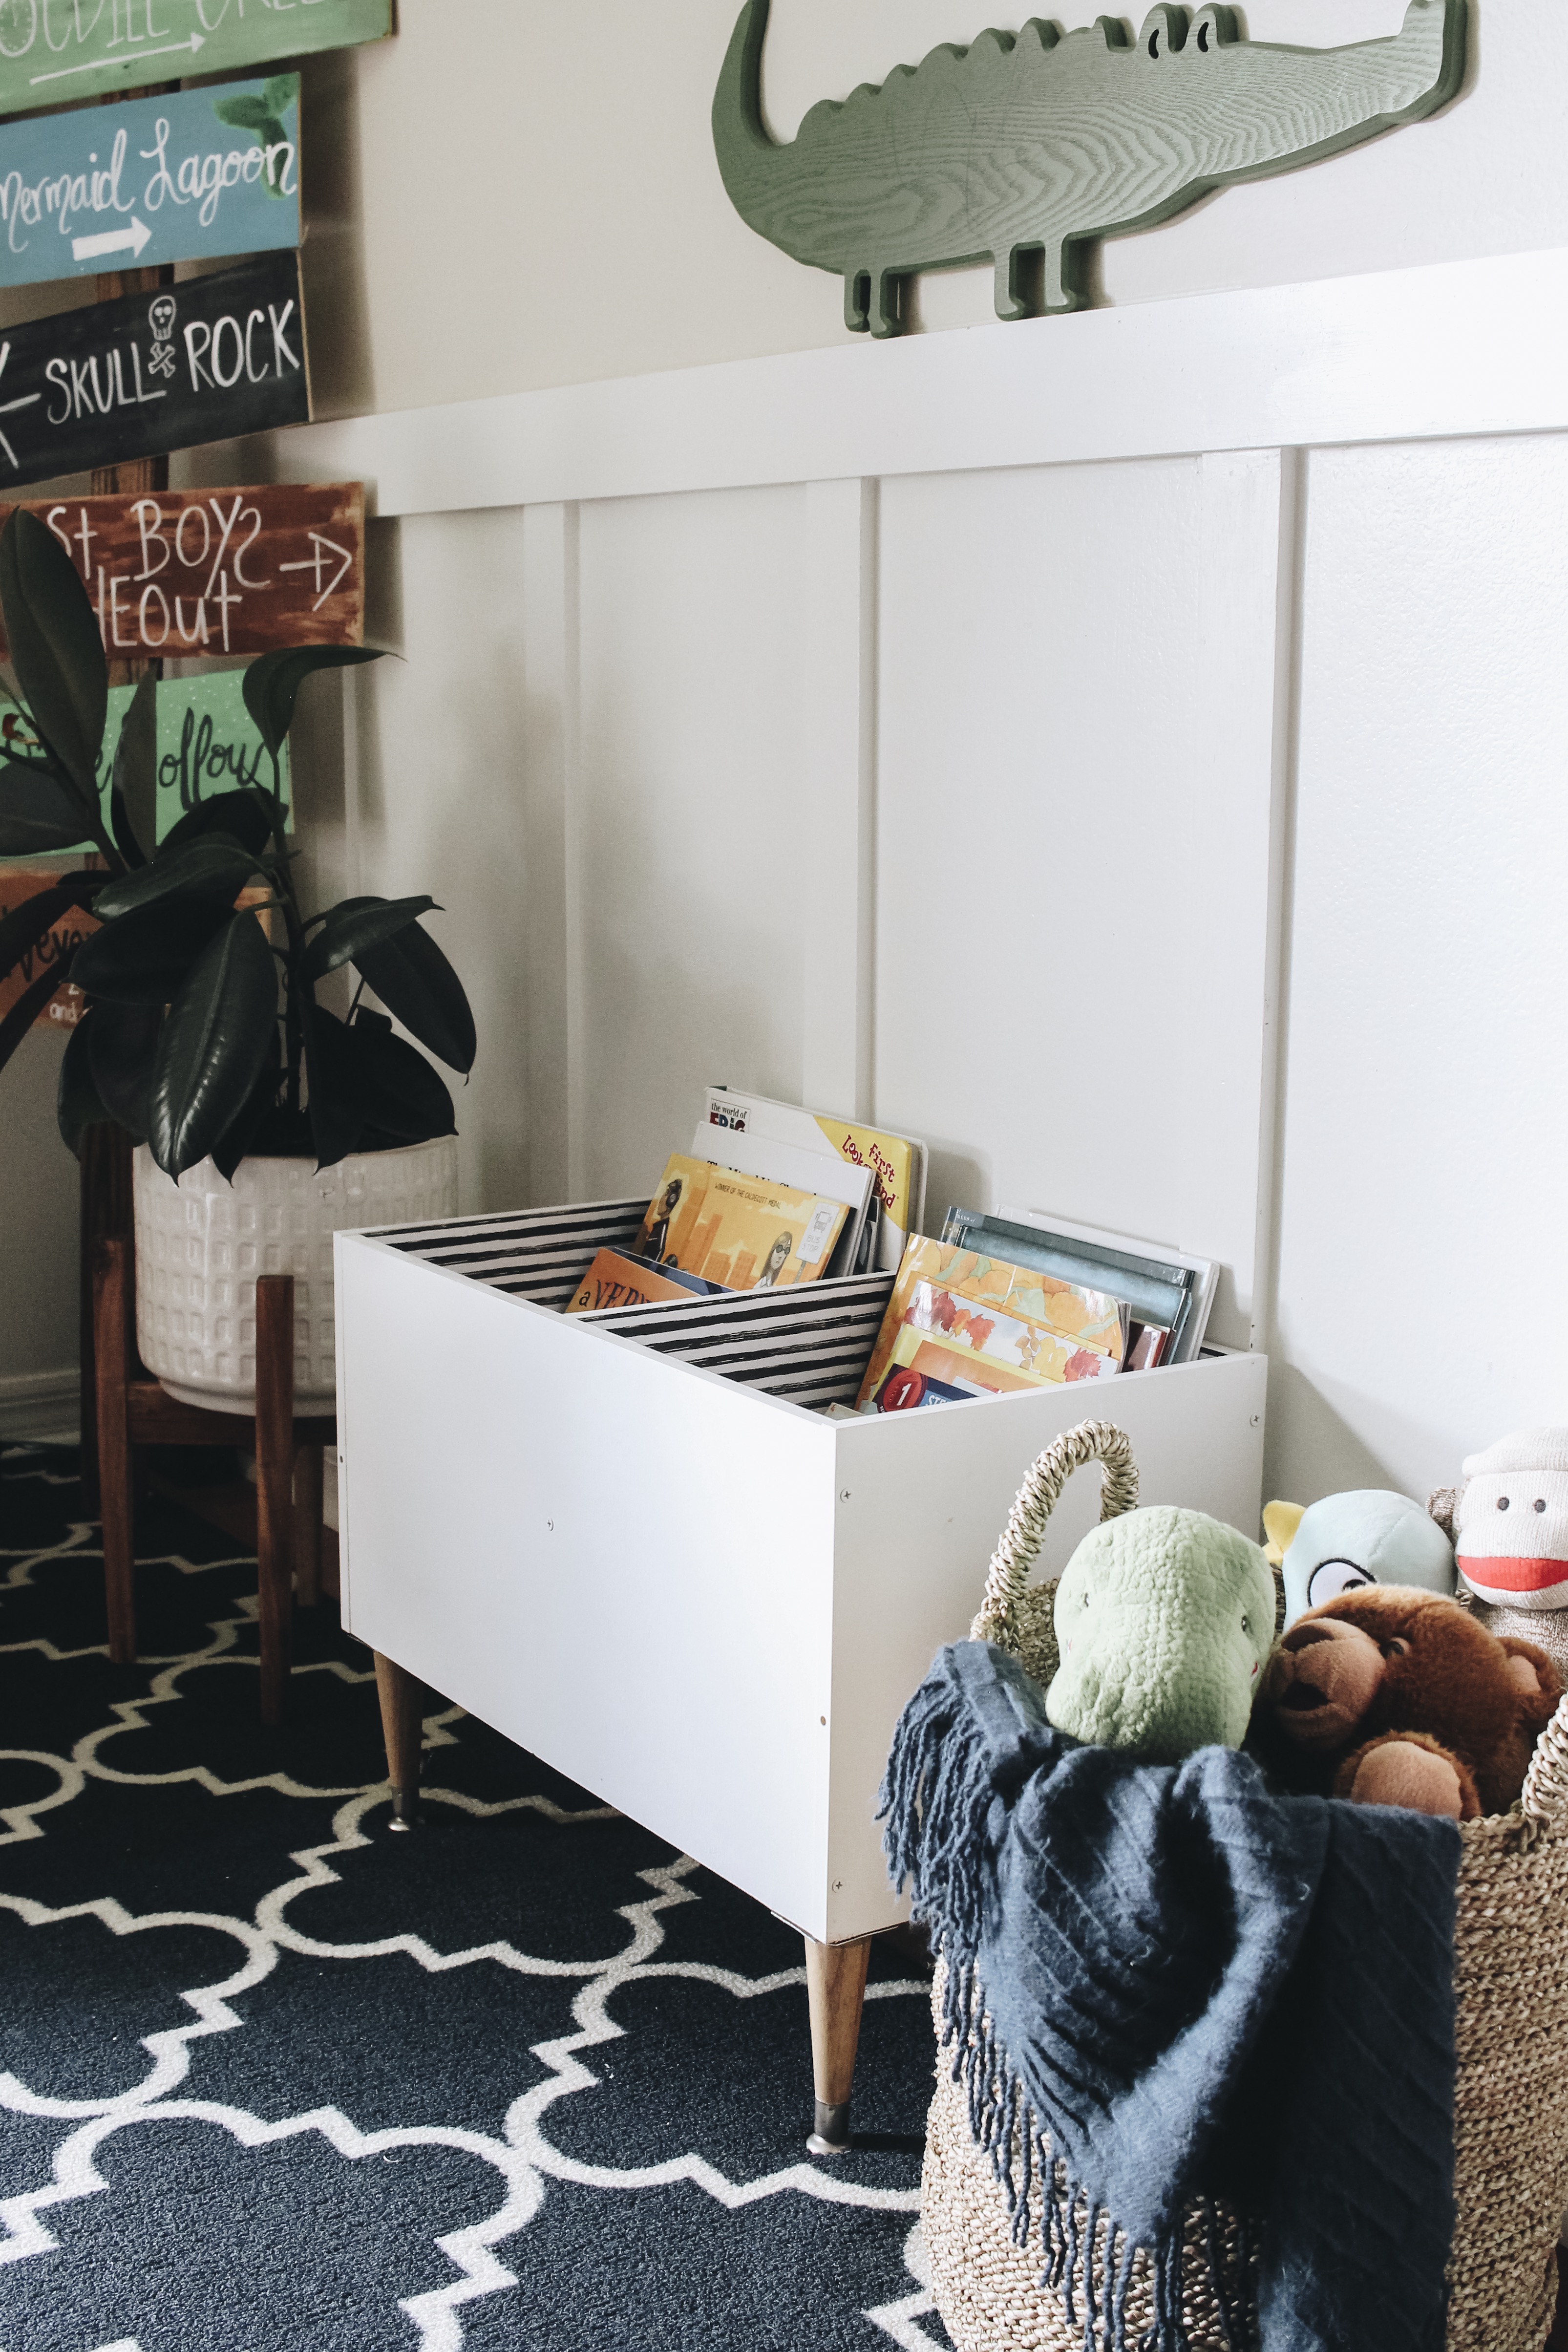
How to Create a Book Bin

I went into my local Goodwill not having a clue as to what I would find. I’ve found that if I go in looking for a particular item, it’s not going to happen 99% of the time. So my game plan? To see what caught my eye and inspired a flipped. I just about always head to the furniture first and that’s when I found this small bookcase within 5 minutes of being in the store for only $5.99. I had the perfect plan for it!

Ever since I organized Oliver’s toys in his playroom, I’ve wanted a way to display seasonal books where they’re easily accessible for him. That’s when I knew this bookcase could be used just for that reason but by making it even more functional and easy to use. The makeover on this bookcase was a breeze and one you can easily do as well if you’re looking for a way to store books.

Materials Used

halk spray paint in White Matte
Clear spray paint in Matte
4 wooden legs
4 metal table leg plates
Drill
Stain in Flagstone
Mod Podge
Scrapbook paper
Small paintbrush

The How-To

I gave the entire bookcase a good cleaning (thankfully it wasn’t too bad) and decided to give it a fresh coat of paint. I placed it on the backside since that will become the bottom of the book bin. Using chalk spray paint, I gave it two coats of fresh white paint followed by a clear coat.

This was the first time that I used this type of spray paint and I’m officially a fan! It allowed for bare minimum prep, dried within minutes, left a pretty matte finish, and provided great coverage. The only part I didn’t spray was the inside and you’ll see why in a minute.

While the paint dried, I applied the stain to the wooden legs. I ended up going with Flagstone. The same stain I used in our laundry room closet makeover. It’s a stain color that I recently discovered and love!

I attached each leg to the corners of the bookcase. Remember, the back of the bookcase is now the bottom. To attach the legs, I screwed a metal leg plate in each corner making sure the sides were flush with the sides of the bookcase. Once attached, you easily screw the table legs into the plates.

The last step is attaching the scrapbook paper on the interior sides of the book bin. This is a fun way to add a little personality and color! Working one side at a time, apply mod podge on the side you’re applying the paper to. You’ll then place the piece of paper on the glue (cut and measured for the perfect fit) and apply mod podge on top of the paper to further seal it. This is repeated for each interior side.

This project was completed and placed in Oliver’s playroom all in the same day! Talk about a quick thrift store makeover. It was so precious seeing Oliver wake up from his nap discovering his new book bin. And that whole thing of making books more accessible for him? Well, my friends, he couldn’t get his hands on the books fast enough.

It’s the perfect addition to his playroom and I’ll be able to switch out the books seasonally, add educational books, and his favorites. It can also easily be placed in his bedroom if he wants it in there instead.

So, there you have it! My $5.99 thrift store find flipped into a custom book bin for our whole family to enjoy. I can’t get over how cute it is! Now, are you ready to see what everyone else created? You’re going to love what everyone else came up with and will inspire you to go running to your closest thrift store to see what you can find. Remember, to use the hashtag #thriftstorechallenge over on Instagram and tag me so that we can see it and share some in our stories.

Check Out the Other Projects

Amber Oliver – How to Turn Dresser Drawers into Shelves
At Charlotte’s House – Flea Market Mirror Makeover
Green with Decor – Painted Christmas Village House
Love, Create, Celebrate – DIY Wooden Spoon Rest
Love & Renovations – Little Tikes Toy Makeovers
Small Stuff Counts – DIY Pegboard Broom Organizer
Within the Grove – DIY Book Bin

Let’s keep in touch!
We have a brand new community over on Facebook, House & Home, where we’ll be chatting, sharing, and helping one another when it comes to home decor and projects. Come join us! Check it out here.
Like on Facebook || Follow on Instagram || Follow on Pinterest

Share this:

  • Click to share on Twitter (Opens in new window)
  • Click to share on Facebook (Opens in new window)

Related

Filed Under: DIY, Furniture Flip, Home Decor, Our Home Improvements

« Toddler Bedroom Makeover
How to Paint a Garage Floor »

Comments

  1. Meg Green With Decor says

    September 16, 2019 at 8:41 pm

    This is seriously so cute!! I love the scrapbook paper you chose!

    Reply
  2. Rachel says

    September 16, 2019 at 6:58 pm

    Oh my gosh I adore this!!! I would love to recreate it, but any time I’ve used mod podge I feel like the outside is sticky and never fully cures. Any ideas or tips on that?

    Reply
  3. Charlotte Smith says

    September 16, 2019 at 5:01 pm

    So fun!! I love that it sits up on the legs so you can slide things underneath!

    Reply
  4. Pat says

    September 16, 2019 at 3:08 pm

    Oh, my word…so cute AND functional!

    Reply
  5. Kelli says

    September 16, 2019 at 2:59 pm

    Love it! Also, Where did you get the adorable alligator?

    Reply
  6. Jolene says

    September 16, 2019 at 12:54 pm

    Wow what a great idea

    Reply
  7. Amanda says

    September 16, 2019 at 10:49 am

    What a genius idea!!! I LOVE this and I’m totally copying it next time I see one of these!

    Reply

Trackbacks

  1. How To Turn Dresser Drawers Into Shelves | Amber Oliver says:
    September 16, 2019 at 6:20 pm

    […] Within the Grove – DIY Book Bin […]

    Reply
  2. DIY Wooden Spoon Rest - Love Create Celebrate says:
    September 16, 2019 at 8:02 am

    […] Amber Oliver – How to Turn Dresser Drawers into ShelvesAt Charlotte’s House – Flea Market Mirror MakeoverGreen with Decor – Painted Christmas Village HouseLove Create Celebrate – DIY Wooden Spoon RestLove & Renovations – Little Tikes Toy MakeoversSmall Stuff Counts – DIY Pegboard Broom OrganizerWithin the Grove – DIY Book Bin […]

    Reply

Leave a Reply Cancel reply

Your email address will not be published. Required fields are marked *

This site uses Akismet to reduce spam. Learn how your comment data is processed.

Looking for something?

withinthegrove

This pretty much sums up the progress of making 25 This pretty much sums up the progress of making 250 cement tiles. But I’m halfway through! The moment I finish the last tile is the moment I knock out the old tile. Let’s do this!
Time to bet on my DIY skills! I’m attempting to Time to bet on my DIY skills! I’m attempting to make my own cement tiles for our outdoor front door area. Mainly because of what I’m saving vs buying them. Won’t be saving much on time but I’M MAKING TILES! Never thought I’d hear myself say that. Make sure to follow along because if this works out, I have a feeling a lot of you are already eyeing a spot in your home to try your own DIY cement tiles. 
 
Thank you @vintagerevivals and @abby_roadhome for showing it’s possible with your gorgeous bathroom tiles! 

#CementTiles #DiyCementTiles #DiyProject #DIYonABudget #DIYProjects
We got the call that the pool build is starting! W We got the call that the pool build is starting! Which had me scrambling to dig up all the plants that were in the way in an effort to save them. Literally down to the last second before the crew showed up. Exciting day but you know what’s even more exciting? Knowing the next crew will officially be breaking ground with the excavation phase of the build.
This time of year is full of organizing and purgin This time of year is full of organizing and purging to bring spaces back to life. But sometimes all a space needs to feel refreshed is, well, a refresh and a little attention. Your number one requested space was the living room. So I gave mine a refresh with some unique and gorgeous finds from @homesense_us . I found a few fun pots for my houseplants, a gorgeous magnifying glass, and a few other items for our coffee table and couch.

I never know what I’m going to find when I walk into Homesense since it’s always rotating with amazing finds. But I do know I’ll walk out with a few new favorites for my home at affordable prices. If you haven’t yet, I urge you to check and see if you have a Homesense near you! #DiscoverHomesense #HomesensePartner
2022, you were awesome. But I’m determined to ma 2022, you were awesome. But I’m determined to make 2023 even better! And I hope you join me! We can be one of our biggest cheerleaders, but together we’re going to do big things. Go ahead and write down a big, small and a few in-between projects you want to get done this year in your home. Kicking it off with intention and that reminder that we can do this. Ready to get started?! Let me know in the comments the first project you want to tackle!
We finally got the Christmas/winter edition of the We finally got the Christmas/winter edition of the window projection up and running! It was a hit for Halloween and just as fun for this time of year as well. I built frames wrapped with a plastic drop cloth but you can also secure the drop cloth over the windows using command strips. The videos are from @atmosfx and we use a mini projector to play them on the screen. Place a Bluetooth speaker outside and you’re in business! Such a fun addition this time of year for the exterior of your home.
It’s the last little bit of the demo we needed t It’s the last little bit of the demo we needed to do in order to give the green light for the pool to start. And 2,456 pavers later, it’s done! This was exhausting but worth the money we saved doing it ourselves. And why remove them? We’re using a different stone around the pool and we want it to be cohesive up to the house. Don’t worry, someone got one heck of a deal on these pavers, we made a little money, and someone else got them out of our driveway. I’d say that’s a win-win. Stayed tuned for the entire pool process as we enter 2023. It’s going to be pretty exciting to watch!
Our patio space has served us so well over the yea Our patio space has served us so well over the years and now it’s time for a change because we’re getting a POOL!! Sharing this with you makes it even more real because just a year ago I would have told you it isn’t in the cards for us. We’ll be breaking ground soon but first we have to remove the screen enclosure. Spoiler: we won’t be putting one back up around the pool. It has already made the biggest difference visually and SO much natural light pours into our home now with it gone. It’s going to be so exciting seeing this all unfold so stay tuned! Up next: removing the pavers.
This holiday season we were able to travel to my h This holiday season we were able to travel to my hometown for the first time in awhile. We were greeted by the most beautiful sunset on the beach. Fast forward to this week as I headed to @homesense_us for some holiday shopping, and I ended up finding a few pieces for our home that remind me of that core memory on the beach. The beautiful wicker bench caught my eye first followed by the comforter and toss pillows. Everything at amazing price points while not sacrificing style and quality. #HomesensePartner

Mixing a thrill of a find with a core memory, I guarantee you'll fall in love with your home even more as you go to decorate. Decorating your home isn't grasping on to the newest trend or what you think others would do. It's what YOU want to do. And sometimes that's based on an emotional connection. Oh, the stories your spaces will be able to tell as you decorate each one. Start with seeing if there’s a @homesense_us near you! #DiscoverHomesense #HomesenseSarasota
Load More... Follow on Instagram

Sign up here to have our fresh posts delivered to your inbox!

Enter your email address:

Delivered by FeedBurner

Copyright © 2023 Within The Grove • Customized by Brave Creative Design · Log in

  • Privacy Policy
  • Terms and Conditions
  • Disclosures + Photo Usage
 

Loading Comments...