• Home
  • ABOUT
  • WORK WITH ME
  • Paint Colors
  • Shop Our House
    • Guest Bedroom
    • Front Living Room
    • Living Room with Fireplace
    • Previous Second Living Room
    • Current Playroom
    • Prior Playroom
    • Dining Room
    • Laundry Room
    • Oliver’s Bedroom
    • Guest Bathroom
    • Covered Lanai
    • Patio
    • Master Bedroom
  • CONTACT
    • Facebook
    • Instagram
    • Pinterest

Within the Grove

Join the list to receive occasional news and special updates!

Toddler Bedroom Makeover

September 6, 2019

Thank you to Rooms To Go for sponsoring this post. As always, all thoughts and opinions are my own.

I knew this moment would come but I didn’t realize how fast it would arrive. I’m talking about switching Oliver’s nursery into a toddler bedroom. With summer winding down and his third birthday quickly approaching, I knew this was the perfect time to finally give him a bedroom refresh. My main focus? Switching out the crib and dresser. They’ve been wonderful but it’s time for something new. Here’s where we started.

And here’s the after:

As we started planning the refresh, we wanted to keep this process simple and enjoyable for all of us to pick out what we wanted for Oliver’s room. So, last weekend we decided to head to for two reasons. Number one, they offer a large array of quality furniture at prices that will allow us to stay within our budget. Secondly, we shopped for our first apartment together at Rooms To Go when we first moved to Florida about six years ago. Talk about coming full circle when shopping for our almost three-year-old.

Once in-store, it took us about an hour to pick out the bed and dresser mainly because it was hard to make a final decision. If you’re a visual person like me, it’s 100% worth it to go to a Rooms To Go showroom so you can see how certain pieces look in a space. And don’t be afraid to ask for help if you have your heart set on a certain style but you can’t find it in-store. We did that with Oliver’s bed (we knew we wanted a metal frame) and we were able to order it online while in Rooms To Go. It saved us so much time!

Leaving Rooms To Go that day, both the bed and dresser were ordered. We knew before going that it would take 7-10 business days for our furniture to be delivered. But to our surprise, we were able to schedule it to arrive in less than a week. We went to Rooms To Go on a Sunday and that following Friday morning at 8:00 a.m. the delivery truck arrived.

The ease of this whole process from shopping to delivery saved us such a headache. We didn’t have to figure out how to get the furniture pieces home or carry them through the house to his room. The delivery personnel took care of it and Oliver got to see a huge truck arrive just for him. By 8:10 they were gone and we were left with a room to style!

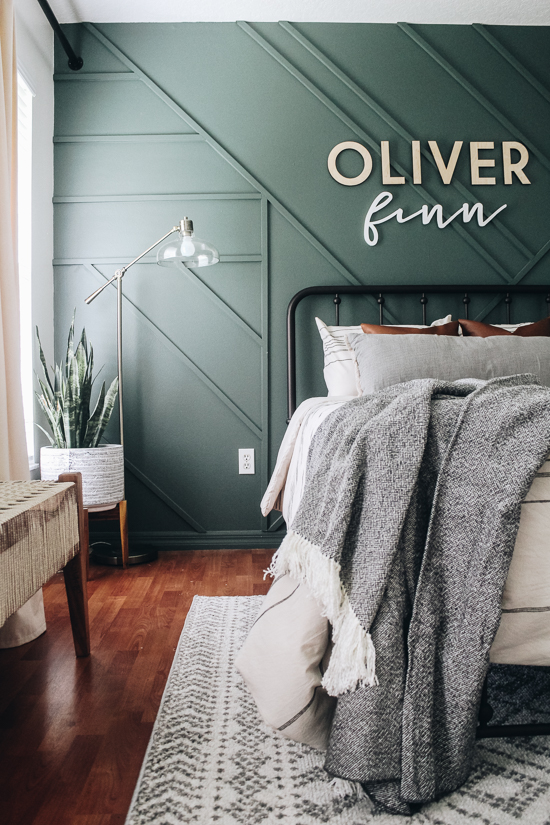
The joy in Oliver’s face seeing his new furniture is something I’ll never forget. We ended up going with the Lasula Brown Full Post Bed. We love the airy feeling this bed has in his bedroom which still allows his green accent wall to show off. Any other style bed could have been overwhelming when paired with the wall. Plus, it’s a bed that will grow with him especially since we ordered it in a full.

The chest of drawers was also a refreshing and great choice for us. Even though we went from a crib to a full bed, this chest of drawers allowed for more space beside the bed compared to going with a dresser. I don’t think we’ll run out of room for clothes either! Plus, we just adore the playful spirit of the design so that our little boy won’t have to grow up too fast.

I don’t think my mama heart can handle another big transition any time soon, but oh my, was this a wonderful memory to create with Oliver. I’ve never seen him so excited with styling pillows on his bed, picking out a lamp for his dresser, and plopping down on his bed for the first time.

Honestly, if I had known it would have been this easy of a process to refresh his room, I probably would have done it sooner. Now, getting him to stay in his new bed might pose to be a little challenge. Or he might love it so much, he’ll want to go bed early tonight and sleep in tomorrow morning.  I’ll let you guess which one will probably happen tonight. But either way, we have one happy little boy enjoying his new big boy bedroom.

Thank you to Rooms To Go for such a wonderful experience during a special time for our family. Check the store locator to see if you have one near you! Rooms To Go offers the largest array of furniture in the nation so you’re bound to find something you love.

Let’s keep in touch!
We have a brand new community over on Facebook, House & Home, where we’ll be chatting, sharing, and helping one another when it comes to home decor and projects. Come join us! Check it out here.
Like on Facebook || Follow on Instagram || Follow on Pinterest

Share this:

  • Click to share on Twitter (Opens in new window)
  • Click to share on Facebook (Opens in new window)

Related

Filed Under: Home Decor, Home Inspiration, Home of the Rishels, Home Project

« Toddler Bedroom Mood Board
Thrift Shop Challenge: DIY Book Bin »

Comments

  1. Kim says

    March 20, 2021 at 12:56 pm

    How did you hang the freestanding letters on the wall? We’re doing the same thing and not sure how to keep them straight and the same distance from the wall.

    Reply
    • WithintheGrove says

      March 29, 2021 at 10:02 am

      Hi Kim! I used double-sided sticky tape (the foam version) and just did my best to place it where I was able to with the wall detail.

      Reply
  2. Lauren says

    January 17, 2021 at 5:15 pm

    What color are the other walls? Not the green one.

    Reply
    • WithintheGrove says

      March 29, 2021 at 10:39 am

      Whipped by Clare Paint

      Reply
  3. Amy Marshall says

    October 20, 2020 at 8:20 pm

    I love this room!! So beautiful! Can you please tell me where you bought your sons bedding? I’ve been looking for something similar to this for a long time!

    Reply
    • WithintheGrove says

      October 27, 2020 at 8:39 am

      Hi! It’s from Target! I have everything linked under “Shop our Home” at the top of our website. I hope that helps!

      Reply
  4. Lindsey says

    September 13, 2020 at 2:26 pm

    Where is the comforter from?

    Reply
  5. Courtney says

    May 30, 2020 at 6:32 pm

    Where is this rug from?? I love it!

    Reply
  6. Dan says

    May 6, 2020 at 10:05 pm

    Could you tell me where the comforter is from? I would love to get it for my sons room. Your room is an inspiration for my sons room. You did a great job.

    Reply
    • Paige Gregory says

      August 13, 2020 at 11:46 am

      Would also like to know! Love this room!

      Reply
  7. Morgan Hackenkamp says

    February 12, 2020 at 1:45 am

    Where did you find the letters for the wall? So cute!

    Reply
  8. Emily Jacob-Rudesill says

    January 2, 2020 at 1:09 pm

    Hi! Do you have the paint color of the green on the wall? Its beautiful!

    Reply
    • Emily Jacob-Rudesill says

      January 2, 2020 at 1:13 pm

      Nevermind, I found it in the Mood Board post!

      Reply
      • Sarah says

        May 3, 2020 at 2:21 pm

        Where can I find the mood board? I love this paint color

        Reply
        • Kacie says

          May 10, 2020 at 12:52 am

          What is the color of this wall?? I can’t seem to find where you mentioned it was. Thanks

          Reply
      • Kacie says

        May 10, 2020 at 12:49 am

        What is the color of this wall?? I can’t seem to find where you mentioned it was. Thanks

        Reply
        • Shana says

          May 24, 2020 at 5:03 pm

          Paint color is called Current Mood by Clare!

          Reply
  9. susan says

    October 18, 2019 at 9:55 pm

    I love this bed! Did you happen tp spray paint it black?

    Reply
  10. Allison says

    September 7, 2019 at 1:30 pm

    This turned out absolutely gorgeous! Love the bed & chest you picked out. I’d love to know the bedding details too?

    Reply

Trackbacks

  1. Toddler Bedroom Makeover - Within the Grove | Dadne says:
    April 22, 2020 at 5:45 am

    […] Original Source […]

    Reply
  2. Moody Floral Wallpapered Nursery - Inspired By This - centophobe.com/... - #Moda says:
    April 19, 2020 at 9:56 am

    […] Design by Within The Grove […]

    Reply
  3. Most Popular Projects of 2019 - Within the Grove says:
    January 2, 2020 at 8:54 am

    […] toddler bedroom reveal grabbed your attention and snagged the number 8 spot for 2019. We’re still tweaking his space […]

    Reply

Leave a Reply Cancel reply

Your email address will not be published. Required fields are marked *

This site uses Akismet to reduce spam. Learn how your comment data is processed.

Looking for something?

withinthegrove

The waterline tile and decking are both done! With The waterline tile and decking are both done! With the limestone making the biggest difference with this pool update. It’s stunning!! Very exciting to see our entire pool area installed. We’re almost there!! Just the interior finish to go and then it’s time to fill the pool. 

•Pavers are limestone in Myra White 
• If you’re local to Central Florida, @caapavers installed ours! 
• Waterline tile is by NPT in the color Carbon.
DIY TILE REVEAL! The front door is styled and now DIY TILE REVEAL! The front door is styled and now taking the time to soak these tiles in! I kept it simple with the decor and took away the rug. If you've been here for a little bit, you know I love to place a rug underneath my wooden doormat. But letting these tiles SHINE is a must. Still can’t believe I made these! Head to the last image. I installed an imperfectly perfect tile as a little nod to these being handmade. DIY tile blog post coming your way soon! Grabbing packages from my front door just became even more exciting. 

Front door color: Black Magic by Sherwin-Williams
House Color: Cloud White by Benjamin Moore
Decor: You can find it on my LTK through my profile!
Right when we thought the pool excavation day was Right when we thought the pool excavation day was exciting, the gunite was installed! We’re about halfway through the pool build and we officially have the shell of the pool done. This all happened so fast. I’m talking about two weeks. The waterline tile and decking up next!
This will forever be a project where I will say: “ I MADE THESE TILES!” What would have cost me close to $2,000 to buy, I was able to make them for $350. I started experimenting with how to make them and nailing down the perfect black color 8 weeks ago. Let that sink in! This has been such a labor of love. 20 hours went into making the tiles. Two weeks worth of demo + installation. And a lot of learning curves in between. This project is so much more than saving money. It’s the process I went through and what I pushed myself to learn and do to get to this moment. We can do hard things!! Cheers to this project being done. How about we make a front door next? JUST KIDDING!! But a new front will be happening!

Thank you @vintagerevivals for showing that making cement tiles is a project one can tackle and @abby_roadhome doing the same with this amazing pattern!
The tiles are in place! 🎉 I’m not done yet bu The tiles are in place! 🎉 I’m not done yet but this is certainly a part of the project that needs to be celebrated. Grout is up next to call this project a wrap. It has been a process but one of the most rewarding ones when it comes to projects I’ve tackled in our home.
IT IS TIME! I have been waiting for this moment to IT IS TIME! I have been waiting for this moment to smash these front door tiles ever since we moved in. And it felt so dang good! Here’s what I’m doing to prep the concrete slab for the tile install: 

1. Remove old tile
2. Use an angle grinder with a diamond grinding blade to remove the thin set and paint. 
3. Wash the slab
4. Apply two coats of Hydro Ban to create waterproofing barrier from the moisture in the concrete slab and to help with crack isolation.
Another exciting step for the pool: Excavation day Another exciting step for the pool: Excavation day! We officially broke ground. It was the coolest thing to watch. Rebar and gunite up next.
250 cement tiles made!! 20+ hours went into making 250 cement tiles made!! 20+ hours went into making these tiles and we’re going to celebrate making it to this point! I questioned myself during the last push when molds started failing, tiles weren’t turning out, and I was just flat out tired. If there’s a project to test patience, this is the one. But want to know the craziest part? I’d do it all over again. What an awesome process being able to make my own tiles. And the part we’ve all been waiting for is coming up next: INSTALL!! Tiles, don’t fail me now.
This pretty much sums up the progress of making 25 This pretty much sums up the progress of making 250 cement tiles. But I’m halfway through! The moment I finish the last tile is the moment I knock out the old tile. Let’s do this!
Load More... Follow on Instagram

Sign up here to have our fresh posts delivered to your inbox!

Enter your email address:

Delivered by FeedBurner

Copyright © 2023 Within The Grove • Customized by Brave Creative Design · Log in

  • Privacy Policy
  • Terms and Conditions
  • Disclosures + Photo Usage
 

Loading Comments...