


This DIY industrial pipe curtain rod is a surprisingly easy project that adds major attitude and style to a room. If you’re looking for unique curtain rod ideas, look no further!
This project was one of the first ones we did as we started to transform Oliver’s room from a nursery into a big boy room. We decided to tackle it one project at a time. After first completing the accent wall, we let that soak in for a little while. Then we were ready for another project in this space: hanging the curtains!

Now, I know you’re probably thinking hanging curtains really isn’t a project. But it is if the curtain rod becomes a DIY galvanized pipe curtain rod that goes the length of the wall!
What can I use instead of a curtain rod?
This was the main question I was asking myself when I started thinking about the curtains in my son’s room. I knew I wanted a unique approach to a curtain rod that would look great, function well and be durable enough to stand up to life in a kid’s room.
After looking around for some creative curtain rod ideas, I found this inspiration photo on Pinterest (though I could never find the original source) and knew this is what I had to try and recreate. Of course, with a few little changes of my own.

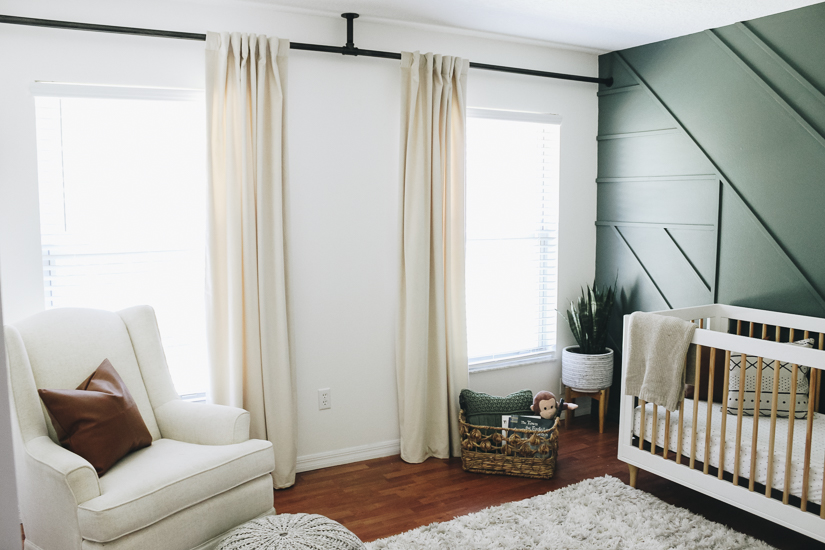
Since both of the windows in this room are close to the adjoining walls, I immediately loved the idea of only using two curtain panels versus four. It all seems to balance out since the curtain rod made out of wooden closet rods and pipes stretches the length of the wall. So what do you say? Let me show you how you can create this in your own home!

What You’ll Need To Make A DIY Industrial Curtain Rod

- 1 inch galvanized iron floor flange
- 1 inch galvanized iron pipe
- 1 inch galvanized iron tee
- 2 wooden closet rods – these need to be the same length as your wall when placed together
- – Closet rod flange pairs – Using only the open flange.
- Oil rubbed bronze spray paint
- 6 drywall screws
- 4 Pop-Toggle screws
- Screwdriver
- Jig saw
- Level
- Measuring tape
- Pencil
How to Make a DIY Black Pipe Curtain Rod

Can you use a metal pipe as a curtain rod?
You absolutely can! A lot of the tutorials for DIY industrial pipe curtain rods I found online used full metal pipes for the actual curtain rod. You’ll notice when looking at my materials list, however, that I decided to take a slightly different approach. While the flanges and all the connecting materials are galvanized iron pipes, the actual curtain rods are wooden closet rods that I painted to match the look of the pipe parts.
I did this for a couple of reasons:
- It saved me money – The wooden curtain rods were less expensive than the full iron pipes.
- It is lighter weight – While these sturdy DIY curtain rods have shown no signs of being pulled down by a rambunctious kid, it’s comforting to know it would be a wooden rod and not a metal pipe falling from the ceiling.
- It is easy to cut to length at home – If you were going to use full metal pipes you’d need some pretty fancy cutting equipment to cut and thread the pipe appropriately. I was able to use a simple saw to cut my curtain rods to size.
Step One: Spray Paint All Parts
I wanted the curtain rod to appear like black galvanized pipes so I knew I would have to spray paint it. The Oil-Rubbed Bronze spray paint by Rusteoluem was my go-to choice. Not only does it give the black look I was wanting, but the finish still makes everything look like galvanized pipes.
This is also the reason why I went with wooden closet rods versus pipes. Since everything is getting spray painted, the paint would easily flake off painted pipe versus painted wood when opening and closing the curtains.
Another plus? The wooden rods are easier to cut down to the custom size you need. You’ll go ahead and spray paint everything! The wooden rods, the galvanized pipe items, the two open closet rod flanges and all of the screws.

Step Two: Build Your Curtain Rod Mid-Point Connection
Once everything is dry, you’ll start the first part of installing the curtain rod. Take the floor flange, pipe and tee pieces and screw them together. This will be the midpoint of your curtain rod that you’ll be attaching to the ceiling.

Find the midpoint of ceiling along the wall you’ll be hanging the curtain rod. From there I placed the floor flange 4 inches away from the wall on the ceiling. Mark where the four screws will go. You’ll use the pop-toggle screws to attach the galvanized iron pieces to the ceiling. Pop-toggles are made to safely hold a lot of weight so you don’t have to worry about the galvanized pieces falling from the ceiling.


Step Three: Installing the Wooden Rods
Next you’ll install the wooden rods to the left and right of the pipes hanging from the ceiling. If your rods are like ours, they may not fit in the galvanized tee piece due to being too big. We used a router to route one end of each rod that it fit in the pipe. You can also use a sander but it will take a little longer.

Insert the end you just shaved down into one side of the tee piece and place the other end in the open flange against the wall (do not attach the flange on the wall yet). It doesn’t matter if you start on the left or right side. If your wooden rod is too long, you’ll have to trim it down using a jigsaw. Cut just a little bit off at a time if you need to. Reason being, if you cut too much, it won’t fit at all due to being too short.


Step Four: Attaching the Open Flanges to the Side Walls
Place a level on top of the rod while it’s in place to make sure that it’s level. You may have to hold your rod up with one hand and hold the level in place with the other while you do this. You’ll also want to make sure that the open flange on the wall is four inches away from the wall it’s going in front of so it’s in line with the tee. I found this easiest to measure using a sewing measuring tape.

Mark the holes on the open flange on the wall so you know where you’ll be inserting the drywall screws. Secure the piece on the wall with the drywall screws and then insert your rod. You’ll repeat these steps on the other side. Once you have your pieces fitted on the left and right, it’s finally time to hang your curtains!
By using the open flanges to hang the curtain rods, it’s actually really easy to hang a variety of curtains on this DIY industrial pipe curtain rod. This was another feature I knew I wanted to build into this design, since a lot of the industrial curtain rod ideas I saw were very hard to take down and switch out curtains once they were installed. With this design, simply lift out the wooden bar from the flange and slide your curtains on and off.


Pros and Cons of a DIY Industrial Pipe Curtain Rod
You’ve now created a fun and unique curtain rod that runs the length of a wall. Of course you can hang as many curtains as you’d like but I’m going with just two in the middle. I love the look of it, the statement yet simplicity it brings to the space and they serve their function. I found my velvet curtains here.

Like any project around the home, these DIY curtain rods have some pros and cons. I think the pros far outweigh any negatives, but it’s important to keep these things in mind before deciding to make these in your home.
Cons of Galvanized Pipe Curtain Rods
Since you’re not able to adjust your curtain rod up or down once it’s in place, be prepared to hem your curtains or spend some time looking for curtains that are the exact right length. Another option is letting them gather on the floor. It honestly comes down to personal preference.

These can be a little more complicated to install than standard curtain rods, depending on the side of your pipes, closet rods and room. While using wooden closet rods instead of full-length pipes certainly makes it easier to cut the rod to any needed length, routing or sanding the wooden rod to fit in a pipe can be a bit tedious.

Pros of a DIY Industrial Curtain Rod
Thankfully, there are many more pros for this simple project!
First of all, these DIY curtain rods are super customizable. They can be made to fit any size window in any size room. They work for many different styles of window, too, from standard windows like the ones in our son’s room to picture windows or even large bay windows.
These are also super sturdy. They’re great for using across a full room because they won’t get saggy in the middle like a lot of store-bought metal or plastic curtain rods too. They can also withstand kids yanking on the curtains from time to time (always a must in a kids room!).
My favorite benefit of this curtain rod is the unique look that it’s added to this space. These are a great way to add a pop of interest to any room in your home. And they’re really versatile! While I love the black look of my galvanized pipe curtains, they could also be spray-painted gold, brass or even silver. A matte black spray paint would also look really good!
Make Your Own DIY Industrial Pipe Curtain Rod
If you create this curtain rod in your home, I’d love to see! Make sure to tag me on social media so I can celebrate your home project with you. Until then, here’s where we can chat about all things home and keep in touch:
Like on Facebook || Follow on Instagram || Follow on Pinterest
We have a great community over on Facebook, House & Home, where we’ll be chatting, sharing, and helping one another when it comes to home decor and projects. Come join us! Check it out here.

[…] Credit: withinthegrove.com […]
[…] Right now that is where the majority of our plants are. Most of you know that I actually built a bar in our kitchen in order to create more space for plants. I get asked about it frequently. I got the idea to make this faux iron bar from Liz over at Within The Grove. She is a fearless DIY-er and is always sharing fun projects with easy to follow steps so that you can do them too. Here is the tutorial from her blog that I followed. […]
Have you had any trouble with the wooden curtain rods starting to sag?
[…] knew as soon as we hung the new curtain rod and curtains in Oliver’s room that something needed to go between them. I wasn’t sure […]
I love this idea. How would you do this with three walls of windows? Any ideas??