


How to Paint and Stencil Floor Tile

Thinking of painting and stenciling floor tile in your home? Read my in-depth guide to exactly how I transformed my laundry room with tile stencils and less than $200.

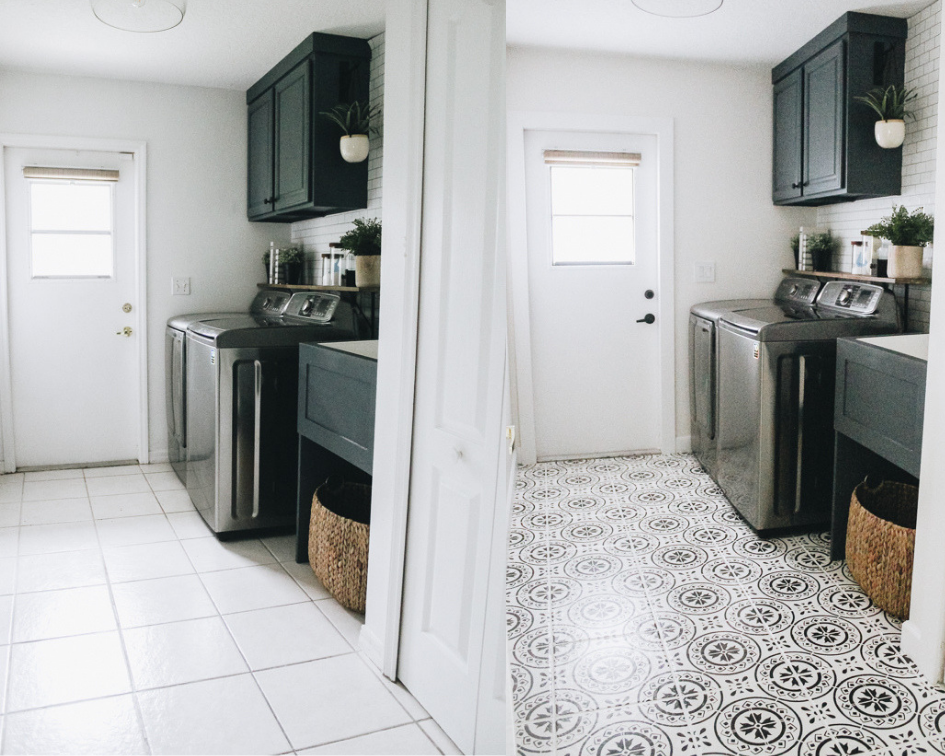
After sitting on my tile stencil for 6 months, I finally decided to take the leap and go ahead with painting floor tiles in my laundry room. You can actually see the full reveal here. But today’s post is all about how to paint tiles with a stencil.
I’m spilling all my tips and tricks, sharing my method and answering your questions. My friends, this is going to be a tutorial with an abundance of details including the cost breakdown and a Q & A at the end. If your question isn’t answered by the end of the post, leave it in the comments and I’ll make sure to get to it.

Is painting floor tiles a good idea?
I asked myself this question approximately 500 times before jumping into this project. I’d seen so many other creators and DIYers tackle painted tile floors in their homes and they seemed happy with the results. But it was still nerve-wracking to actually make the decision!
Ultimately, I decided to go this route of stenciling floor tile for a couple of different reasons:
- I wanted to see how well painting tile truly works
- It’s less of a mess than ripping up our old tile and installing a new floor
- I can have a custom design
- and for the fun transformation
I was also fully prepared to replace the tile if it didn’t work. But that wasn’t the case! Let’s dive into this DIY project that anyone can do with just a little patience.
I’m going to be sharing the exact steps I used to transform our laundry room tile, but first I wanted to share some general information to consider and answer some common questions before you jump into this project yourself.
Tips & Tricks for Stenciling Floor Tile
What kind of paint do you use to stencil on tile?
I wanted to make sure these painted tile floors would stand up to the wear and tear of daily use, so I decided to go with a porch and patio paint from Sherwin-Williams. Many tutorials about how to stencil a tile floor use chalk paint, which can also work well. But I’m really glad I went with the most durable paint option.
Where do you start when stenciling a floor?
When stenciling floor tile, it’s important to start from as far into the room as possible and work your way backward towards the door you’ll eventually be leaving from. Remember: you have to be able to walk around and stand while painting your tile, so you’ll need to be able to get out of the room without messing up all your hard work! Don’t start right along the wall either – save those tougher spots for the end.
How do you keep a floor stencil from bleeding?
This is one of the most important tips before you start stenciling floor tile. Once you’ve made sure that your stencil is placed where you want it, use painter’s tape to stick it down. Then, use a light pressure to ensure the paint doesn’t bleed under the stencil.
Should you seal a stenciled floor?
If you want your painted tile floor to last, then yes – you should absolutely seal it. Sealing your stenciled floor tiles ensures they can withstand everyday foot traffic and last longer. I recommend using a matte polycrylic for the sealant.

Here’s What You’ll Need
- Powder Barkeepers Friend
- Grout Brush
- Rag + Bowl
- Painters Tape
- Degreaser – I used Simple Green.
- Orbital Sander (or you can do it by hand with a block sander)
- 150 grit sandpaper
- Products to clean the floor
- Broom
- Vaccuum (I preferred a shop vac)
- 3 – 1/4 inch nap roller
- Nylon/polyester 2 1/2 inch angled paintbrush
- Piece of cardboard
- Small paint tray
- Tile Stencil – MORELLO Tile Stencil
- Primer – Zinsser All Purpose Primer
- Paint base coat – I used Porch and Patio Paint in Greek Villa by Sherwin Williams
- Paint for stencil – I used Porch and Patio Paint in Peppery by Behr
- Matte Polycrylic for the sealant
- Small craft paintbrush
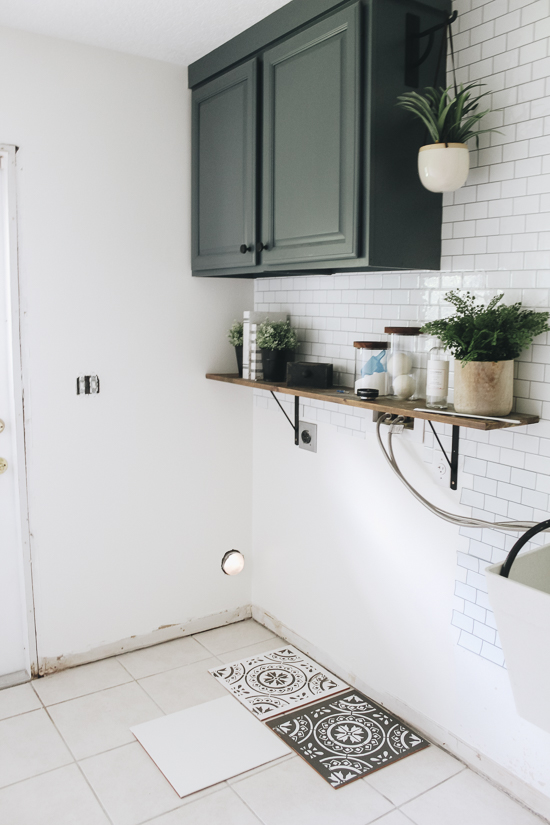
Here’s where we started with before painting our tile. The transformation still blows my mind that this was just paint, a stencil and a lot of patience.


How to Paint and Stencil Floor Tile: Step-By-Step Guide
Armed with the right knowledge and the right products, you can absolutely transform any tile floor in your home with paint and stencils. Use the following steps to make painting and stenciling floor tile simple (if time-consuming).
Prepping Your Floor for Paint

First thing you’ll want to do is clean your grout. Think of it this way, would you paint a wall with dirt all over it or would you clean it first? You want the paint to adhere successfully, so cleaning it allows this to happen.
You’ll take the powder Barkeepers Friend, sprinkle it on a small section of the grout, spray it with water and right away scrub with the grout brush. You’ll see instant results as soon as you wipe away the solution with a wet rag. This does not damage the grout. It’s simply lifting the dirt from the grout. Repeat this until you’ve gotten all the grout.

Next, you’ll want to clean your tile with a degreaser to remove any gunk from the surface. I used Simple Green because it’s a safer alternative compared to other cleaners. I sprayed my area, scrubbed it down and wiped it with a wet rag using a bowl of clean, warm water.

Now, just like you sand a piece of furniture to prepare it for paint, you want to do the same for your tile. Using a hand orbital sander (I found this to be the quickest and easiest method), you’ll want to sand the entire surface of your tile using 150-grit sandpaper. This sandpaper is coarse enough to create traction on the tiles for the paint to adhere but not so much to where it scratches the tile.


Using a vacuum, run it over the tiles to remove any sanding dust. I also did one extra step of mopping the tile just to make sure it was 100% clean and clear of anything before I started painting. Better safe than sorry was my thought process.
Painting Tiles with Stencils

Before we even get started with the painting, here are a few tips to help keep your tile clean as you go:
Tips for Keeping Stenciled Tiles Clean While Painting
1. Wear your hair in a ponytail. bun, etc. I can’t tell you how many stray hairs landed in my wet paint from wearing my hair down. Lesson learned.
2. Don’t wear shoes! The best thing you can do is wear socks that stay in the laundry room. In other words, don’t wear them in other parts of them home. If you go barefoot, the traction/pressure of the bottom of your foot if you stand in a spot too long can cause the paint to be removed from your foot sticking.
3. This doesn’t help with a clean workspace, but grab yourself a pair of wireless headphones and jam out to music or listen to some podcasts to help pass the time.
We’re finally to the exciting part of painting the tile. Or at least starting that process. Before you dive in, this is where patience is going to come into play. You’ll have to let each coat dry for hours, some for a full day, before moving on to the next coat. But, with that said, let’s dive in.
We were replacing our baseboards during this project so painting the tile along the edges was a little easier for us. For those with baseboards during this project, you’ll want to use painter’s tape along the bottom of the baseboards to protect them from any paint.
Start with Primer for Tile Floors
The first coat you’ll paint is the primer. You don’t want to skip this step! The primer I used was Zinsser Primecoat. There are several different primers to choose from. You just want to make sure you use a primer that is made to adhere specifically to tile. You’ll want to use primer for two reasons: It adheres successfully to tile and then allows your main paint to successfully adhere to the primer. See where this is going?

One coat did the trick for me! I worked in small sections by brushing the grout first with the primer and then rolling the tiles with a mini nap roller. I also painted the perimeter of the tiles with my paintbrush as I went. Remember to paint yourself out of the room! Allow the primer to dry for the time it states on the can.
I found by using a paintbrush on the grout, it was quick and easy to get the grout covered especially with how coarse it is. Of course you may opt not to paint your grout but it could make painting your tile a little trickier with having to be extra careful not to get any paint on the grout.

Paint Tile with Base Coat
You’ve now made it to the base coat! This is where things start getting exciting. You may want to take a minute and think about what color you want as your base coat. I purchased two tiles that were 75 cents each and stenciled the design trying the two different base coat colors: white and charcoal gray. I knew right away which one I wanted to do after that.
I decided to use Porch and Patio paint simply because it’s more durable to wear and tear and I could use any color I wanted. Think about it, it’s meant to go outside on patios where it can withstand weather conditions. Why wouldn’t I use this!? Of course, you can also try chalk paint like others have.

I used Greek Villa by Sherwin-Williams as my basecoat. It’s actually the same color as my walls. I followed the same method of working in small sections, painting the grout with a paintbrush and rolling the tile with a nap roller. The quality of this paint was amazing! It did require two coats which I expected because of it being white. I allowed the paint to dry for 24 hours before applying the next coat. I noticed that porch and patio paint requires this longer dry time to allow it to fully cure.


Choosing Stencils for Tile Floor Painting
Time to get your stencil out! Don’t let this step freak you out. Maybe I’m saying this because I hesitated for a minute with mine. It was the turning point in the project of if this was going to work or not. It’s easier than what you think, you just have to take your time.
I ordered my stencil from Dizzy Duck Designs for two major reasons: I could order a custom size to match the size of my tiles and they were 2 for 1. Which meant I received two of the larger stencils in my custom size and two quarter pieces. This alone, was a game changer with speeding up the painting process and you’ll see why.

If you have to order a custom size, make sure to measure and then re-measure. You want to make sure you get the exact size so the stencil isn’t too small or even too big where it will run into the grout lines.
Keep in mind the stencil itself will be larger than your tile but the graphic you’ll be stenciling will be the size of your tile. As far as picking out the design, it comes down to personal preference. You can check out my blog post that shows you my favorite places to purchase a tile stencil.
Painting Tiles with Stencils: Whole Tiles
Ok, it’s officially time to stencil our floor tile! Let’s chat about the starting point. I started where I knew the washer and dryer would be going to give me a little wiggle room to try the stencil for the first time. I think as long as you start where you can work your way out of the room you’re fine. Also, start with the whole tiles. The ones along the wall will be the last ones you paint.

Take your time and align the corners of your design with the corner of the tile. Make sure that all the sides of the design are also evenly lining up with the sides of the tile. Once you have the stencil in the perfect position, tape the corners down with painters tape. I did not use a spray adhesive with this project due to in the past it has caused a bigger mess and makes it hard to clean the stencils.
Using a new nap roller, roll it in the paint and roll off the excess using a piece of cardboard. You don’t want your roller soaked with paint. You actually want barely any paint on it at all. Just enough to roll a light layer over the stencil. I used Peppery by Behr in their Porch and Patio Paint.
** I used two different brands for the porch and patio paints. I could have color-matched and gone with one brand, but I wanted to make sure I got the exact colors I wanted. Which is why I went with the two different brands. If I had to pick the better of the two, it would be Valspar for the coverage, thickness and quality.
Apply the paint by rolling it over the stencil gently, one small section at a time. It’s important to not push down and cause a lot of pressure. This will cause the paint to seep underneath the stencil. Just lightly go over the stencil even if you have to roll over a section a few times. Please keep in mind that it’s probably going to take two coats. I’ll get to that in a minute.

This is where having a second stencil comes in handy. While the first stencil is drying, I went ahead and worked with the second stencil. You don’t want to stencil an adjoining tile because you don’t want the edges of the stencil hitting the wet paint of the tile you just stenciled. Work on every other tile as you go. Repeat the stenciling process.

I gave about a 10 minute dry time before I applied the second coat. This worked out perfectly because as I was finishing one stencil, the other stencil was ready for the second coat. This made the process go so much faster! By the time you make it out of the room, you’re able to go back and paint the tiles you skipped.
Pro Tip: Make sure to clean your stencils after using each one on a few tiles. If not, the build-up of paint on the stencil could cause more paint to leak underneath the stencil.

Painting Tiles with Stencils: Partial Tiles
You’ll now work with the tiles along the wall. These may be smaller than your stencil but can still be easily painted! The stencil, at least the one I purchased from Dizzy Duck Designs, is very bendable.
I matched the corners of my stencil to the tile like normal and bent the stencil so it became flat on the tile. With the stencil bent and pushed down, I taped the other two corners to the wall. From there I was able to use the roller on the stencil. You may have to do a few touch ups along the wall and that’s okay! You’ll still have to stencil every other tile and then go back and fill in the rest as they dry.


If you have a linen closet like me where you need to paint the floor inside of it, do that section last. Reason being, I ended up cutting my stencil to get around those really hard corners. But since it was the last space, it didn’t matter that I cut them. There were even a few spots I ended up painting by hand because it was too difficult with a stencil. Just like your base coat, allow the stenciled paint to dry for 24 hours before sealing it.

How to Touch Up Painted Tile Floors
I was nervous with how my tile would do since it has a slight texture to it. I learned to go slow and just take my time for the best results. I did, however, have some touch-ups once I finished where the paint got under the stencil. You’ll want to go back and fix those areas using a small craft paintbrush. This will help create a more finished and professional look. I wasn’t too meticulous about mine because in all honesty, you’ll be your biggest critic! When you aren’t eye level with the tile, you won’t even notice.

Sealing Painted Tile Floors
Although porch and patio paint typically doesn’t require a top coat, you do not want to skip this step. Tile isn’t porous like concrete, bricks and other materials that you would find on a patio. Therefore, the paint could easily chip on tile if you don’t seal it. I used a matte polycrylic to seal our floor and I love the results! The matte finish doesn’t give the tiles a high shine, doesn’t give the paint a yellow tint and it does the job well.
It’s best applied using a paintbrush over the entire floor. I found when trying to use a paint roller, it left bubbles. Work in small sections by painting the grout and then brushing over the tile as you paint yourself out of the room once again. I recommend applying at least 3 coats. There’s only a 2 hour dry time for polycrylic which means you can get all three coats done in a day.

When the first coat is dry, you’ll need to lightly sand over it using the orbital hand sander (or a block sander) with the same 150 grit sandpaper. Quickly go over each tile. As long as you don’t apply a lot of pressure and stay in one spot a long time, your paint will be fine. This is also a very important step because you want the next coat of polycrylic to successfully adhere. Make sure to sweep after each sanding. You’ll repeat this after the second coat as well.
Once the third coat was applied, I allowed the floor to dry and cure for 24 hours before doing anything in the space. We were able to successfully bring the washer and dryer into the laundry room (carefully) without messing up the floor which was huge and shows you how well the polycrylic protects the floor.

After all of this hard work, it’s time for you to enjoy your new tile! I’ll be giving a 6 month update and a year update so you know how the painted tile is holding up. It looks, feels and is holding up great now but it has only been three weeks. Keep reading for the cost breakdown and the Q & A.
How Much Does It Cost to Stencil Floor Tile?

Here’s the cost of every material, giving you the total cost, if you started without anything. So, keep in mind your cost is going to be significantly lower if you already have the base materials (sandpaper, paintbrush, cleaning materials, etc.).
- Powder Barkeepers Friend – $1.98
- Grout Brush – $2.97
- Rag + Bowl – Should have at home
- Painters Tape – $4.54
- Degreaser – $7.97
- 150 grit sanding block – $4.27
- Products to clean the floor – Should have at home
- Broom – Should have at home
- Vaccuum (I preferred a shop vac) – Should have at home.
- 2 – 1/4 inch nap roller – $7.43
- Nylon/polyester 2 1/2 inch angled paintbrush – $8.47
- Piece of cardboard – Grab a scrap piece
- Small paint tray – $1.87
- Tile Stencil – MORELLO Tile Stencil – This price wall vary depending on your tile size. Mine was $30.
- Primer – $22.47
- Porch and Patio Paint x 2 – $60 ($30 each)
- Matte Polycrylic for the sealant – $17.99
- Small craft paintbrush – $1
TOTAL COST: $169.96
MY COST due to materials I already had on hand: $123.39
Common Questions About Stenciling Floor Tile
Can you paint shiny floor tile?
As long as you do the prep work (cleaning, sanding, primer, etc.) and sealing it, it should work on shiny tile.
Can you stencil laminate flooring?
This is a great question! I’ve heard of people stenciling a design (minus the basecoat) on their wood floor and sealing it. It could possibly work on laminate flooring knowing this.
Are painted tiles smooth or do you feel the texture from the stenciled paint?
The texture is completely smooth! Especially with the three coats of polyacrylic.
Would you try this in a high-traffic area?
This will be a great question to come back to after I’ve had my stenciled tile for 6 months. I think it would be fine but would probably apply 4-5 coats of the polycrylic instead of 3.
Can you use a smaller stencil?
Yes! I’ve seen others use a stencil a quarter of the size to create a smaller, more frequent pattern.
How do you clean painted tile?
Like you normally would! Once the resins in the polycrylic have dried, it’s resistant to water.
Can you stencil shower tiles?
I’m not an expert on this method by any means, but I personally wouldn’t recommend these specific products for tiles in the shower. You can find paint that’s made for tub and shower tile.
Can you stencil diagonal tile?
Yes! Your pattern would just be going a different direction. Or if it’s a pattern that doesn’t show a direction you won’t really be able to tell.
Do stenciled floors last?
In my experience, yes! I first painted my laundry room tile THIS MANY years ago, and they’re still going strong today! The key is to use quality materials, be patient and not skip any steps for the sake of time. I think because I used a quality primer, chose porch and patio paint for the body color and stencil color, and used a polycrylic sealant to finish the project off, my tiles look as good as new!
We’ve done a lot of work to this little laundry room over the years, but stenciling floor tile definitely brought the whole space together. Check out all the other work we’ve done to this room:
- The design plan from the beginning
- Adding a shelf above the washer and dryer
- Installing cabinets and subway tile
- Building a faux cabinet for the utility sink
- Installing a new faucet
We have a great community over on Facebook, House & Home, where we’ll be chatting, sharing, and helping one another when it comes to home decor and projects. Come join us! Check it out here.
Like on Facebook || Follow on Instagram || Follow on Pinterest

[…] DIY-er Angela Rose had put up last year. Another person I’d like to mention is Liz, from Within the Grove, she is such a sweetheart – always looking to help and just encourages you to do your very […]
I think this is much effective guide to paint and stencil floor tile.
So glad that it helped!
[…] tile with a stencil is a great idea! Our friend Liz, over at Within The Grove, did just that and you can see that it is […]
What did you use to clean your stencils in between uses? Would you recommend a polyurethane you don’t have to sand?
Love the floors. Have you ever had to slide your washer or dryer out over the painted floor? If not, do you think it will ruin your hard work if you had to? I also see bathrooms and laundry rooms all over the Internet but very few kitchens done. Is this a bad idea for a kitchen? Again, sliding refrigerator out for cleaning or repairs?
[…] tile with a stencil is a great idea! Our friend Liz, over at Within The Grove, did just that and you can see that it is […]
Where did you get your laundry tub?
[…] Source: Within the Groove […]
[…] How To Paint & Stencil Floor Tile […]