


Laundry Room Update: Painted Stenciled Floors


You guys! It’s time to finally reveal the painted laundry room tiles. It took a little over two weeks to get to this point. All because, well you know, if you give a mouse a cookie. . . What I really mean is that once I started prepping the floor for paint, I decided to rip out all the baseboards + trim, paint the walls, switch out the light switches, and install the new baseboards + trim. And to think it all started with the floor.

Even though it turned into a bigger and longer project, it was 100% worth it! In the past year we’ve come a long way with this laundry room and proof things don’t happen overnight. Here’s what we’ve done in the past year and the picture that takes us all the way back to the beginning.
- The design plan from the beginning
- Adding a shelf above the washer and dryer
- Installing cabinets and subway tile
- Building a faux cabinet for the utility sink
- Installing a new faucet

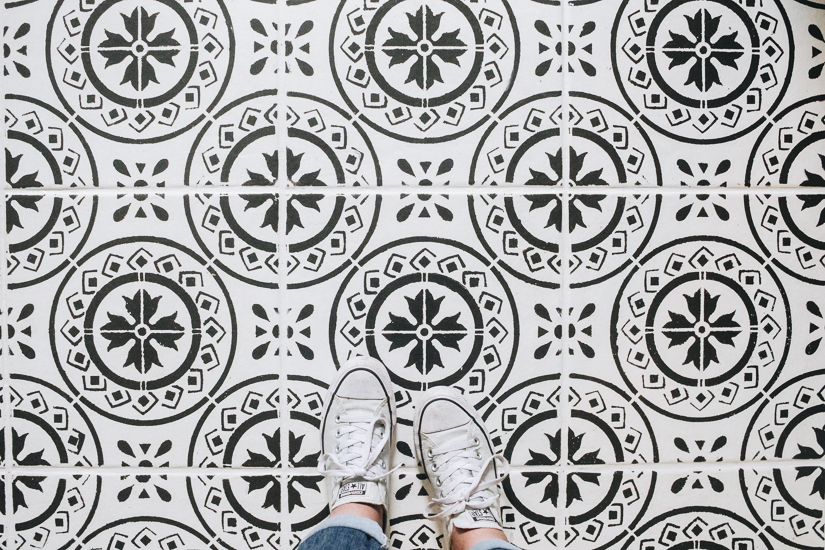
Enough of what we’ve done and let’s look at what we just accomplished: PAINTING THE FLOORS! I ordered the stencils 6 months ago and it took me this long to finally dive in and paint them. When you’re renovating and decorating on a budget, going the route of painting your floors can be cost friendly. But if it doesn’t work out or messes up (which it still could), you’re left ripping the tile out and a bigger expense of replacing them.

But let’s live in this moment of IT WORKED. Painting our tiles completely transformed the laundry room and it has left us feeling as if we did install new tile. Just look at the detail and it came together beautifully. We used the MORELLO Tile Stencil by Dizzy Duck Designs. You can see why we went with them here along with other places you can look for the perfect stencil. We opted to purchase a custom stencil so it covered the entire tile and therefore made the pattern slightly larger.


Before I keep going, you might be wondering about how I painted the floors and the process. That post is coming this week! There was so much that happened in this space over the past two weeks I wanted to reveal it to you first without it being overwhelming. You will be able to find what I used and the paint colors at the end of this post.

I choose to use porch and patio paint after reading the reviews and other people who have used it on their tile for the durability, even a year later. I used Valspar Porch and Paint in the Greek Villa for the base coat and Behr Porch and Paint in Peppery for the stencil color. I could have colored matched the paint colors, but I wanted to make sure I got the exact color I wanted. Especially since the base color is the same color as the walls. Just so you know, after using both, Valspar seemed to be better quality!

The biggest takeaway from painting and stenciling our floors: you’ll sweep a lot, wear your hair up so you won’t have any loose flyers as you’re painting and you’ll need a lot of patience. If you can handle those things, you can certainly transform the tiles in your home as well. What was beige is now a gorgeous design that has inspired me to do more laundry. Well, at least this week.

Now on to the other things we updated in the space. I gave the walls a fresh coat of paint in a creamy white called Greek Villa by Sherwin-Williams. I’m 100% certain that these walls have never been painted except for the primer applied to the drywall when the home was built. The paint soaked right in and I could see the drywall in spots where the primer didn’t cover. I went through 5 different samples painted on the wall before just going for it. I had the biggest help by those of you who voted and sent in suggestions over on Instagram stories when asked about your favorite whites.

We also updated the trim and baseboards for something a little more streamlined. We love the simplicity yet sharp lines they bring to the laundry room. Ryan taught me how to install the trim which I’m sharing with you over on Instagram in my highlights. I painted them Extra White by Sherwin-Williams, my go-to white for trim, baseboards and interior doors in our home.

Speaking of doors, the exterior door in our laundry room still has me spinning my wheels. I originally wanted to paint it the same color as the cabinets or the gray I used on the floor. Once I painted the color samples on the door, I wasn’t feeling them! Instead of rushing and forcing a color, I decided to paint it the same color as the trim. This is something I can approach and experiment with at a later date. My dream door? Installing a wood door but remember that budget I was talking about? One day!

And to hopefully help you out in your own home renovations, here are all of the sources for this space:
Wall cabinets: Thrift find and painted
Utility sink cabinet: Here’s the tutorial
Faucet: Miri by Pfister
Peel and Stick Wall Tiles
Stencil by Dizzy Duck Designs
Laundry Sign
Hanging plant
Plant on shelf
Glass jars
Wall color: Greek Villa by Sherwin-Williams
Door + trim + baseboard color: Extra White by Sherwin-Williams
Base floor color: Greek Villa by Sherwin-Williams
Stencil color: Peppery by Behr
Cabinet color: Outerspace by Sherwin-Williams

So, I want you to remember to tell yourself that home projects don’t happen overnight, within a week or when you expect them to. It has taken a year to get the laundry room to this point and we’re still not done! And that’s okay. Everything we’ve done has been done with intention.

Because I can’t stay in one space for long (which might be another reason why this space has taken a year), I’ll be focusing on other areas of the home and at some point come back to this one! You can follow along on all of the behind the scenes, my process and to join in on the fun by following along on my social media platforms. So, what do you say!? Let’s keep in touch!
We have a great community over on Facebook, House & Home, where we’ll be chatting, sharing, and helping one another when it comes to home decor and projects. Come join us! Check it out here.
Like on Facebook || Follow on Instagram || Follow on Pinterest

Hello,
The floor looks wonderful! It seems to have been a year since you completed your project, I can’t seem to find the update. Can you direct me to the update of send a picture of how the floor wore?
Thank you
[…] to take the leap and paint the tiles in my laundry room. You can actually see the full reveal here. But today’s post is all about how to paint your tiles. I’m spilling all my tips and […]
[…] Source: Within The Grove […]