• Home
  • ABOUT
  • WORK WITH ME
  • Paint Colors
  • Shop Our House
    • Guest Bedroom
    • Front Living Room
    • Living Room with Fireplace
    • Previous Second Living Room
    • Current Playroom
    • Prior Playroom
    • Dining Room
    • Laundry Room
    • Oliver’s Bedroom
    • Guest Bathroom
    • Covered Lanai
    • Patio
    • Master Bedroom
  • CONTACT
    • Facebook
    • Instagram
    • Pinterest

Within the Grove

Join the list to receive occasional news and special updates!

Subway Tile Accent Wall in our Laundry Room (+ Video!)

May 7, 2018

Using Tic Tac Tiles in the Laundry Room

This post has been sponsored by Tic Tac Tiles. All thoughts and opinions are my own.

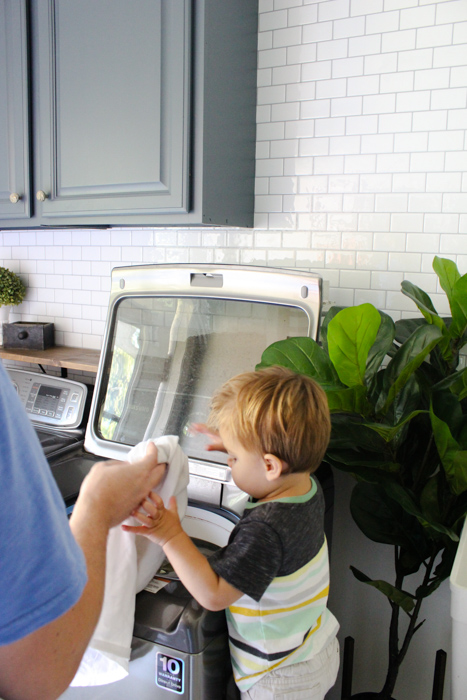
Hello, my friends! We’re kicking off the week with a laundry room update. A few months ago we chatted about our plans of updating this space one project at a time. We previously took down the wire shelving, added a wooden shelf above the washer and dryer, and now that same wall received a HUGE update by adding cabinetry and subway tile. We’re more than thrilled to be sharing it with you today!

Creating a laundry room you'll want to spend time in.

When we first started planning our laundry room, we knew we wanted an accent wall to really bring design to the space. Not only to make the chore of laundry more enjoyable, but because the laundry room is visible from some of the main areas of our home. Therefore, we wanted to blend our laundry room with the rest of our home and not a separate area that we would want to avoid. Don’t be afraid to pay your laundry room a little attention!

Creating a modern farmhouse laundry room

We started updating this space by adding a pair of cabinets that I found thrifting one afternoon. Here’s what I came home with:

Painting cabinets for the laundry room

Right away we painted them the same color as our kitchen cabinets, Outerspace by Sherwin-Williams, for an instant makeover. Now we have extra storage and cabinets that look brand new!

Painting cabinets for the laundry room.

With the cabinets in place, it was time to install our subway tile. Our goal was to create a feature wall that would stay within our budget, wasn’t time consuming to install (hello toddler), and didn’t require major tools and leave a big mess behind. Most importantly though, we still wanted the look of real tile.

Using subway tile in the laundry room.

Which is exactly why we went with3-D adhesive tiles by Tic Tac Tiles. We loved how theMono White Subway Tiles turned out in our kitchen, so we decided to use the same ones in our laundry room. And you guys, these are a game changer when it comes to adding tile to a wall. They only took an afternoon (2 hours) to install because you literally peel and stick the tiles to the wall. But, here’s the thing. They look SO real! Even close up it’s hard to tell these are peel and stick tiles.  Here’s a great way to see the difference Tic Tac Tiles made in our space:

Before

Modern Farmhouse Laundry Room Design Board

After

Transforming a space using Tic Tac Tiles

Our style is changing (going away from farmhouse) and it’s becoming more modern, mixing in bold statements, and still adding in the neutrals. I’d have to say between the combination of our thrifted cabinets and tiles applied to the wall, that’s exactly where we’re going with this space. We also added a fiddle leaf fig, a few accessories to the shelf and checked one more thing off our laundry room to-do list for this super successful weekend project! 

Modern laundry room design

And we saved the best for last. You can see our process from beginning to end of installing Tic Tac Tiles in our laundry room! We’re giving you the step-by-step in hopes that our video will help you transform a space in your home using these tiles.

Let me know in the comments below if you plan on giving Tic Tac Tiles a try or already have! And of course, pictures of your space are always welcomed. Don’t forget to tag me on social media if you post there also. You can find Tic Tac Tiles on Amazon and on their website. 

Creating a modern farmhouse laundry room

Let’s keep in touch!

We have a brand new community over on Facebook, House & Home, where we’ll be chatting, sharing, and helping one another when it comes to home decor and projects. Come join us! Check it out here.

Likeon Facebook ||Followon Instagram || Follow on Pinterest 

Share this:

  • Click to share on Twitter (Opens in new window)
  • Click to share on Facebook (Opens in new window)

Related

Filed Under: DIY, Home of the Rishels, Home Project, Our Home Improvements

« Designing a Closet to Become an Extension of your Master Bedroom
Plant Summer Flower Pots that will Thrive »

Comments

  1. Jill says

    February 9, 2020 at 1:22 pm

    A year on, how are they holding up? Would you do anything differently? Thanks!!

    Reply
  2. Mike says

    July 30, 2019 at 7:54 am

    Hi! Great update! We took your room and basically did the same thing in our laundry room and love it. How did you guys hang the shelf over the washer and dryer? I am nervous to drill into the tiles. Can you do that? Thanks!

    Reply

Trackbacks

  1. Home Projects from 2018 - Within the Grove says:
    December 31, 2018 at 12:10 am

    […] here’s what the laundry room looks like now. You can see the changes here and here. Can’t wait to update this space even […]

    Reply

Leave a Reply Cancel reply

Your email address will not be published. Required fields are marked *

This site uses Akismet to reduce spam. Learn how your comment data is processed.

Looking for something?

withinthegrove

The garden is cleaned up, prepped, and ready for t The garden is cleaned up, prepped, and ready for the summer crop. What started as a single garden box has transformed to this garden space over the past few years. Favorite thing about it: being tucked away in this cozy corner with the winding paths throughout it. One thing I would do differently: using pea gravel instead of the granite rocks we went with. These rocks hurt! Pea gravel is smooth enough to comfortably walk barefoot on.
The grass is in! Saying BUH BYE to the dirt around The grass is in! Saying BUH BYE to the dirt around the pool for the first time since December when we broke ground. We spent the past few weeks installing irrigation throughout our backyard and around the pool. Yesterday we finally had the sod delivered and within a few hours it got us one step closer to finishing our backyard oasis. We still have a long ways to go, but my goodness does it feel good to see this part done! And we can finally check off the final inspection for the pool build.
What does it cost to fill a 16,000 gallon pool wit What does it cost to fill a 16,000 gallon pool with a garden hose? Our total came to $229! Does this total surprise you? This of course can greatly vary depending on where you live and your situation. For us, we live in Florida and on county water. We only pay water fees and not sewage. The water company did not give us a discount. We filled the pool right at the start of our billing month so this is it! Have you filled up a pool before? I’d love for you to share your cost, pool size, and location if you feel comfortable doing so!
We have a 16,000 gallon pool and filled it up with We have a 16,000 gallon pool and filled it up with a single water hose. And we for sure had some questions! Answering them here:

• Why not use a water truck? We weren’t in a rush, it was the best way to end this project watching it fill up, and it would have been more expensive. 

• Why not use our local fire station? Our local fire department doesn’t do this and it isn’t very common that most do. We wouldn’t ask if they did. 

• Did our water company give us a discount? Nope. Most water companies will take off the sewage fee but we only pay for water and not sewage where we live. We did notify them so they wouldn’t turn our water off thinking it was a leak. 

• What is that on the end of your hose? We added a filter on the hose to help reduce iron, scale, any other heavy metals and containments to help give our pool a fresh start. 

• How long did it take? 51 hours 

I’ll be sharing the cost soon so make sure to add your guess in the comments!
Pizza nights are back! And one thing we’re addin Pizza nights are back! And one thing we’re adding since our screen enclosure is gone, are these Bitefighter LED String Lights by @tikibrandproducts . You’ve seen us use them in our playset area and now for our patio area. They give us the ambiance we need at night while helping to fight off the mosquitoes as a 2 in 1 solution. There’s no odor, no mess, and they will last all season long. Cheers to the summer nights ahead! #ad #TIKIbrand
Protecting outdoor furniture for the summer!

It’s time to give your outdoor furniture the best start for summer and to help it last long term. Here are some things you can do to protect your outdoor furniture as we enter the summer season:

1. If you have wood furniture, it’s time to seal it! I use Thompson’s Waterseal on all my outdoor wood furniture except for teak. This protects it from moisture, sunshine, and mold/mildew.

2. Easiest way to help keep cushions clean is by spot cleaning throughout the season. I use 30 Seconds Outdoor Cleaner for quick, fresh looking cushions. 

3. To really protect cushions, Shield H2O provides a water repellent treatment that repels moisture and spills, which in return helps prevent mold and mildew. 

4. Have teak furniture? Use a teak SEALER and not an oil. Teak oil is a short term solution and easily washes out with rain. Time to seal it to last long term! 

I have everything I used in my Amazon storefront under outdoor.
We were told 16 weeks for our pool install but it We were told 16 weeks for our pool install but it ended up taking exactly 12 weeks. Broke ground on December 16th and started filling it with water on March 16th. I’m sharing all the pool details over on my blog. Including the answer to the number one question: How much did this cost? Covering how we picked a pool builder, the construction process, the materials we went with and why, what we splurged on and where we saved, and so much more. Save it for future reference! It’s a good one!
We have an outdoor dining space again! It’s some We have an outdoor dining space again! It’s something we have missed the most these past few months while under construction with the pool. I’m such a visual person so being able to walk into @homesense_us and see exactly what we could use to create our outdoor dining space was amazing. There was so much to choose from at a great price point and something for every style. I’m noticing more Homesense Stores opening around the US so check to see if there is one near you! #HomesensePartner #DiscoverHomesense

Here are a few tips for creating an outdoor dining space:

1. Choose a table that fits the space with at least 4 feet around each side. 
2. Plenty of seating. Extra seats if you have the space.
3. Add an option for shade.
4. Select a style + decor that suits you 
5. Use outdoor furniture that’s easy to maintain. 
6. Enjoy your new outdoor space!
Are we lounging poolside or beach side? It’s har Are we lounging poolside or beach side? It’s hard to tell without our sod installed yet but regardless, loving this new addition to the pool area. Just need to find some cute side tables and this part of the pool area is done. Should I go with teak or black ones?  I’ve linked everything on my LTK through the link in my profile!
Load More... Follow on Instagram

Sign up here to have our fresh posts delivered to your inbox!

Enter your email address:

Delivered by FeedBurner

Copyright © 2023 Within The Grove • Customized by Brave Creative Design · Log in

  • Privacy Policy
  • Terms and Conditions
  • Disclosures + Photo Usage
 

Loading Comments...