


Installing Tic Tac Tiles Peel-and-Stick Kitchen Backsplash


This post has been sponsored by Tic Tac Tiles. All thoughts and opinions are my own.
Looking for a budget-friendly kitchen upgrade that looks great and lasts? Read all about installing Tic Tac Tiles kitchen backsplash in this how-to guide.
A few years back, we revealed part of our original kitchen makeover. Really, a huge part of it! At the time, it was our biggest project since we painted all the cabinets and added shiplap to the back of each exposed cabinet. It was worth every hour spent sanding, priming, and painting! Now, we’re back with another update. We’re slowly marking things off our project list and this time we crossed off backsplash – a peel-and-stick kitchen backsplash, to be exact.

This post contains affiliate links. See the full disclosure here.
And would you believe me if I told you installing a peel-and-stick backsplash only took me a little over two hours? Not even kidding and that’s because we went with self-adhesive 3-D wall tiles by Tic Tac Tiles.
You guys, this product is magical because all you do is peel and stick. Installing Tic Tac Tiles is that easy! I know, I know. I couldn’t believe it either. Do you know how much time and money this could have saved others?
Keep reading to learn more about why we went with Tic Tac Tiles, the peel-and-stick backsplash installation process and get your questions answered.

Are peel-and-stick backsplashes any good?
I get this question a lot and I had the same question when we were preparing for this project. The last thing I wanted to do was put a bunch of time and energy into installing a peel-and-stick backsplash only to have it not even last a year.
But here’s the good news: peel-and-stick tiles have come a long way, and peel-and-stick backsplashes are absolutely a great upgrade for your home! The key is choosing a high-quality self-adhesive backsplash that looks like real tile.
This is one reason I love Tic Tac Tiles – their 3D wall tiles look just like the real thing, despite being a lot more affordable and easier to install!
Choosing a Tic Tac Tiles Kitchen Backsplash
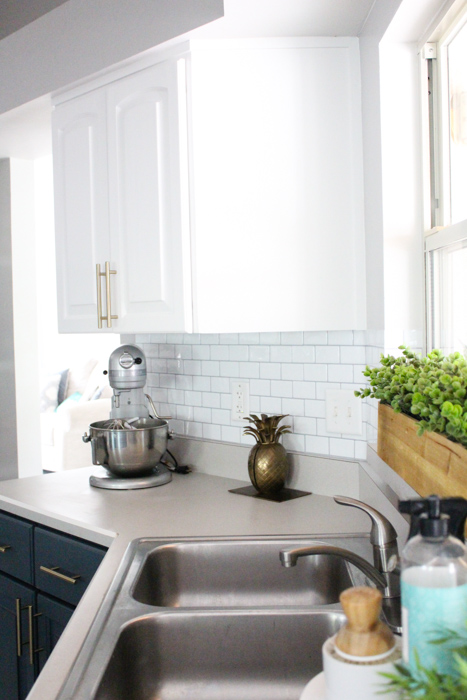
There are so many amazing options for a Tic Tac Tiles kitchen backsplash. We decided on the Subway Mono White for our design and love how the gray grout ties in with our countertops. I’m amazed at the texture, design, and overall look these tiles provide for our kitchen. We applied Tic Tac Tiles above all the counters and continued around the kitchen window.

Where to Buy Tic Tac Tiles
One of the best things about Tic Tac Tiles is not only the high-quality peel-and-stick tiles, but also that they’re really easy to source! You can buy Tic Tac Tiles from Amazon, Home Depot, Lowe’s and many other home improvement stores both in-person and online. And with so many designs to choose from, there’s bound to be the right peel-and-stick backsplash design for your kitchen.
Why Use a Tic Tac Tiles Kitchen Backsplash
So, why did we decide to give Tic Tac Tiles a try in our kitchen? For so many amazing reasons!
1. Peel-and-Stick Backsplashes Save Time

With a toddler running around full of energy, time is very limited to focus on a huge project like installing a peel-and-stick tile backsplash. We needed something that was going to be fairly quick, easy, and with great results. Tic Tac Tiles took a little over two hours to install in our entire kitchen.
2. Peel-and-Stick Tiles Are Budget Friendly

When installing real tile, you need a lot of materials and tools. Not to mention hoping you install it correctly if you’re attempting it yourself. The labor cost if you decide to hire someone can also add up quickly. All these things combined, it can take a huge chunk of your renovation budget. With Tic Tac Tiles, you pay for the amount you need and that’s it. Plus, you do it yourself. Very budget friendly and saves money in the long run.
3. Quality and Appearance of Peel-and-Stick Backsplash

The quality of these adhesive tiles are so much more than I expected! They’re created out of eco-friendly materials, feel like real tiles, and give the appearance of real tiles. Also, don’t worry, the seams disappear once you press them on the wall. And I’ve got to include they’re heat resistant, mildew and mold resistant, and can be cleaned.
4. Permanent and a Semi-Permanent Solution

These adhesive tiles aren’t going anywhere! Once they’re on, they’re on to stay. Which is what anyone would want. But! We’re planning to turn our counter tops into concrete countertops in the future. We can easily remove the tiles if we need to with direct heat from a hair dryer.
Warning: If you need to remove the tiles for any reason in the future, use a hairdryer! I can’t stress this enough. The direct heat from the hairdryer will allow you to easily remove the tiles (may take a little paint with them). If you don’t, simply ripping them off the wall will result in drywall coming off also.
5. Do-It-Yourself
We’re obviously big on do it yourself projects and this is one where I knew the whole family could get involved. The hardest part was cutting out areas so that the tiles could go around outlets. But even then we were using a pair of scissors and an X-Acto knife to cut out those pieces. So simple!

So, with that, I’d love to share the process of installing Tic Tac Tiles. It’s too easy not to share and I’m hoping to inspire you to give your kitchen a mini-makeover (or somewhere else in your home). We’re thrilled with the results and even more excited to knock off one more thing on our kitchen makeover list!
HOW TO INSTALL TIC TAC TILES KITCHEN BACKSPLASH

WHAT YOU’LL NEED:
Tic Tac Tiles
Xacto Knife
Scissors
Ruler
Cutting mat or a flat surface to safely cut the tiles on
TIC TAC TILES INSTALLATION
Preparing for peel-and-stick tile backsplash:
Make sure the temperature of your tiles and walls you’re adhering the tiles to are 70°F 12 hours prior to installation and 24 hours after installation. If you apply cold tiles or apply them on cold walls, they won’t adhere very well.
Step 1: Sand Your Walls
If the wall your applying the tiles on has a glossy finish, you’ll want to give your wall a light sand using a fine grit sandpaper. This will allow the tiles to adhere better. Here’s a guide from Tic Tac Tiles on what surfaces you can and can’t apply the tiles on.

Step 2: Clean Your Walls
Wash your walls with TSP to get rid of any grease, residue, and to give a clean surface to start on. You’ll do this step even if you didn’t have to sand your walls. Allow your walls to fully dry.

Step 3: Apply the Tiles
Starting from the top, peel down 1-2 inches and evenly place the tile on the wall and press. You can use a level or draw a level line to make sure you’re applying them straight. Slowly peel the rest as you press the tiles and all the grout lines firmly. If you peel the whole sheet off at once, it becomes harder to align the pieces evenly. They’re very difficult to get off the wall once they’ve been applied.

TIP: When starting, you’ll have to trim the left side of the tiles for an even edge. This is easiest with a pair of scissors but you can also use an X-Acto knife. Remember to save the pieces you cut off. You’ll use them at the end of the wall to fill in a few areas that need to be filled in. That is, if you use the subway tiles like me.
Step 4: Cut Around Outlets and Light Switches
You’ll keep going until you fill the entire area where you want tile. With every new sheet, make sure you overlap the grout line. Don’t worry, you won’t see the crease.

The only tricky areas will be cutting out parts of the tiles to leave an open space for the electrical outlets and light switches. You’ll use the X-Acto knife to cut these areas out as you hold the tiles firmly on a cutting mat. It’s always better to order a few extra sheets of tiles just in case you mess up. Trim where necessary but always make sure your tiles are lining up evenly.

Common Questions About Installing Tic Tac Tiles
Can you put Tic Tac Tiles over existing tiles?
Yes, you can…in most cases. If your tiles have smooth surfaces, you can apply Tic Tac Tiles over them, including the grout lines. Some of the surfaces you can apply peel-and-stick tiles to include smooth ceramic tiles, smooth glass tiles, acrylic wall panels, wall linoleum, mirror, painted walls and wallpaper.
How do you remove peel-and-stick tiles?
If you need to remove peel-and-stick tiles for any reason in the future, use a hairdryer! I can’t stress this enough. The direct heat from the hairdryer will allow you to easily remove the tiles (may take a little paint with them). If you don’t, simply ripping them off the wall will result in drywall coming off also.
How long will peel-and-stick backsplash last?
How long your peel-and-stick kitchen backsplash will last depends a lot on your installation, as well as the tiles you choose. Tic Tac Tiles come with a very strong adhesive that is designed to last many years. But it’s important you properly clean, prep and sand your walls as needed for the best results.
I installed these peel-and-stick tiles and had them up for 3 years before removing them. They remained in place perfectly like the day I installed them. Removing them, I definitely used a hair dryer and it helped tremendously with preventing any drywall damage.
Install Your Own Peel-and-Stick Kitchen Backsplash
After completing this project, I’m amazed at the results and 100% recommend trying Tic Tac Tiles! Will you be giving them a try in your home? In my opinion, the kitchen is a great place to start. Let me know in the comments below! I just might have to try the laundry room wall next since that’s on our design board as well. We shall see! You can find Tic Tac Tiles on Amazon (hello Prime shipping) and on their website.


Let’s keep in touch!
We have a brand new community over on Facebook, House & Home, where we’ll be chatting, sharing, and helping one another when it comes to home decor and projects. Come join us! Check it out here.
Like on Facebook ||Follow on Instagram ||Follow on Pinterest

[…] View Image More Like This […]
[…] View Image More Like This […]
[…] View Image More Like This […]
[…] Original Source […]
[…] If you’re worried that it’ll come out cheap looking…you may want to rethink that after seeing this photo from the blog “Within the Grove.” […]
[…] View Image More Like This […]
These have the absolute worst feedback on Amazon. If you search by most recent almost every poster is saying they don’t stick, change color, etc.
You didn’t experience any of that?! I feel too nervous to order them!
The tiles turned out beautifully! After having them this long do you still love them? Are there any CONs to putting them near the stove/range?
[…] To stay within our budget, we decided to paint the original cabinets and add new hardware. Other than that, we replaced the appliances and it looked like a brand new kitchen! You can see the details of our kitchen makeover here and here. […]
Hi there! This looks like a godsend! A couple questions: (1) Can Tic Tac tiles be applied to textured / knockdown walls? (2) Are these suitable for a bathroom vanity backsplash? Thanks!
Hi; where did you buy these and what is the price for each? Do they come in different patterns? I’m not a fan of subway tiles.
You did a good job ????
Hi! These are from Amazong. Here’s the link to them: https://amzn.to/2JeMUK2 These run around $30 for the pack. There are various sizes and different patterns besides the subway. A lot to choose from! If you search “Tic Tac Tiles” on Amazon, you’ll see all the different patterns. You’ll have to let me know if you end up trying some. Would love to cheer you on with this project!
I just finished these in my kitchen redo. I got black, white, and grey mosaic tiles. Turned out fabulous. Everyone has had a fit over them .
Hi Sandra! That’s so exciting that you’ve tried these as well! Isn’t it fun seeing people react to them? I’d love to see a picture! Feel free to email me if you’d like to. Love cheering others on with their home projects. wtg@withinthegrove.com
OMG this is genius and now I can actually do the back splash I want in my kitchen without dragging my complaining husband into it!! Yay!!
You’ll have to share when you try this!
These look amazing! I think I may have to do this to my kitchen backsplash! I love the look of the subway tiles and your instructions are so thorough I believe I could easily get this Done!
Thanks Laura! Happy to hear!! Let me know if you end up trying them and what you think.
Wow they look great. I saw these in Home Depot and wanted to see how it works as compared to regular tile. You have convinced me to get these instead for my kitchen.
That’s so exciting, Bertha! I tried to find them in mine and couldn’t. Awesome you saw them and could compare. Let me know what you think!
Your kitchen is beautiful! Y’all did a great job on it!
Thank you Jennifer! Still so excited with how it turned out. Have an amazing weekend!
This is such a great idea. Its cheaper and it looks great . This could be a idea for my new home.
They would be a great option for your home! Let me know if you try them out!