• Home
  • ABOUT
  • WORK WITH ME
  • Paint Colors
  • Shop Our House
    • Guest Bedroom
    • Front Living Room
    • Living Room with Fireplace
    • Previous Second Living Room
    • Current Playroom
    • Prior Playroom
    • Dining Room
    • Laundry Room
    • Oliver’s Bedroom
    • Guest Bathroom
    • Covered Lanai
    • Patio
    • Master Bedroom
  • CONTACT
    • Facebook
    • Instagram
    • Pinterest

Within the Grove

Join the list to receive occasional news and special updates!

DIY // Painted Color Block Letters

September 23, 2015

DIY Painted Color Block Letters

The links in this post contain affiliate links and I will receive a small commission if you make a purchase after clicking on my link.

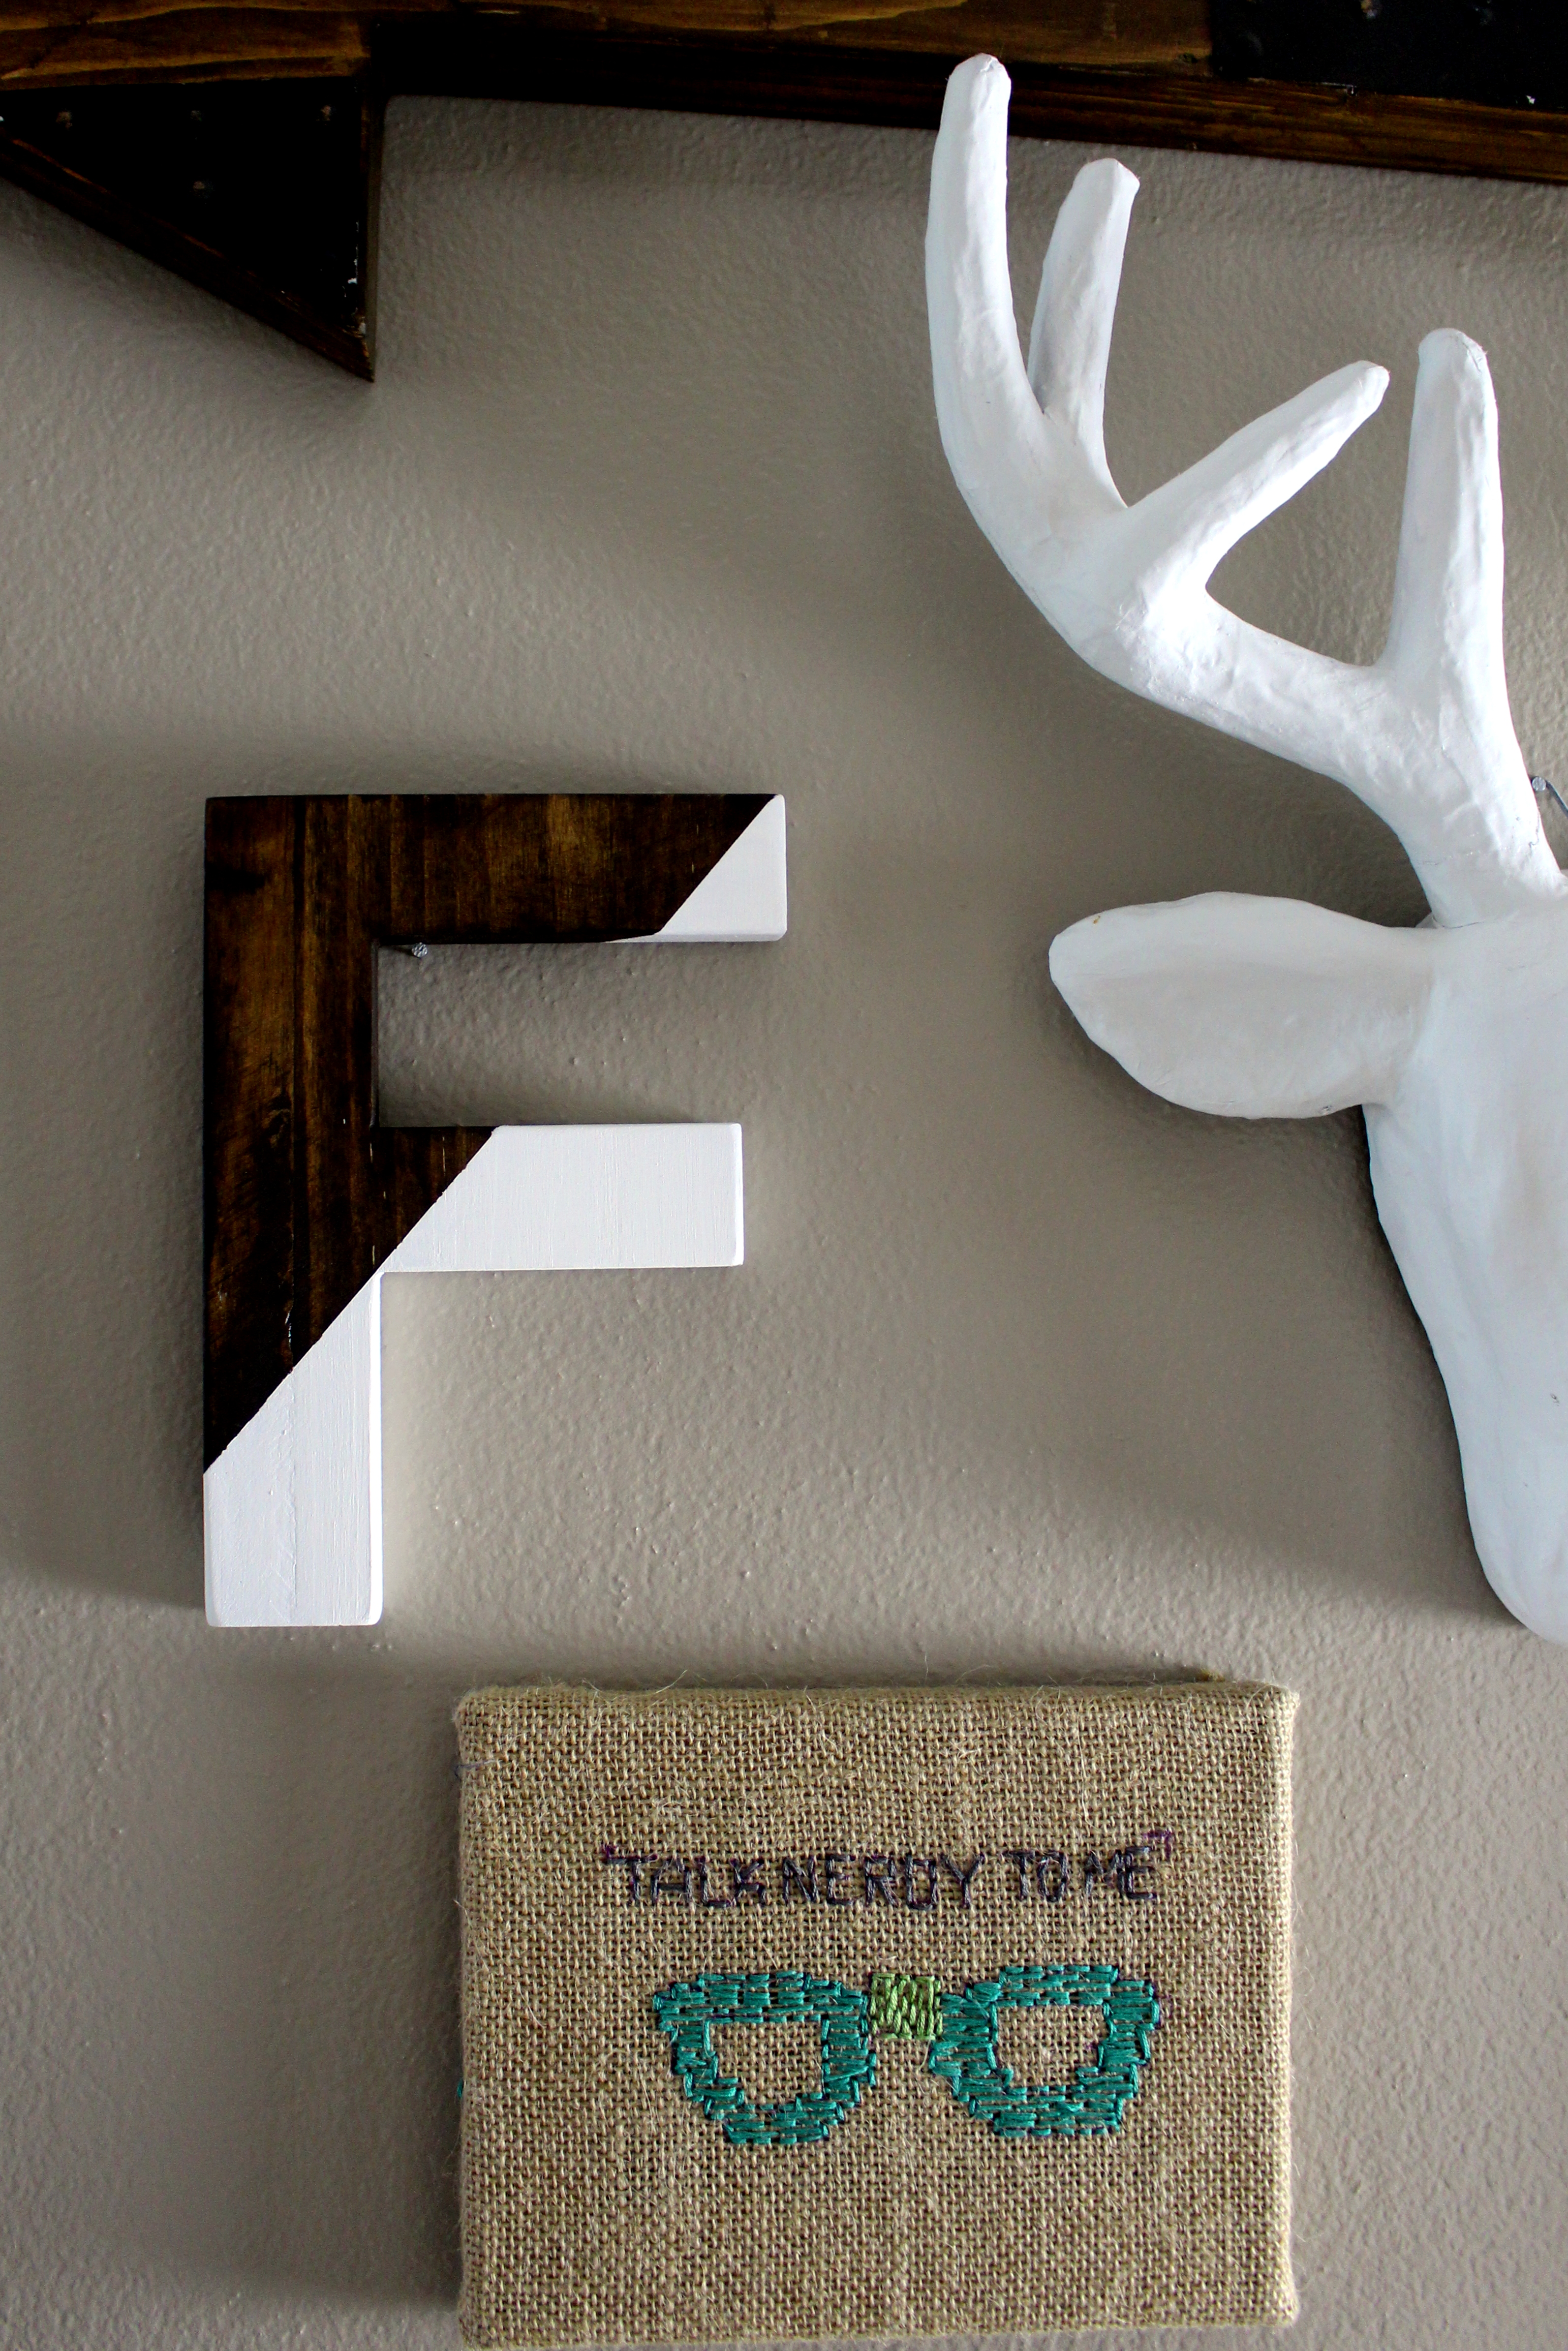
Life has an amazing way of placing beautiful people in your path.  I’m constantly amazed at the memories I create with those that surround me as I help celebrate their milestones in life.  My best gal and her husband recently moved into their new home.  They are planning a fabulous gallery wall that will display the letter “F” in different variations to represent their family name.  I knew then that I wanted to create a custom letter to give my bestie to add to her home!  In today’s DIY tutorial I’m showing you how to create your own painted color block letter for your home {or to give to your best gal}.

While creating this DIY tutorial, it also gave me another excuse {like I need one} to visit my local Target.  If you haven’t noticed, they have this inspiring Hand Made Modern arts and crafts section that made my crafting heart happy.  They have the perfect wooden letters to use for this DIY project!

Painted Color Block Letters

Here’s the how-to:
Supplies:

Wooden letter || Wax paper || Lacquer || White acrylic paint || Paintbrush || Foam brush || Paper towel || Painter’s tape || Stain

Colors used:
Stain– Dark Walnut by Rust-Oleum  Acrylic Paint– Wedding Cake by Martha Stewart

Supplies to create your own color block letters.
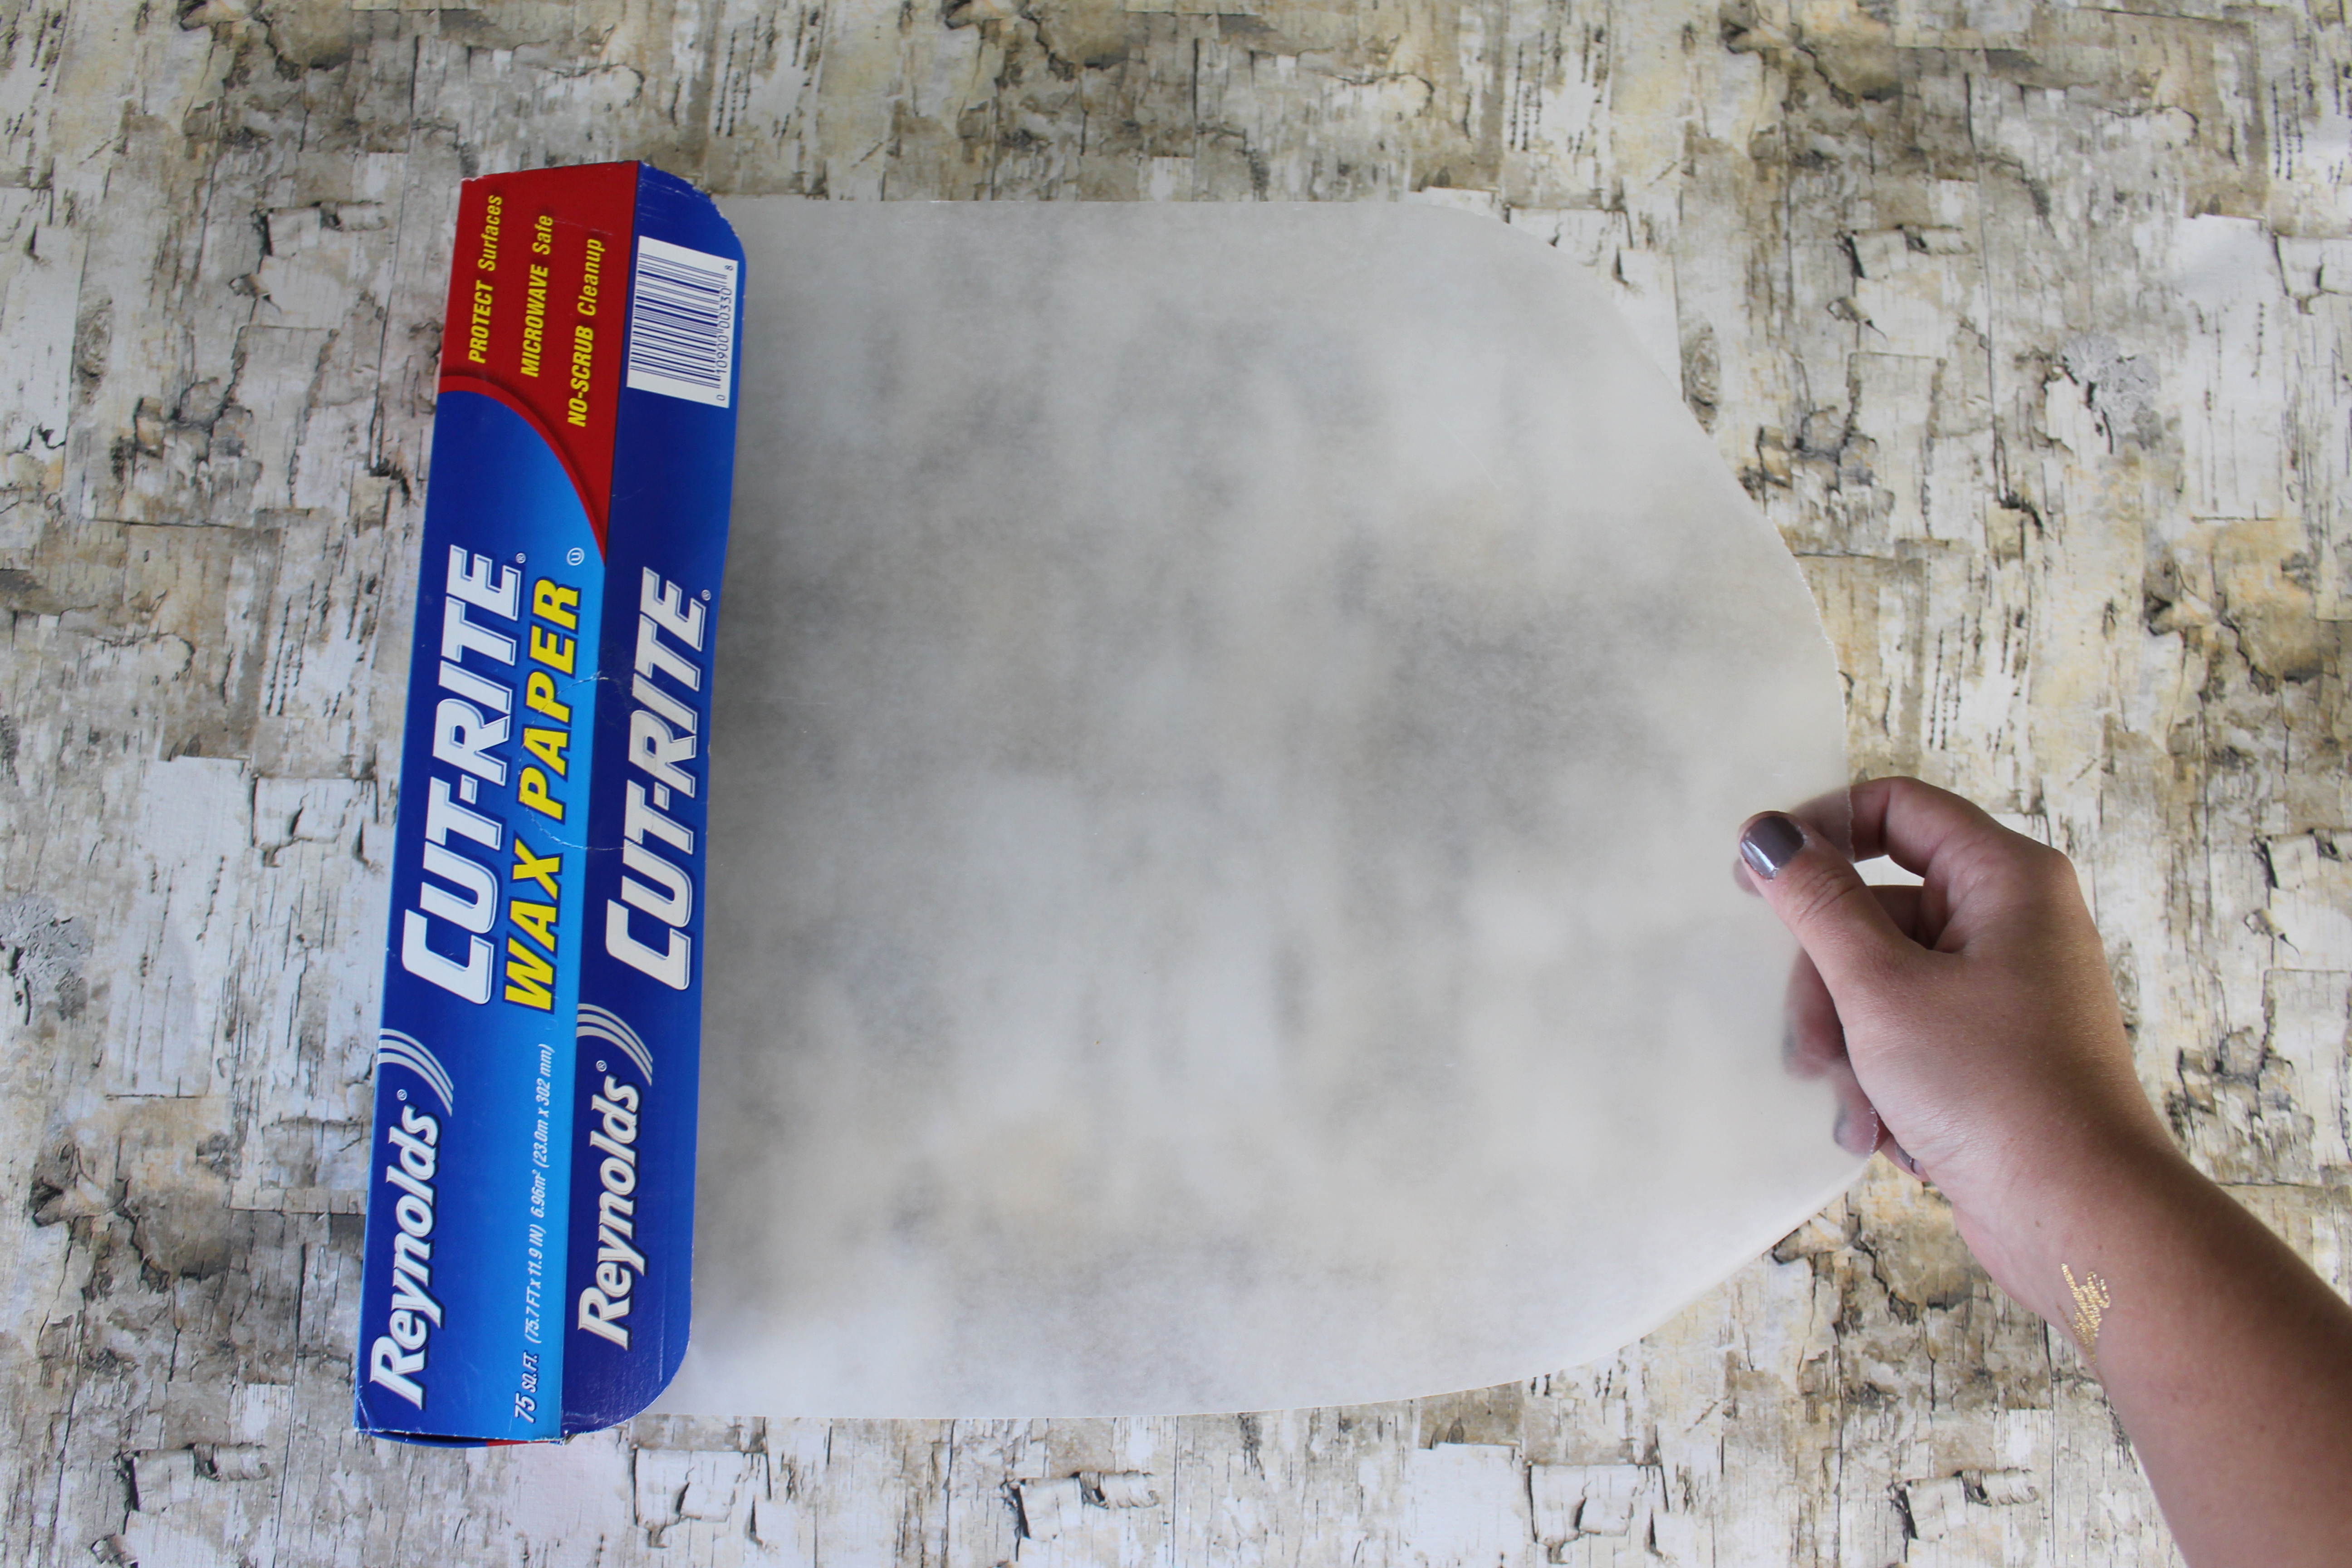
Step 1: 
 Tear a section of wax paper and place on your work area.  This will provide an easy clean up and prevent your surface from being permanently stained.

Using wax paper for a DIY project for easy clean up.

Step 2: Using your foam brush, carefully dip the first inch of the brush in the stain.  Do not dip the entire brush because this can cause the foam brush to absorb too much stain.  As more stain is needed, simply dip the brush in the stain for needed amount.

Applying stain to a wooden letter.

Using a foam brush to apply stain to wooden letter.
Step 3:
Apply the stain to the front and sides of the letter by brushing in the same direction.

Step 4: Once the letter is fully covered with stain, allow the stain to sit on the letter for 2-3 minutes.  The longer the stain sits, the darker the results.

For darker results when staining a wooden letter, allow the stain to sit longer before wiping off the excess stain.

Step 5: Once you have waited your desired length of time, using a paper towel, wipe off the excess stain.  Wipe the stain off by rubbing the paper towel generously in the same direction.  This will also allow the natural grain to show through.  Discard the paper towel once this step is completed.

Wipe off excess stain to allow the natural grain to show.

Step 6: Allow your letter to dry for at least an hour before continuing to the next step.

Step 7: After the stain is fully dry, create your desired diagonal line on your letter by using the painter’s tape. This will help create the color block look.

Using painter's tape to add detail to a wooden letter when painting.

Creating a color block letter using stain and paint.

Step 8: Make sure to wrap the painter’s tape to the back of the letter.  This will help secure the painter’s tape.  Run a finger along the edge of the tape to fully seal the tape to the letter.

Wrap the painter's tape around the back of the wooden letter for added security.

Step 9: Using a paintbrush, apply the white acrylic paint to the right side of the painter’s tape (or the left).   Be very careful and don’t paint towards the painter’s tape as this can result in paint getting underneath the tape.  Paint away from the tape.

Paint away from the painter's tape when applying paint to the wooden letter.

Applying paint to make your own color block letter.

Step 10: Apply 2-3 coats of paint as needed.  Once you have painted your last coat, immediately and carefully peel off the painter’s tape.  This will prevent the paint from sticking to the tape and peeling half of your design off.

Peeling off the painters tape to create a clean line.

Step 11: After the paint is dry (about an hour), use the lacquer gloss spray paint to seal/protect the stain and paint.  Make sure to hold the spray 8-10 inches from the letter and do not over saturate with the lacquer.  This will cause runs throughout the letter.

Now you have a color block letter for your own gallery wall or to give as a thoughtful gift {and another reason to head to Target}.  I’m thinking about spelling out a word using DIY color block letters for my mantel this fall season!  I would love to see the ones you create.  Don’t forget to use #WTGtutorial when sharing on social media!

Simple DIY tutorial for painting color block letters.

Thank you for supporting the brands and companies that make this blog of mine a possibility. 

Let’s keep in touch!

We have a brand new community over on Facebook, House & Home, where we’ll be chatting, sharing, and helping one another when it comes to home decor and projects. Come join us! Check it out here.

Like on Facebook || Follow on Instagram || Follow on Pinterest

Share this:

  • Click to share on Twitter (Opens in new window)
  • Click to share on Facebook (Opens in new window)

Related

Filed Under: Uncategorized

« Decor Daydreams // Laundry Room Storage
WTG Shops // Brittany Fuson Paper »

Trackbacks

  1. DIY // Wooden Cake Stand - Within the Grove says:
    January 15, 2016 at 6:51 am

    […] your cake stand to match your party theme. I went with a color block theme just like I did with my DIY Letter Tutorial by using a darker stain and white paint.  Even better?  I only spent about $10 on […]

    Reply

Leave a Reply Cancel reply

Your email address will not be published. Required fields are marked *

This site uses Akismet to reduce spam. Learn how your comment data is processed.

Looking for something?

withinthegrove

This pretty much sums up the progress of making 25 This pretty much sums up the progress of making 250 cement tiles. But I’m halfway through! The moment I finish the last tile is the moment I knock out the old tile. Let’s do this!
Time to bet on my DIY skills! I’m attempting to Time to bet on my DIY skills! I’m attempting to make my own cement tiles for our outdoor front door area. Mainly because of what I’m saving vs buying them. Won’t be saving much on time but I’M MAKING TILES! Never thought I’d hear myself say that. Make sure to follow along because if this works out, I have a feeling a lot of you are already eyeing a spot in your home to try your own DIY cement tiles. 
 
Thank you @vintagerevivals and @abby_roadhome for showing it’s possible with your gorgeous bathroom tiles! 

#CementTiles #DiyCementTiles #DiyProject #DIYonABudget #DIYProjects
We got the call that the pool build is starting! W We got the call that the pool build is starting! Which had me scrambling to dig up all the plants that were in the way in an effort to save them. Literally down to the last second before the crew showed up. Exciting day but you know what’s even more exciting? Knowing the next crew will officially be breaking ground with the excavation phase of the build.
This time of year is full of organizing and purgin This time of year is full of organizing and purging to bring spaces back to life. But sometimes all a space needs to feel refreshed is, well, a refresh and a little attention. Your number one requested space was the living room. So I gave mine a refresh with some unique and gorgeous finds from @homesense_us . I found a few fun pots for my houseplants, a gorgeous magnifying glass, and a few other items for our coffee table and couch.

I never know what I’m going to find when I walk into Homesense since it’s always rotating with amazing finds. But I do know I’ll walk out with a few new favorites for my home at affordable prices. If you haven’t yet, I urge you to check and see if you have a Homesense near you! #DiscoverHomesense #HomesensePartner
2022, you were awesome. But I’m determined to ma 2022, you were awesome. But I’m determined to make 2023 even better! And I hope you join me! We can be one of our biggest cheerleaders, but together we’re going to do big things. Go ahead and write down a big, small and a few in-between projects you want to get done this year in your home. Kicking it off with intention and that reminder that we can do this. Ready to get started?! Let me know in the comments the first project you want to tackle!
We finally got the Christmas/winter edition of the We finally got the Christmas/winter edition of the window projection up and running! It was a hit for Halloween and just as fun for this time of year as well. I built frames wrapped with a plastic drop cloth but you can also secure the drop cloth over the windows using command strips. The videos are from @atmosfx and we use a mini projector to play them on the screen. Place a Bluetooth speaker outside and you’re in business! Such a fun addition this time of year for the exterior of your home.
It’s the last little bit of the demo we needed t It’s the last little bit of the demo we needed to do in order to give the green light for the pool to start. And 2,456 pavers later, it’s done! This was exhausting but worth the money we saved doing it ourselves. And why remove them? We’re using a different stone around the pool and we want it to be cohesive up to the house. Don’t worry, someone got one heck of a deal on these pavers, we made a little money, and someone else got them out of our driveway. I’d say that’s a win-win. Stayed tuned for the entire pool process as we enter 2023. It’s going to be pretty exciting to watch!
Our patio space has served us so well over the yea Our patio space has served us so well over the years and now it’s time for a change because we’re getting a POOL!! Sharing this with you makes it even more real because just a year ago I would have told you it isn’t in the cards for us. We’ll be breaking ground soon but first we have to remove the screen enclosure. Spoiler: we won’t be putting one back up around the pool. It has already made the biggest difference visually and SO much natural light pours into our home now with it gone. It’s going to be so exciting seeing this all unfold so stay tuned! Up next: removing the pavers.
This holiday season we were able to travel to my h This holiday season we were able to travel to my hometown for the first time in awhile. We were greeted by the most beautiful sunset on the beach. Fast forward to this week as I headed to @homesense_us for some holiday shopping, and I ended up finding a few pieces for our home that remind me of that core memory on the beach. The beautiful wicker bench caught my eye first followed by the comforter and toss pillows. Everything at amazing price points while not sacrificing style and quality. #HomesensePartner

Mixing a thrill of a find with a core memory, I guarantee you'll fall in love with your home even more as you go to decorate. Decorating your home isn't grasping on to the newest trend or what you think others would do. It's what YOU want to do. And sometimes that's based on an emotional connection. Oh, the stories your spaces will be able to tell as you decorate each one. Start with seeing if there’s a @homesense_us near you! #DiscoverHomesense #HomesenseSarasota
Load More... Follow on Instagram

Sign up here to have our fresh posts delivered to your inbox!

Enter your email address:

Delivered by FeedBurner

Copyright © 2023 Within The Grove • Customized by Brave Creative Design · Log in

  • Privacy Policy
  • Terms and Conditions
  • Disclosures + Photo Usage
 

Loading Comments...