• Home
  • ABOUT
  • WORK WITH ME
  • Paint Colors
  • Shop Our House
    • Guest Bedroom
    • Front Living Room
    • Living Room with Fireplace
    • Previous Second Living Room
    • Current Playroom
    • Prior Playroom
    • Dining Room
    • Laundry Room
    • Oliver’s Bedroom
    • Guest Bathroom
    • Covered Lanai
    • Patio
    • Master Bedroom
  • CONTACT
    • Facebook
    • Instagram
    • Pinterest

Within the Grove

Join the list to receive occasional news and special updates!

DIY // Wooden Cake Stand

January 15, 2016

DIY Wooden Cake Stand

Hey y’all and happy January!  I’ve been a little selfish by enjoying this new year making new goals, organizing, and finally making some time for reading. I’m back this week with a new and fun DIY project for a cold weekend in.  I love throwing a low key, yet festive, get together.  It could be a mix and mingle for 20 people or maybe only 6, but either way you better believe dessert will be involved!  Sometimes a guest also brings a dessert along or you simply make more than what you need.  More the merrier, right?  But then comes displaying or setting out the dessert for all to share.  I have my go to cake stand but thought another one would be perfect to help display the desserts or appetizers.  Spending no more than $10 I created this wooden cake stand that you can also have party ready in no time!

Creating a wooden cake stand

Color Block Cake Stand

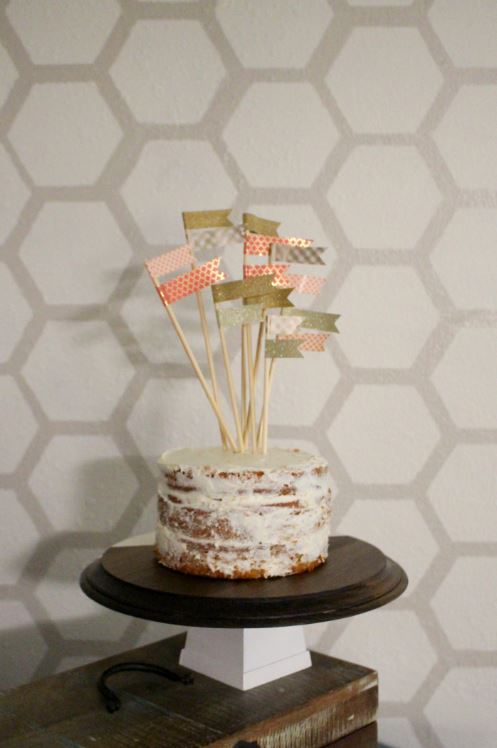
The best part is that you can paint and/or stain your cake stand to match your party theme. I went with a color block theme just like I did with my DIY Letter Tutorial by using a darker stain and white paint.  Even better?  I only spent about $10 on materials!

Here’s the how-to:

Supplies:

Wooden Circle ||  Small Wooden Container || Paintbrush || Foam Brush || Stain {I used Ash by Varathane}|| White Paint || Wood Glue || Painter’s Tape || Polycrylic  || Wood Wax

**I found my wooden circle and container at my local Jo-Ann Craft store.

Supplies needed to create a wooden cake stand

Step 1-  Apply the stain to the top side of the wooden circle, evenly covering the piece. Allow the stain to sit for one minute.  Wipe the excess stain off by using a paper towel.  Allow to dry for 1 hour.

Step 2- While the wooden circle is drying, paint your small wooden container a bright white.  Apply three coats while waiting at least 10 minutes between each coat.

Staining and painting a cake stand

Step 3- Once the stain has dried, flip the wooden circle over and stain the bottom side by repeating step 1.

Step 4- This next step is optional.  You may leave your wooden circle as a beautiful, stained piece, or you can go the route I did by adding a design to the top.  I used painter’s tape to create the crisp line.

Using painters tape to creat a crisp, white line

Creating a color block pattern on a cake stand

Step 5- Before piecing the cake stand together, apply 1 coat of polycrylic to the wooden circle to seal the stain and/or paint. You can also take to a step further by further applying a wood wax for a protective barrier with food.

Step 6- Once all pieces are dry, apply wood glue along the smallest side of the wooden container.

Using wood glue to piece together a wooden cake stand.

Step 7- Center the wooden circle on top of the wooden container.  You will want to apply pressure by pushing down carefully on the wood so that the wood glue successfully works.  Carefully place 2-3 heavy books on top to create the needed pressure.  Allow the wood glue to fully dry, about 1 hour.

Allow the wood glue to dry by also applying pressure by using books.

DIY Wooden Cake Stand to make for your next party.

You’re now party ready or excited to give a friend an amazing handmade gift!  I can’t wait to put mine on display during my next shin dig with friends and family.  Even better, I may try out a new dessert recipe to give me an excuse to use my new wooden cake stand this coming weekend!

Cake Stand to make for your home

Cake Stand for your next party with the DIY tutorial

Let’s keep in touch!

We have a brand new community over on Facebook, House & Home, where we’ll be chatting, sharing, and helping one another when it comes to home decor and projects. Come join us! Check it out here.

Like on Facebook || Follow on Instagram || Follow on Pinterest

Share this:

  • Click to share on Twitter (Opens in new window)
  • Click to share on Facebook (Opens in new window)

Related

Filed Under: DIY Tutorial, Food, Holiday

« Home Project // Dresser Makeover
Decor Daydreams // Reading Nook »

Leave a Reply Cancel reply

Your email address will not be published. Required fields are marked *

This site uses Akismet to reduce spam. Learn how your comment data is processed.

Looking for something?

withinthegrove

Round 2 (and final!) for the grass install in our Round 2 (and final!) for the grass install in our backyard. Dang, does it feel GOOD to finally say that! It has been a long time coming and a little sweat equity saved us so much by doing it ourselves. Next on the backyard to do list is turning it into a tropical oasis by planting the flower beds. Think huge birds of paradise! Time to start planning.
It has been 6 years since we moved into our home a It has been 6 years since we moved into our home and visualized the potential our backyard would one day have. The first few years were spent clearing out and claiming our property back . Two years ago we built our dream garden, last year we built the play area that feels more like a magical treehouse, and this year we added a pool (still pinching myself every day). We’re seeing our hard work over the years starting to come together as we approach the finish line of installing grass and landscaping that’s going to bring it all together. As I always say, stay tuned because you know I’m going to share it all with you! And a little reminder for you to keep going because home takes time.
The garden is cleaned up, prepped, and ready for t The garden is cleaned up, prepped, and ready for the summer crop. What started as a single garden box has transformed to this garden space over the past few years. Favorite thing about it: being tucked away in this cozy corner with the winding paths throughout it. One thing I would do differently: using pea gravel instead of the granite rocks we went with. These rocks hurt! Pea gravel is smooth enough to comfortably walk barefoot on.
The grass is in! Saying BUH BYE to the dirt around The grass is in! Saying BUH BYE to the dirt around the pool for the first time since December when we broke ground. We spent the past few weeks installing irrigation throughout our backyard and around the pool. Yesterday we finally had the sod delivered and within a few hours it got us one step closer to finishing our backyard oasis. We still have a long ways to go, but my goodness does it feel good to see this part done! And we can finally check off the final inspection for the pool build.
What does it cost to fill a 16,000 gallon pool wit What does it cost to fill a 16,000 gallon pool with a garden hose? Our total came to $229! Does this total surprise you? This of course can greatly vary depending on where you live and your situation. For us, we live in Florida and on county water. We only pay water fees and not sewage. The water company did not give us a discount. We filled the pool right at the start of our billing month so this is it! Have you filled up a pool before? I’d love for you to share your cost, pool size, and location if you feel comfortable doing so!
We have a 16,000 gallon pool and filled it up with We have a 16,000 gallon pool and filled it up with a single water hose. And we for sure had some questions! Answering them here:

• Why not use a water truck? We weren’t in a rush, it was the best way to end this project watching it fill up, and it would have been more expensive. 

• Why not use our local fire station? Our local fire department doesn’t do this and it isn’t very common that most do. We wouldn’t ask if they did. 

• Did our water company give us a discount? Nope. Most water companies will take off the sewage fee but we only pay for water and not sewage where we live. We did notify them so they wouldn’t turn our water off thinking it was a leak. 

• What is that on the end of your hose? We added a filter on the hose to help reduce iron, scale, any other heavy metals and containments to help give our pool a fresh start. 

• How long did it take? 51 hours 

I’ll be sharing the cost soon so make sure to add your guess in the comments!
Pizza nights are back! And one thing we’re addin Pizza nights are back! And one thing we’re adding since our screen enclosure is gone, are these Bitefighter LED String Lights by @tikibrandproducts . You’ve seen us use them in our playset area and now for our patio area. They give us the ambiance we need at night while helping to fight off the mosquitoes as a 2 in 1 solution. There’s no odor, no mess, and they will last all season long. Cheers to the summer nights ahead! #ad #TIKIbrand
Protecting outdoor furniture for the summer!

It’s time to give your outdoor furniture the best start for summer and to help it last long term. Here are some things you can do to protect your outdoor furniture as we enter the summer season:

1. If you have wood furniture, it’s time to seal it! I use Thompson’s Waterseal on all my outdoor wood furniture except for teak. This protects it from moisture, sunshine, and mold/mildew.

2. Easiest way to help keep cushions clean is by spot cleaning throughout the season. I use 30 Seconds Outdoor Cleaner for quick, fresh looking cushions. 

3. To really protect cushions, Shield H2O provides a water repellent treatment that repels moisture and spills, which in return helps prevent mold and mildew. 

4. Have teak furniture? Use a teak SEALER and not an oil. Teak oil is a short term solution and easily washes out with rain. Time to seal it to last long term! 

I have everything I used in my Amazon storefront under outdoor.
We were told 16 weeks for our pool install but it We were told 16 weeks for our pool install but it ended up taking exactly 12 weeks. Broke ground on December 16th and started filling it with water on March 16th. I’m sharing all the pool details over on my blog. Including the answer to the number one question: How much did this cost? Covering how we picked a pool builder, the construction process, the materials we went with and why, what we splurged on and where we saved, and so much more. Save it for future reference! It’s a good one!
Load More... Follow on Instagram

Sign up here to have our fresh posts delivered to your inbox!

Enter your email address:

Delivered by FeedBurner

Copyright © 2023 Within The Grove • Customized by Brave Creative Design · Log in

  • Privacy Policy
  • Terms and Conditions
  • Disclosures + Photo Usage
 

Loading Comments...