• Home
  • ABOUT
  • WORK WITH ME
  • Paint Colors
  • Shop Our House
    • Guest Bedroom
    • Front Living Room
    • Living Room with Fireplace
    • Previous Second Living Room
    • Current Playroom
    • Prior Playroom
    • Dining Room
    • Laundry Room
    • Oliver’s Bedroom
    • Guest Bathroom
    • Covered Lanai
    • Patio
    • Master Bedroom
  • CONTACT
    • Facebook
    • Instagram
    • Pinterest

Within the Grove

Join the list to receive occasional news and special updates!

Home Project // Dresser Makeover

January 11, 2016

Dresser Makeover using chalk paint, stain, and copper spray paint.

Maybe my new word for 2016 should be embrace.  It could be used for many different situations, scenarios, and goal achieving moments.  Or maybe it could be used for embracing a DIY flop.  Remember that time I shared my DIY Entertainment Center?  Yeah, me too.  It wasn’t until sitting here a few months ago that I realized that our “rustic” dresser suddenly looked like camouflage.  Imagine my head dropping down into my hands as I say, “Ohhh no, no, no!”  That’s what prompted an immediate dresser makeover.

Here’s what we were trying to achieve after seeing pieces of furniture out and about but not wanting to pay the price:

Kane's Furniture Bombay Wall Unit

Close but not close at all it seems.  Here’s what I want you to know though.  DIY projects and home projects are meant to be messy.  They are meant to not go right because that is the only way that you’ll learn.  There are times that projects work out beautifully and that’s what gives you motivation to keep going.  What’s even better about a DIY that’s gone wrong?  It was a do-it-yourself project!!  You can create a new project all over again!

Creating your own piece of furniture with just a few pieces.

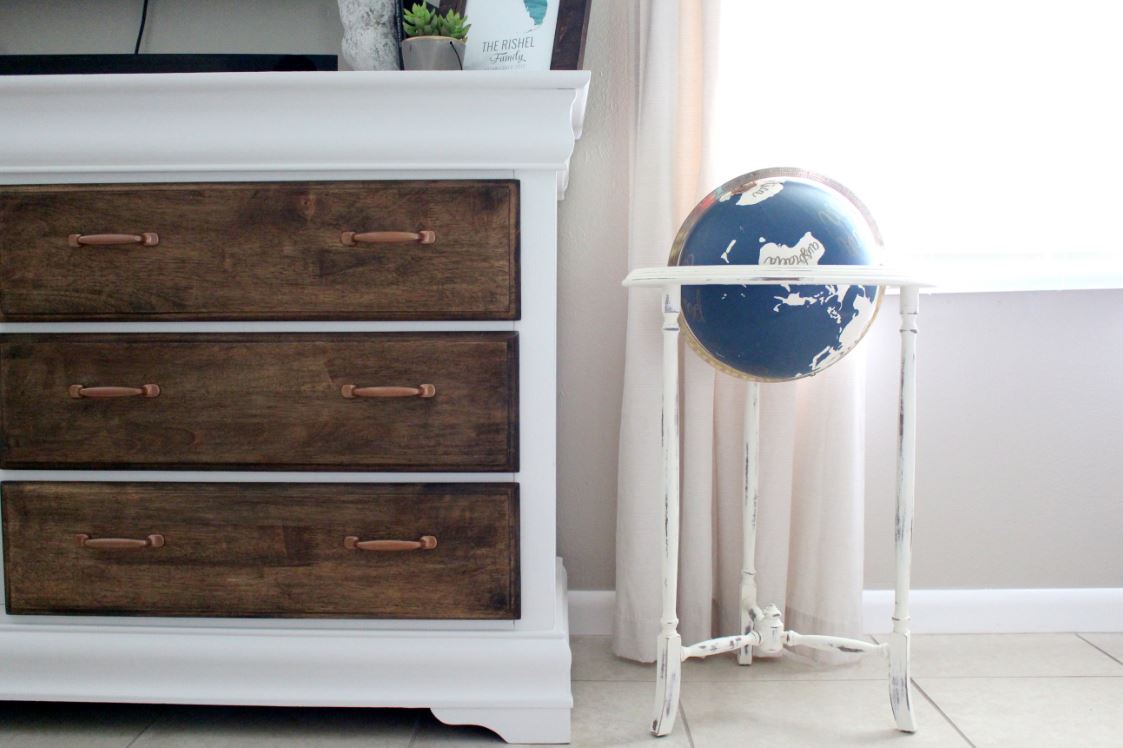
I brainstormed, read magazines, and tried to give Joanna Gaines a call {I wish} about what I could do to the dresser to completely turn it around.  I finally decided on a white chalk paint, copper handles, and stain. And my goodness did it make a difference and it only took two afternoons to complete.

Stained and painted dresser with copper handles

I started by taking off the handles and sanding down each drawer to the bare wood.  This took a little elbow grease but the natural wood was beautiful!

Making over a dresser

Sanding down drawers before staining

I found a stain, Ash by Varathane, that was the perfect color.  I didn’t want to go light but not too dark either.  It was meant to be when I checked out at Home Depot and the stain was on clearance for $2!

Modern dresser for your home

Staining drawers a darker color

Next up?  Transforming the handles.  This dresser has 12 handles and it would have been way too expensive to buy all new handles.  The alternative? Purchase copper spray paint for $6 and create my own copper handles.  It was a lengthy process to spray paint all of the sides evenly but the result was worth it!

Spray painting handles to create a new look

Copper handles for dresser.

Copper handles for furniture

While the drawers and handles were drying, I tackled the rest of the dresser.  I already had a quart of white chalk paint which is UH-MAZING! No sanding, not stripping of paint, no nothing!  Just evenly apply the paint.  I had to apply 3 coats of paint for a solid, bright white.

Painted dresser with copper handles

Once everything was placed back together, I was {and still am} one happy gal!  By making over a makeover with brighter hues, it completely transformed not only the look of the dresser but the feel and look of our living room. I. Can’t. Stop. Staring.  My husband was happily shocked, my mom instantly fell in love with it when she came over, and most of all I’m not greeted with camouflage anymore.

+9Painting a dresser

Dresser with copper

What do you think?  Does this inspire you to transform a piece of furniture?  I hope so because it’s such a rewarding feeling.  Thanks for checking it out!

Decor for the top of a dresser

Let’s keep in touch!

We have a brand new community over on Facebook, House & Home, where we’ll be chatting, sharing, and helping one another when it comes to home decor and projects. Come join us! Check it out here.

Like on Facebook || Follow on Instagram || Follow on Pinterest

Share this:

  • Click to share on Twitter (Opens in new window)
  • Click to share on Facebook (Opens in new window)

Related

Filed Under: DIY, Home of the Rishels, Home Project

« January Wallpaper 2016 // Free Download
DIY // Wooden Cake Stand »

Leave a Reply Cancel reply

Your email address will not be published. Required fields are marked *

This site uses Akismet to reduce spam. Learn how your comment data is processed.

Looking for something?

withinthegrove

A little garden magic just by adding some solar li A little garden magic just by adding some solar lights. Notice the starburst pattern they give off? My favorite part! These would also work great along a deck railing, the top of a wooden fence, or on the side of stairs. I added both solar lights you see here to my Amazon shop!
Round 2 (and final!) for the grass install in our Round 2 (and final!) for the grass install in our backyard. Dang, does it feel GOOD to finally say that! It has been a long time coming and a little sweat equity saved us so much by doing it ourselves. Next on the backyard to do list is turning it into a tropical oasis by planting the flower beds. Think huge birds of paradise! Time to start planning.
It has been 6 years since we moved into our home a It has been 6 years since we moved into our home and visualized the potential our backyard would one day have. The first few years were spent clearing out and claiming our property back . Two years ago we built our dream garden, last year we built the play area that feels more like a magical treehouse, and this year we added a pool (still pinching myself every day). We’re seeing our hard work over the years starting to come together as we approach the finish line of installing grass and landscaping that’s going to bring it all together. As I always say, stay tuned because you know I’m going to share it all with you! And a little reminder for you to keep going because home takes time.
The garden is cleaned up, prepped, and ready for t The garden is cleaned up, prepped, and ready for the summer crop. What started as a single garden box has transformed to this garden space over the past few years. Favorite thing about it: being tucked away in this cozy corner with the winding paths throughout it. One thing I would do differently: using pea gravel instead of the granite rocks we went with. These rocks hurt! Pea gravel is smooth enough to comfortably walk barefoot on.
The grass is in! Saying BUH BYE to the dirt around The grass is in! Saying BUH BYE to the dirt around the pool for the first time since December when we broke ground. We spent the past few weeks installing irrigation throughout our backyard and around the pool. Yesterday we finally had the sod delivered and within a few hours it got us one step closer to finishing our backyard oasis. We still have a long ways to go, but my goodness does it feel good to see this part done! And we can finally check off the final inspection for the pool build.
What does it cost to fill a 16,000 gallon pool wit What does it cost to fill a 16,000 gallon pool with a garden hose? Our total came to $229! Does this total surprise you? This of course can greatly vary depending on where you live and your situation. For us, we live in Florida and on county water. We only pay water fees and not sewage. The water company did not give us a discount. We filled the pool right at the start of our billing month so this is it! Have you filled up a pool before? I’d love for you to share your cost, pool size, and location if you feel comfortable doing so!
We have a 16,000 gallon pool and filled it up with We have a 16,000 gallon pool and filled it up with a single water hose. And we for sure had some questions! Answering them here:

• Why not use a water truck? We weren’t in a rush, it was the best way to end this project watching it fill up, and it would have been more expensive. 

• Why not use our local fire station? Our local fire department doesn’t do this and it isn’t very common that most do. We wouldn’t ask if they did. 

• Did our water company give us a discount? Nope. Most water companies will take off the sewage fee but we only pay for water and not sewage where we live. We did notify them so they wouldn’t turn our water off thinking it was a leak. 

• What is that on the end of your hose? We added a filter on the hose to help reduce iron, scale, any other heavy metals and containments to help give our pool a fresh start. 

• How long did it take? 51 hours 

I’ll be sharing the cost soon so make sure to add your guess in the comments!
Pizza nights are back! And one thing we’re addin Pizza nights are back! And one thing we’re adding since our screen enclosure is gone, are these Bitefighter LED String Lights by @tikibrandproducts . You’ve seen us use them in our playset area and now for our patio area. They give us the ambiance we need at night while helping to fight off the mosquitoes as a 2 in 1 solution. There’s no odor, no mess, and they will last all season long. Cheers to the summer nights ahead! #ad #TIKIbrand
Protecting outdoor furniture for the summer!

It’s time to give your outdoor furniture the best start for summer and to help it last long term. Here are some things you can do to protect your outdoor furniture as we enter the summer season:

1. If you have wood furniture, it’s time to seal it! I use Thompson’s Waterseal on all my outdoor wood furniture except for teak. This protects it from moisture, sunshine, and mold/mildew.

2. Easiest way to help keep cushions clean is by spot cleaning throughout the season. I use 30 Seconds Outdoor Cleaner for quick, fresh looking cushions. 

3. To really protect cushions, Shield H2O provides a water repellent treatment that repels moisture and spills, which in return helps prevent mold and mildew. 

4. Have teak furniture? Use a teak SEALER and not an oil. Teak oil is a short term solution and easily washes out with rain. Time to seal it to last long term! 

I have everything I used in my Amazon storefront under outdoor.
Load More... Follow on Instagram

Sign up here to have our fresh posts delivered to your inbox!

Enter your email address:

Delivered by FeedBurner

Copyright © 2023 Within The Grove • Customized by Brave Creative Design · Log in

  • Privacy Policy
  • Terms and Conditions
  • Disclosures + Photo Usage
 

Loading Comments...